
Mobile Proxies are internet access points using real SIM cards from cellular operators (4G/5G/LTE). Their main feature is CGNAT technology. A single operator IP address is used by thousands of regular people simultaneously. Therefore, web resources identify such an IP as a connection from a real user, ensuring high connection stability. This provides a high level of trust (reliability).
In the CyberYozh App, we offer two types of connections. Choose the one that fits your tasks:
Shared:
Concept: One device (modem) is used by several clients at the same time.
Rotation: Automatic only. You cannot change the IP at your own will, as this would break the connection for other users.
Best for: Tasks where access stability is important, testing, and surfing without the need for precise address change control.
Private (Dedicated Ports):
Concept: A personal 4G/5G device that belongs only to you.
Rotation: Full control via link. You decide when to change the IP (manually or by configuring your software).
Best for: Digital marketing, SMM, working with professional accounts where speed and network profile management are critical.
Step 1. Getting Access
Unlike residential proxies, you don't generate a list here. You get access to a specific modem (port).
Go to the "My Proxies" section.
Find your mobile proxy card.
Your IP, Port, Login, and Password are already listed here. Use them to connect.
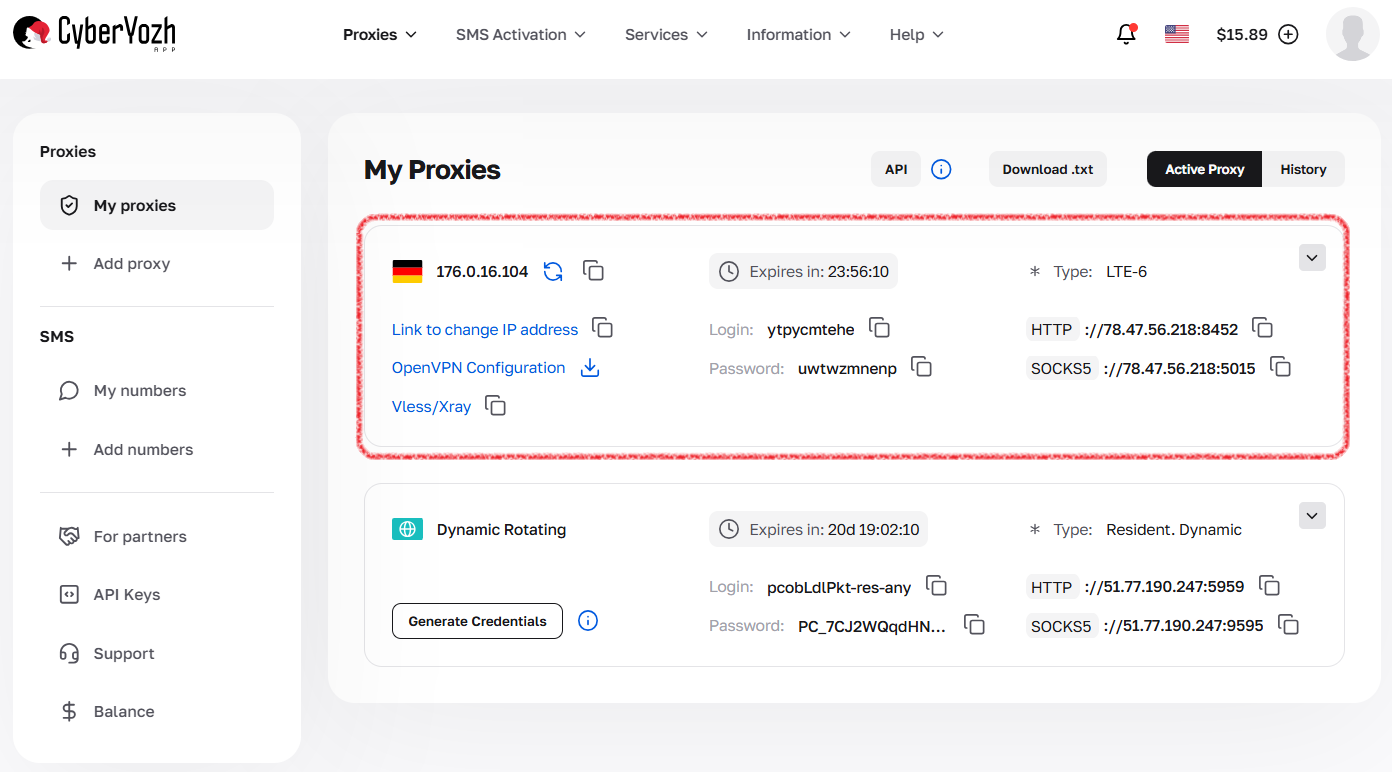
Fig. 1. Mobile proxy card with connection data.
Step 2. Managing IP Change (Rotation) 🔄
The settings here depend on the type of proxy you purchased.
🅰️ If you have Private proxies:
You have full control over the IP change via a special link (API). There is no timer in the dashboard — you determine the change frequency yourself.
In the proxy card, find the item "IP Address Change Link".
Copy this link.
How to use:
Manually: Paste the link into your browser and navigate to it. The modem will reboot, and you will receive a new IP.
In a specialized browser: Paste the link into the "IP Change URL" field. The browser will activate it automatically when needed.
In software/scripts: Configure your software to call this link at your desired interval (whether every minute or once an hour).
🅱️ If you have Shared proxies:
Rotation occurs automatically here.
You cannot force an IP change (there is no change link).
Rotation happens according to the service's internal timer (e.g., every 5 or 30 minutes).
Important: Keep this in mind during work — the IP may change right while a page is loading.

Fig. 2. IP address change link in the Private mobile proxy card.
Step 3. Advanced Features (Private Only)
Professional tools for maximum compatibility are available to dedicated port owners. Look for them in the control panel.
Passive OS Fingerprint (TCP/IP):
Allows you to configure matching of the operating system fingerprint at the network level.
Example: You are working on Windows, but the browser profile is set for an iPhone. Enable the iOS fingerprint so the device looks correct to the network.
🛡️ VLESS-Reality (Xray) — Protection Protocol:
Where to find: Available on premium plans with a special Vless/Xray badge.
What it is: A modern protocol that encrypts traffic, making it look like visits to regular websites. This ensures a stable connection even in networks with strict restrictions.
How to connect: In the proxy card, you will find a special link for connecting. It is used in apps like v2rayNG or Streisand (connection setup clients).
Reboot (Manual IP Change):
A button for a full modem reboot. Use it if the internet disappears or the speed drops sharply.
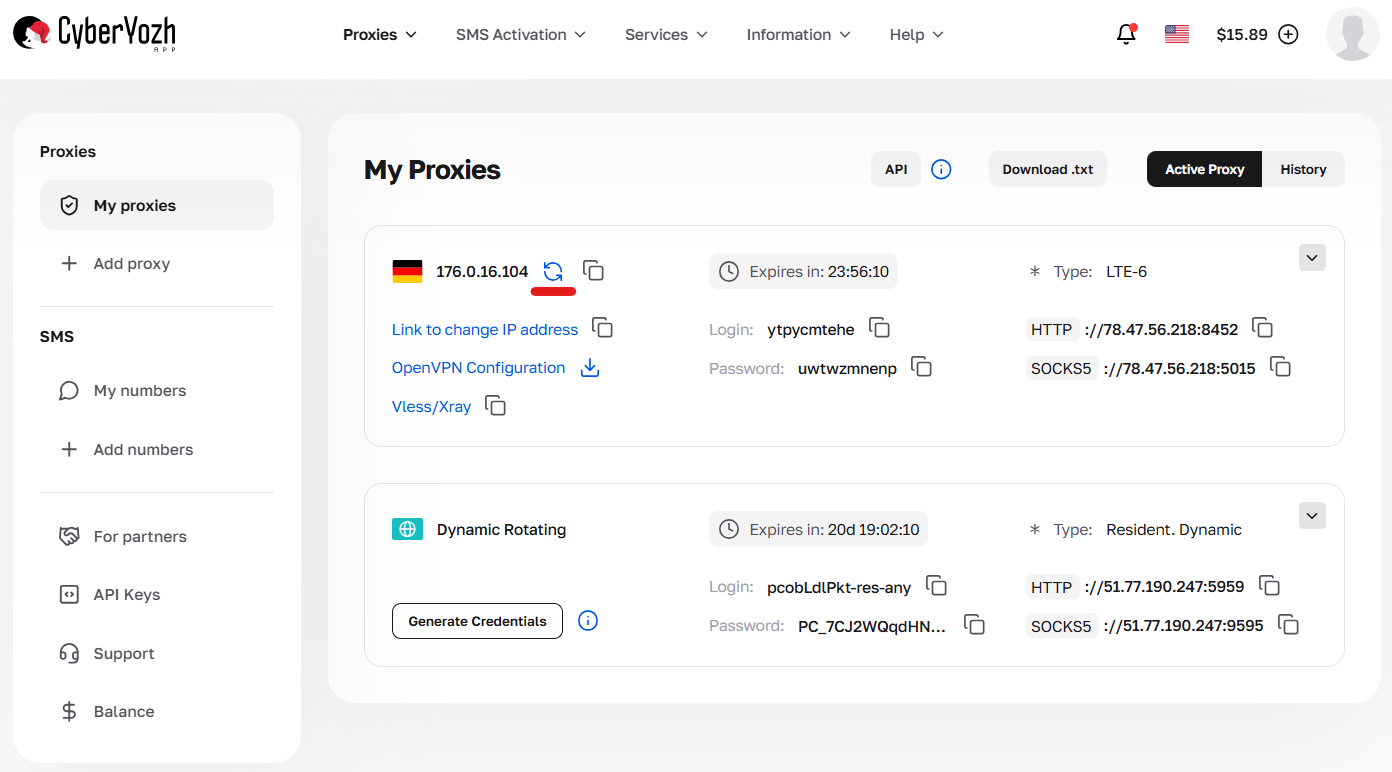
Fig. 3. Manual IP change button (modem restart) in the Private mobile proxy card.
Step 4. Verifying Connection
Let's make sure the proxies are working and the IP is changing.
1. Checking Current IP:
Enter the command in your terminal (or paste the proxy into a checker):
curl -x http://LOGIN:PASSWORD@IP:PORT https://ifconfig.me
Take note of the IP address digits.
2. IP Change Test (Private Only):
- Navigate to the IP change link (the one you copied in Step 2).
- Wait 10-15 seconds (modem reboot time).
- Run the check again — the address should have changed.
Step 5. Where to Enter the Data?
The IP:PORT:LOGIN:PASS format is universal.
1. Multi-login browsers (Dolphin, AdsPower, GoLogin):
Create a profile -> "Proxy" section.
Paste the access string.
For Private proxies: Be sure to paste your "IP Address Change Link" into the special field in the profile settings.
2. Proxifiers (Proxifier, ProxyCap):
Use these if you need to route a program without its own settings through a proxy (games, Telegram bots).
👉 Section with guides on setting up proxifiers (proxy clients).
3. Regular browsers (via FoxyProxy/SwitchyOmega extensions):
Entered manually into the extension fields.
❓ Troubleshooting
(Shared) I cannot change the IP: This is normal for a shared plan. Rotation happens automatically. If you need manual control, switch to Private.
No Internet (Timeout):
Check if the IP change process is currently underway. During rotation (modem reboot), the connection disappears for 10-20 seconds.
For Private: If there is no connection for a long time, press the Reboot button in the proxy card in your dashboard.
Authorization Error: Check the Login and Password for extra spaces (a common error when copying).
👉 Proxy troubleshooting checklist.
🆘 Still can't figure it out?
Don't waste time trying to figure it out alone.
Message our Technical Support (chat widget in the corner of the screen or via Telegram). When contacting us, send a screenshot of your settings or the curl check result — we'll help you quickly!
