
Step-by-Step Guide for Facebook and Google Ads Campaigns
When managing large-scale advertising campaigns on platforms like Facebook and Google Ads, efficient traffic distribution and infrastructure scaling become an operational necessity. Managing a diverse portfolio of campaigns requires separate network environments to ensure data integrity and connection stability. Using proxy servers provides the necessary network isolation and security.
Many specialists configure proxies in specialized campaign management software, but there is another, deeper level of integration — configuring proxies directly within the tracker. This allows for effective routing of service requests that the tracker sends to the ad network, ensuring stable campaign performance and keeping the connection architecture secure and autonomous.
In this technical guide, we will break down in detail how to configure a proxy in the Binom affiliate tracker.
IMPORTANT: This feature was available only in Binom version V1 and was intended exclusively for integration with Facebook and Google Ads campaigns. In newer versions of the tracker, this functionality is currently not implemented. This guide will show how it worked and provide an understanding of the principles behind such integration.
Preparation: What You Will Need
To set this up, you will only need two things:
- Access to your Binom V1 tracker (we will be using the official demo version for this example).
- High-quality proxies with login and password authorization. HTTP or SOCKS5 protocols are suitable.
- 👉 You can read more about mobile proxies here
Step-by-Step Proxy Configuration in Binom V1
The process consists of three key stages: first, we add the proxy to the tracker's database; then, we create an ad account profile with this proxy; and finally, we link this profile to a specific campaign.
Step 1: Gathering Proxy Credentials
The first and most important step is to ensure you have a complete set of authorization data. These "keys" will allow your application or browser to connect to the proxy server and route traffic through it.
Be sure to prepare the following data:
- IP Address (host server)
- Port for the connection
- Login and Password for authorization
- Protocol Type (HTTP or SOCKS5)
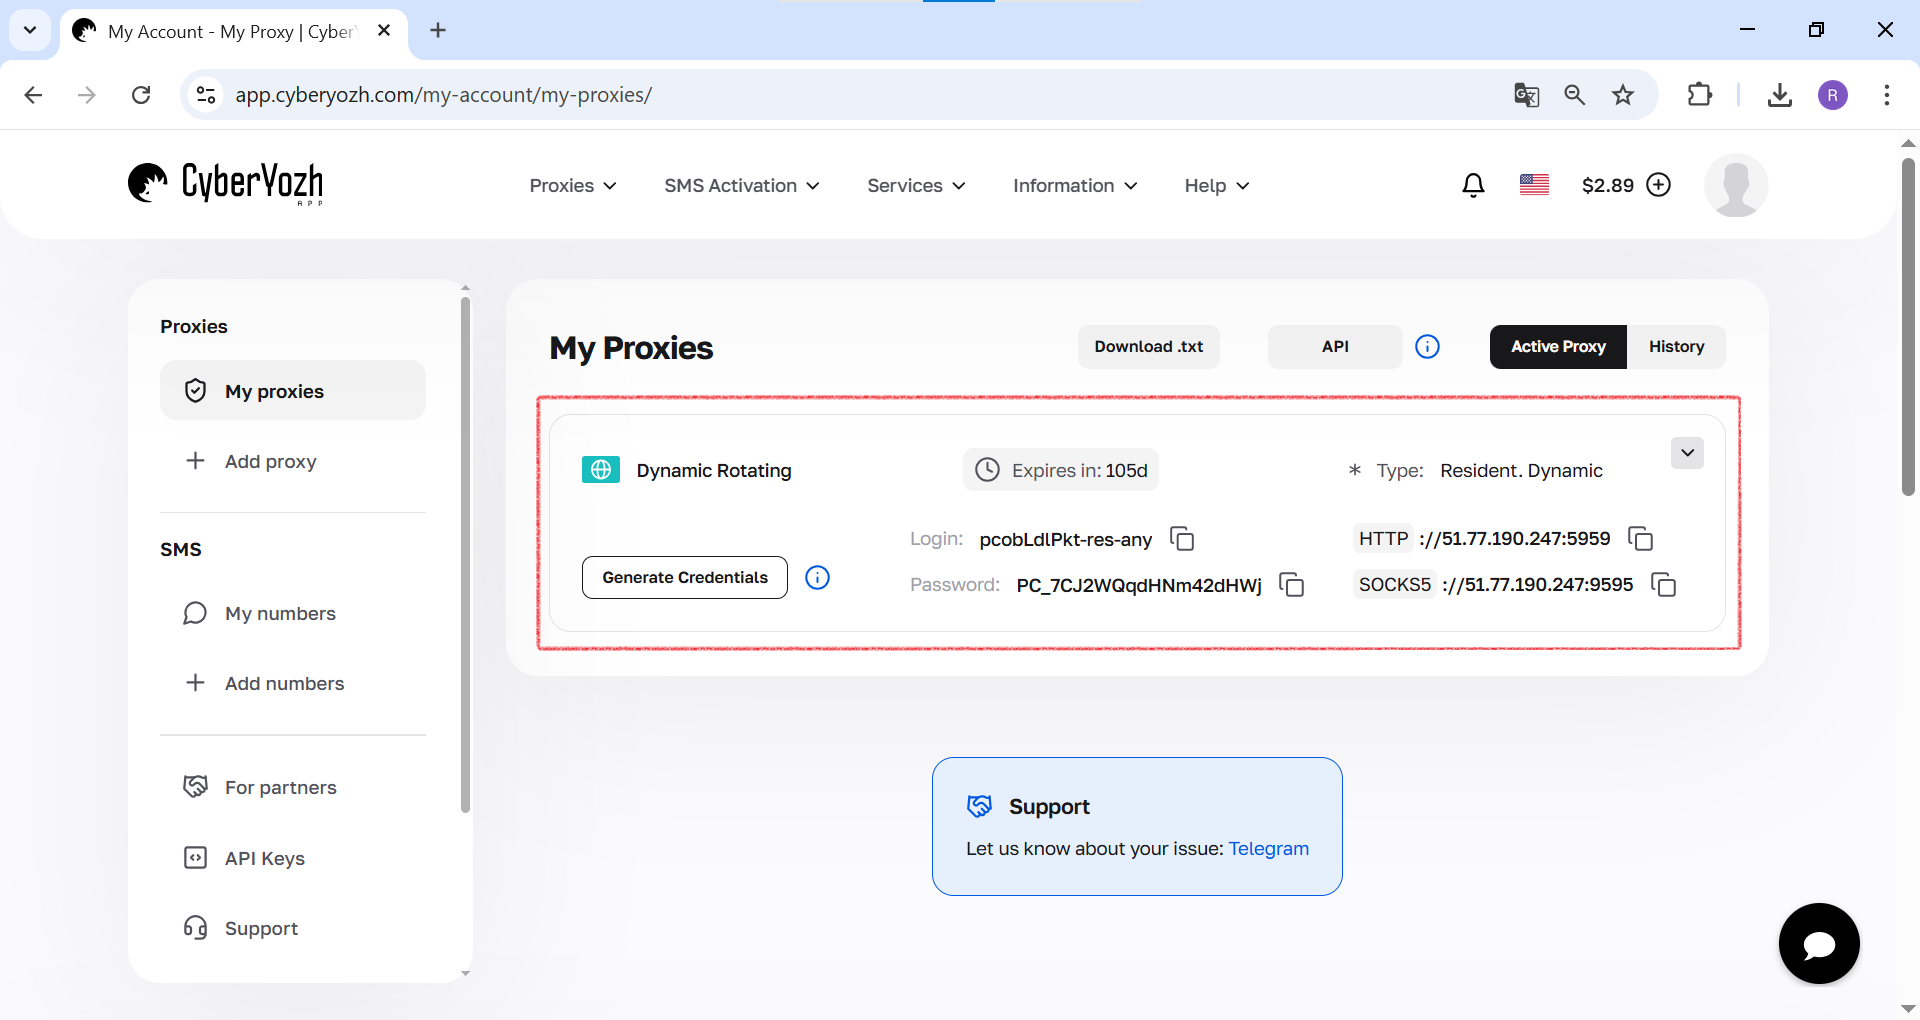 Fig. 1. This screenshot shows where all the necessary fields for connecting to the proxy server are located in the CyberYozh Appdashboard.
Step 2: Adding the Proxy to the Traffic Source
At this stage, we will "introduce" the tracker to our proxy server.
Go to "Traffic Sources". In the Binom V1 interface, select the "Traffic Sources" tab.
 Fig. 2. This screenshot shows the main Binom tracker interface, where you need to go to the "Traffic Sources" tab to begin.
Select the Source. Find and select the source you are working with in the list, for example, "Facebook".
 Fig. 3. This screenshot shows the list of traffic sources. To configure, you must select the required one, in this case — "Facebook".
Open the Proxy Section. After selecting the source, additional control elements will appear at the top. Click the "Accounts" button, and then click the "Proxies" button.
 Fig. 4. This screenshot shows the selected traffic source, where you need to click the "Accounts" button for further configuration.
 Fig. 5. This screenshot shows the "Accounts" tab, where you need to click the "Proxies" button to go to the proxy manager.
Create a New Proxy. In the proxy manager that opens, click "+ Create".
 Fig. 6. This screenshot shows an empty "Proxies" section, where you need to click the "+ Create" button to add a new proxy server.
Fill in the Data. In the "Create proxy" window, enter all the information about your proxy server:
- Name: A recognizable name, for example, "CyberYozh App".
- Host: Server IP address.
- Port: Server port.
- Login: Your authorization login.
- Password: Your password.
- Protocol: Explicitly specify the protocol, e.g., Socks5.
Mobile: Check the box if you are using a mobile proxy.
 Fig. 7. This screenshot shows the "Create proxy" modal window with empty data entry fields.
Save. Click "Save". Your proxy will appear in the list. On the same screen, you can select it and click "Check" to verify it.
 Fig. 8. This screenshot shows the final step of adding a proxy — clicking the "Save" button.
 Fig. 9. This screenshot shows how to run a proxy health check by clicking the "Check" button.
Note: In the Binom V1 demo version, the check function may not work, and the status will remain "inactive" even if the proxy is fully functional.
Step 3: Linking the Proxy to an Ad Account
Now that the proxy is in the database, it needs to be linked to your ad account profile within Binom.
Create an Account. Return to the "Traffic Sources" tab in the "Accounts" settings (inside the Facebook traffic source) and click "+ Create".
 Fig. 10. This screenshot shows an empty "Accounts" section in the "Traffic Sources" tab, where you need to click "+ Create" to create a new account profile.
Link the Proxy. In the "Create facebook account" window, find the "Proxy" field. You have two options:
- "Add proxy": Click to select a proxy already added in the previous step from the list.
"New proxy": Click to open the window for creating a new proxy and add it "on the fly".
 Fig. 11. This screenshot shows the first way to link a proxy — clicking the "Add proxy" button to select an existing server from the list.
 Fig. 12. This screenshot shows the second, faster way — clicking the "New proxy" button to create a new proxy "on the fly".
Fill and Save. After linking the proxy, enter the account name, as well as other data if necessary (User-agent, Cookie, Token), and click "Save". Your account with the linked proxy will appear in the list.
 Fig. 13. This screenshot shows clicking the "Save" button after quickly creating a proxy.
Note: In the demo version, the text "incorrect proxy" may appear in the "Error" column. This is a specific feature of the demo stand; on your production version of the tracker, if the data is correct, there should be no error.
 Fig. 14. This screenshot shows the final result: a new "CyberYozh" profile has appeared in the accounts list with a linked proxy and the "incorrect proxy" error characteristic of the demo version.
Step 4: Linking the Account to a Campaign
The final and most important step is to activate the use of our account (and its associated proxy) in a specific advertising campaign.
Open the Campaign. Go to the "Campaigns" section and open the desired campaign for editing. Make sure it has the correct traffic source selected ("Facebook").
 Fig. 15. This screenshot shows the selection of a specific campaign for editing, in this case — "FB | Samsung s8 | CA | android".
 Fig. 16. This screenshot shows the general editing window for the selected campaign.
Enable Integration. Scroll down the campaign settings to the "Integrations" section. Check the box next to "Facebook (beta)".
 Fig. 17. This screenshot shows how you need to scroll down the page to the "Integrations" section in the campaign settings.
 Fig. 18. This screenshot shows the process of activating the integration by checking the box next to "Facebook (beta)".
Add Account to Campaign. Immediately after activating the checkbox, the "ACCOUNTS" section will appear below. Here, as in the previous step, there are two options:
- "+ Account": Click to select a previously created account from the list.
"New account": Click to create a new account profile directly from this interface.
 Fig. 19. This screenshot shows the first way to add an account to a campaign — clicking the "+ Account" button.
 Fig. 20. This screenshot shows the second way — clicking the "New account" button for quick profile creation.
 Fig. 21. This screenshot shows the "Create facebook account" window opened directly from the campaign settings.
Save the Campaign. Once the account is added to the list within the campaign, don't forget to click "Save" at the very bottom so that all changes take effect.
 Fig. 22. This screenshot shows clicking the "Save" button after the changes have been made.
Conclusion
Excellent! Now your advertising campaign in Binom V1 will interact with Facebook or Google Ads through a dedicated proxy server. This method significantly increases the stability and uptime of your advertising infrastructure by distributing network traffic across different IP addresses and ensuring smoother, continuous operation.
Remember that the effectiveness of this method depends directly on the quality of the proxies used. Cheap or public proxy servers will do more harm than good.
👉 Looking for reliable proxies for media buying? In the CyberYozh App, you will find high-quality residential and mobile proxies that are perfect for scaling ad infrastructure, managing complex data collection, and working with high-load traffic sources.
