
AdsPower Browser — is a tool for safe management of work profiles, ensuring stable operation and privacy protection. In this guide, we will look at the step-by-step process of configuring a proxy in AdsPower.
The guide uses the English version of the program — the international standard recognized by the professional community. At the same time, for user convenience, various interface languages are available in the settings.
Strategy: What proxy do you need for AdsPower?
Before creating a profile, you need to choose the right proxy. AdsPower supports all types of proxies, but their application differs cardinally.
1. Mobile Proxies (4G/5G)
- Purpose: Digital marketing management (Facebook, TikTok, Google Ads), agency work, SMM.
- The Essence: IP addresses of cellular operators. They provide a standard and stable mobile connection.
- Setup in AdsPower: Usually used with rotation. You can configure one port for several profiles, but it is important to ensure that the IP is unique while working with a specific profile (or change it via a link before launching).
2. Residential Proxies (ISP)
- Purpose: E-commerce (Amazon, eBay, Etsy), financial platforms, corporate portals.
- The Essence: Static IP addresses from home internet service providers.
- Setup in AdsPower: Strict rule “1 Profile = 1 Static IP”. The IP must not change throughout the work with the profile to ensure a stable session.
3. Datacenter Proxies (Server)
- Purpose: Technical tasks, public data collection, web resource testing.
- Verdict: Using them for large-scale marketing campaigns in AdsPower is not recommended. Using unsuitable proxies can lead to unstable operation and connection drops.
Obtaining connection data in CyberYozh App
Go to our catalog and select the appropriate proxy type (SOCKS5 or HTTP). It is important to use a separate proxy server for each profile. We recommend reviewing the guide on choosing the right proxy.
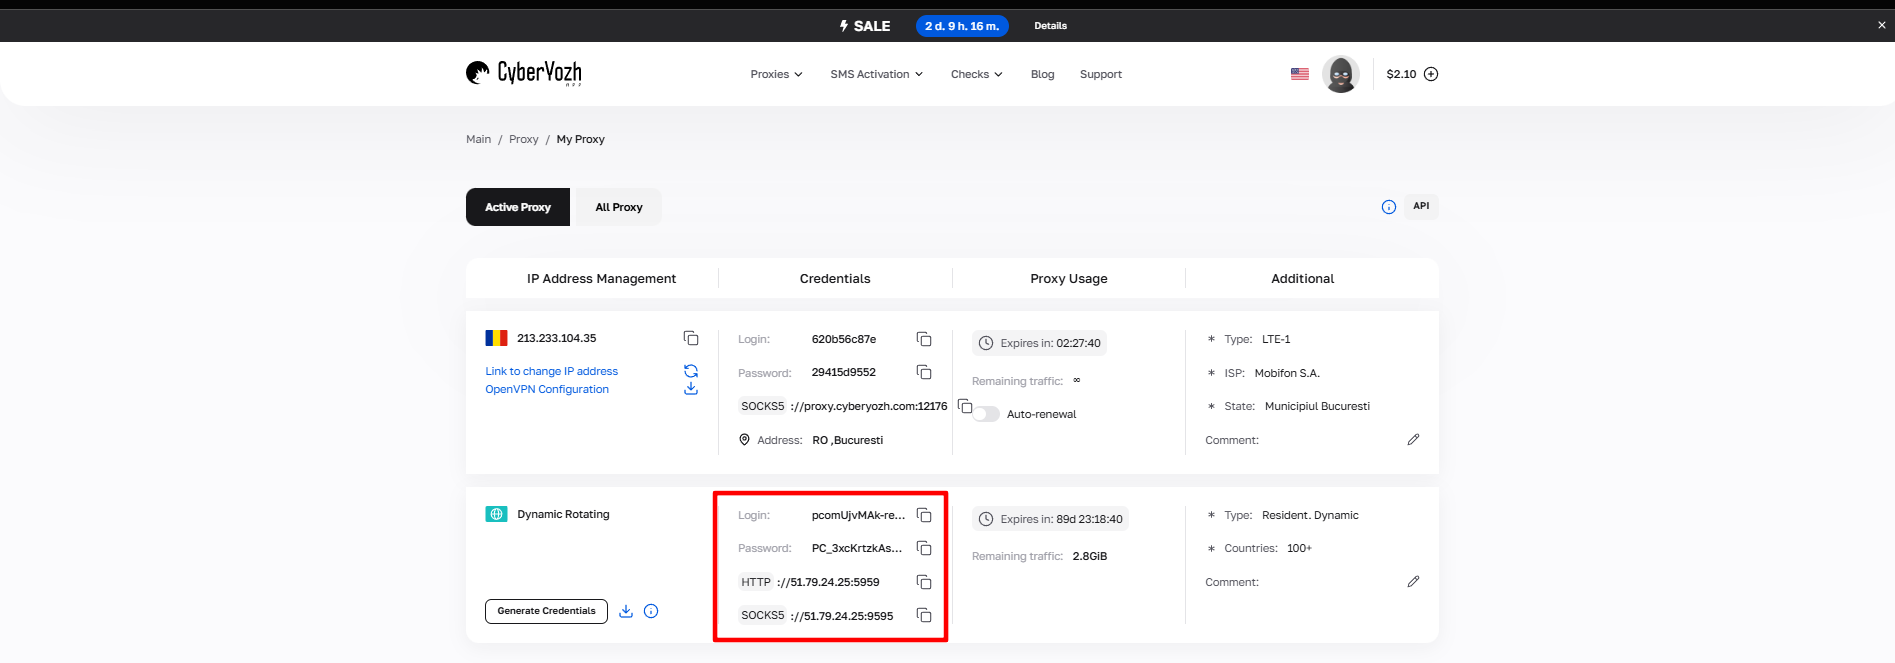 Fig. 1. Screenshot of the CyberYozh platform interface, showing the location of proxy connection data. The image displays fields for IP address (Host), port (Port), username (Proxy Username), and password (Proxy Password).
After purchasing a proxy, you will receive the following connection information:
- Host: Proxy IP address
- Port: Proxy port
- Proxy Username: Login
- Proxy Password: Password
Proxy example:
- Host: 172.98.60.180
- Port: 58763
- Login: 7XbvvWautzmOZMA
- Password: xdtAof3xB7RSmUr
Setting up a profile in AdsPower
Launch the AdsPower browser.
In the menu on the left, select the "New Profile" option.
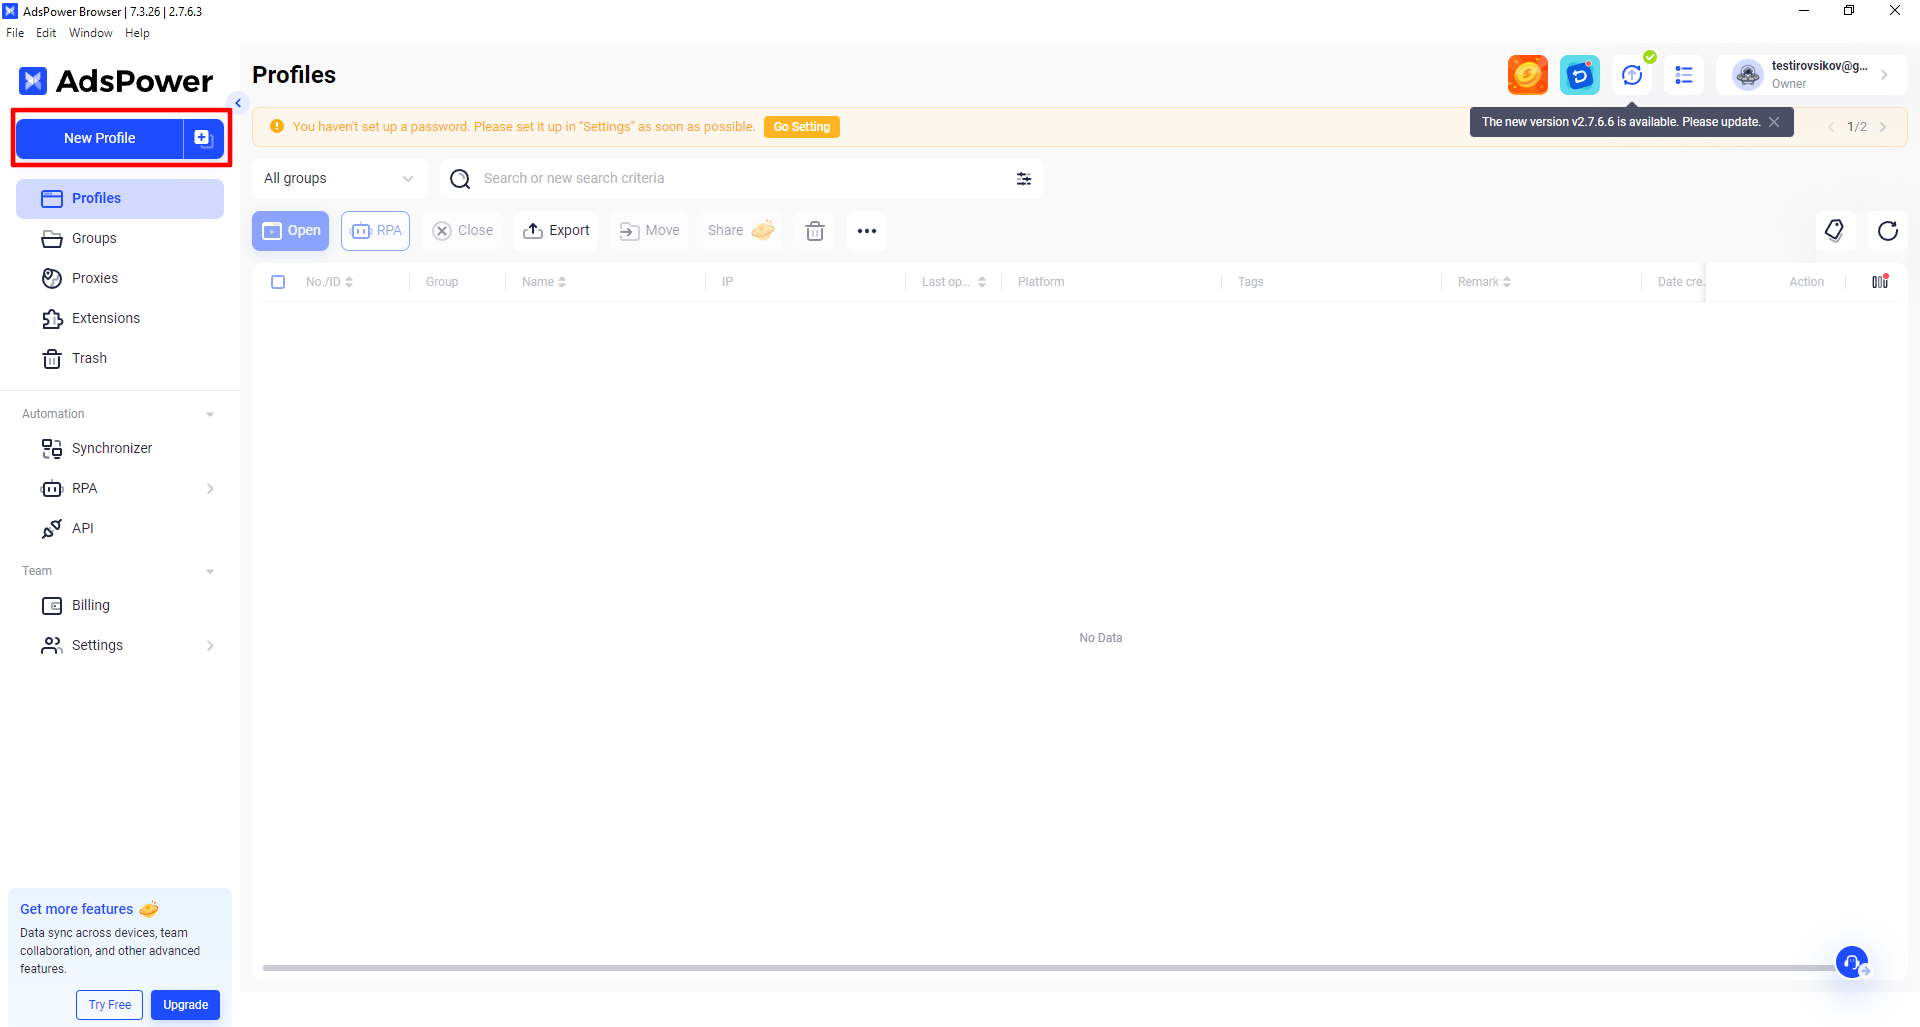 Fig. 2. Interface for creating a new profile in the AdsPower browser.
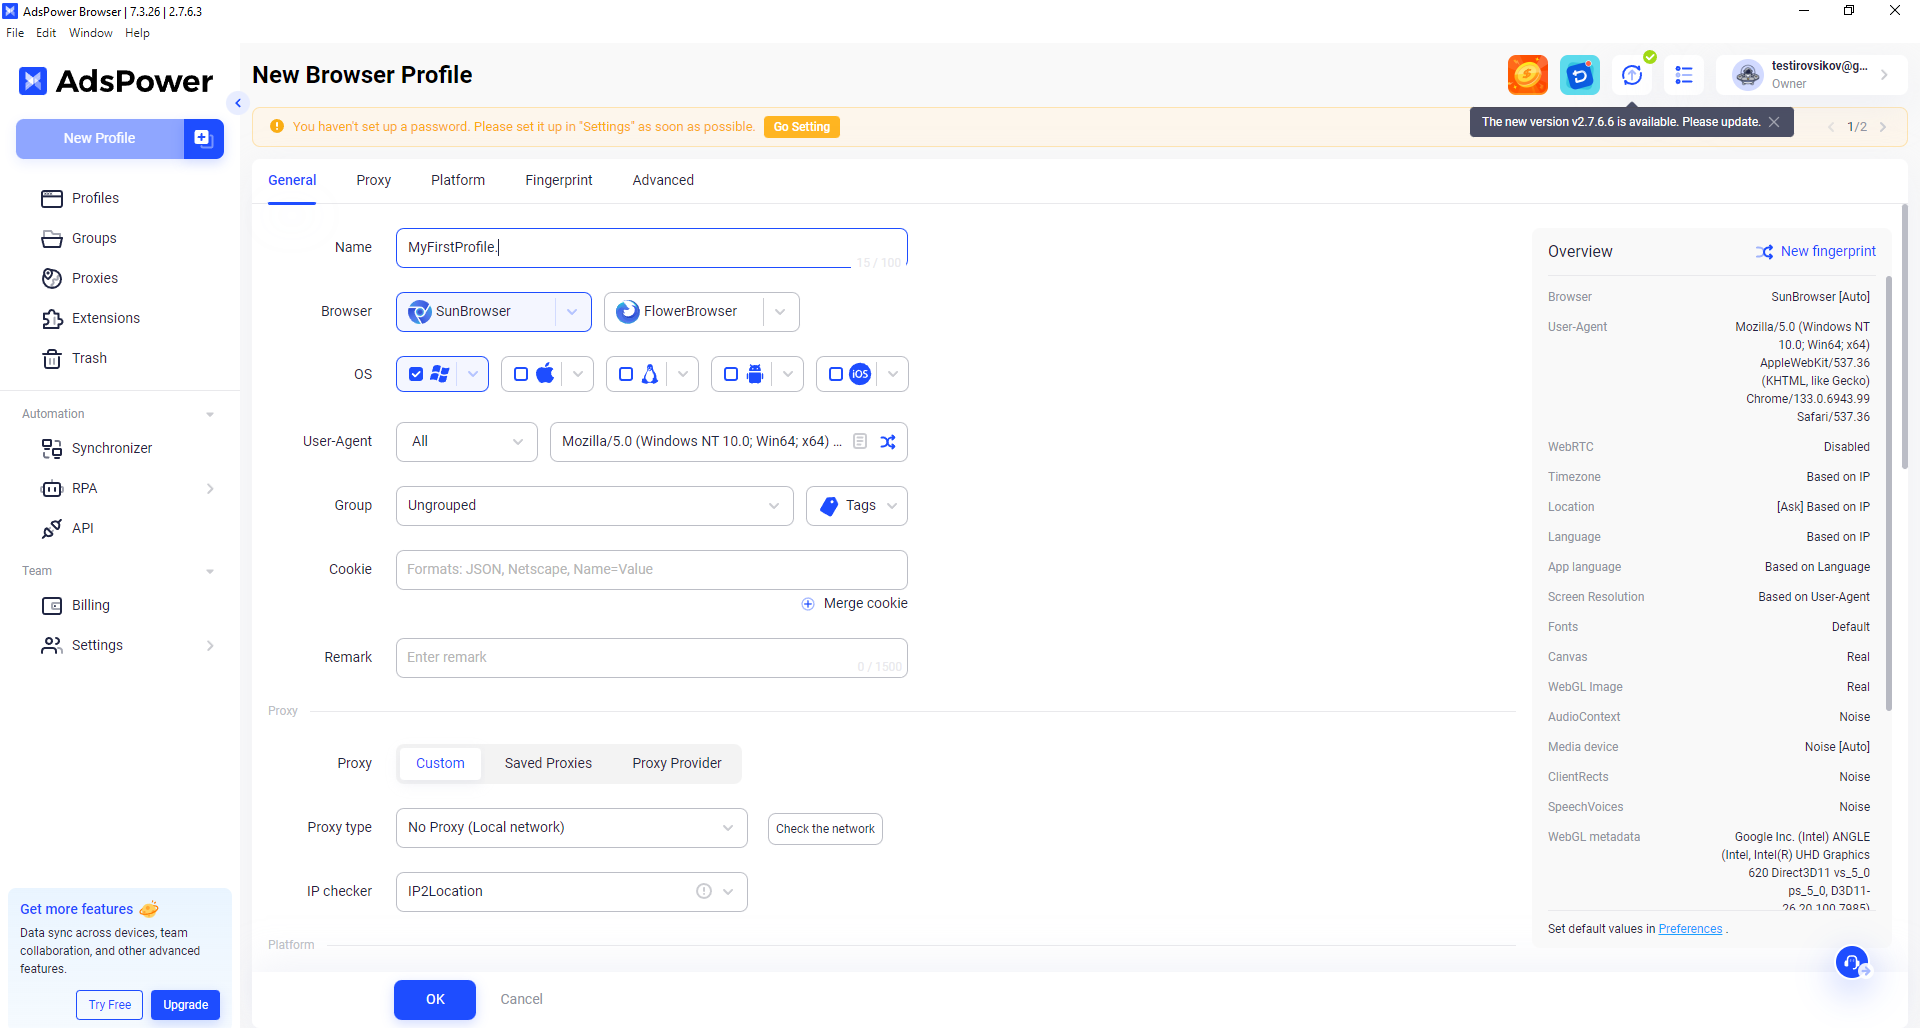 Fig. 3. Profile configuration form in AdsPower with fields for entering basic parameters, including profile name, browser selection, and operating system.
- Profile Name: Enter any name, for example, MyFirstProfile.
- Browser: Select the desired browser.
- Operating System: Select the required OS.
- User Agent: Configure the User Agent as desired.
Additionally:
- You can add the profile to a group and specify tags.
- It is recommended to add Cookies for convenience.
- In the Remark field, add your notes if necessary.
Proxy Configuration
AdsPower provides reliable support for three key protocols for proxy connection:
- HTTP (HyperText Transfer Protocol) — the primary protocol for efficient data transfer on the internet
- SOCKS5 — a powerful tunneling protocol with a robust authentication system
- SSH (Secure Shell) — a secure protocol with enhanced data encryption
In this guide, we will focus on configuring SOCKS5 — a protocol that guarantees a stable and secure connection. The process for configuring HTTP and SSH protocols follows a similar logic.
Proxy setup:
- In the proxy section, leave the "Custom" option selected.
- Select the proxy type you purchased (SOCKS5 or HTTP).
- For verification, use the IP2Location checker.
Entering Proxy Data
Enter the obtained proxy data:
Host:Port, Proxy username, Proxy Password.
For example:
- Host: 172.98.60.180
- Port: 58763
- Username: 7XbvvWautzmOZMA
- Password: xdtAof3xB7RSmUr1
Your settings should look like this:
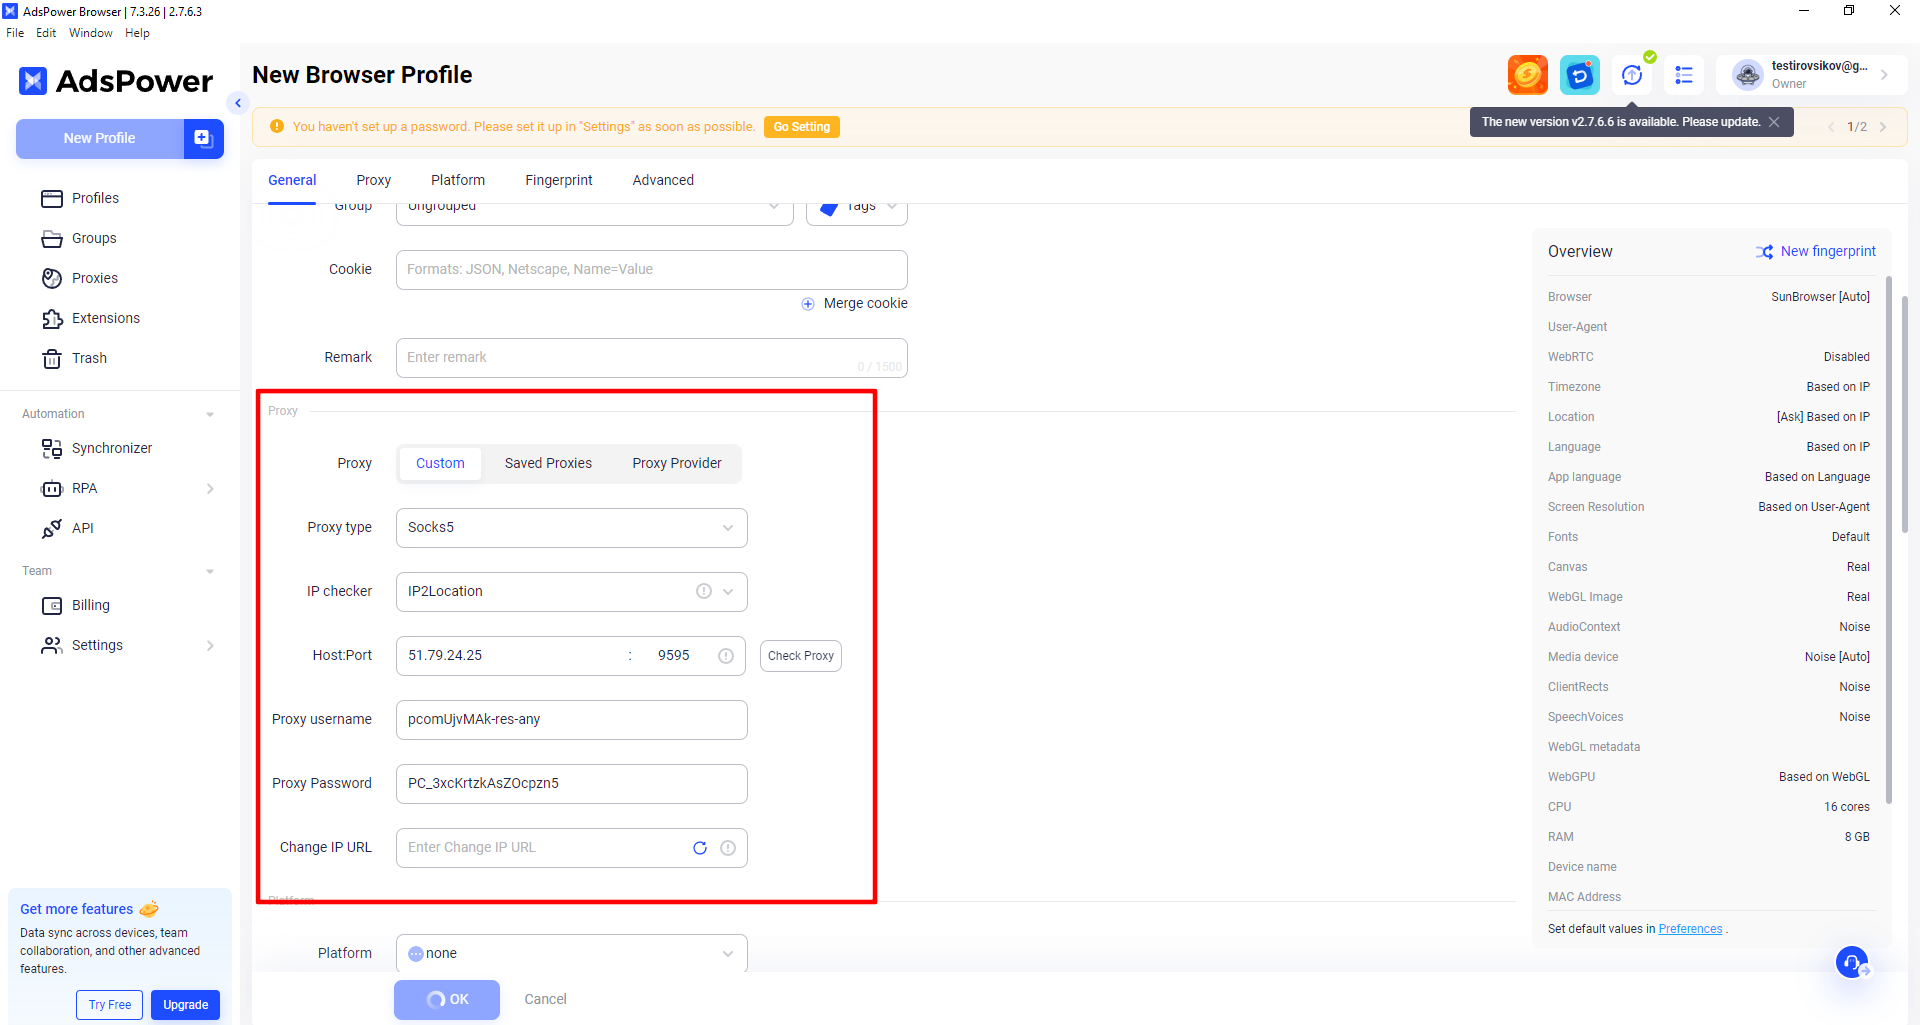 Fig. 4. Demonstration of the proxy settings interface in the AdsPower browser with fields for entering connection data: Host, Port, Username, and Password.
Click the "Check proxy" button. If everything is done correctly, the text on the right should turn green, confirming that the proxy is working.
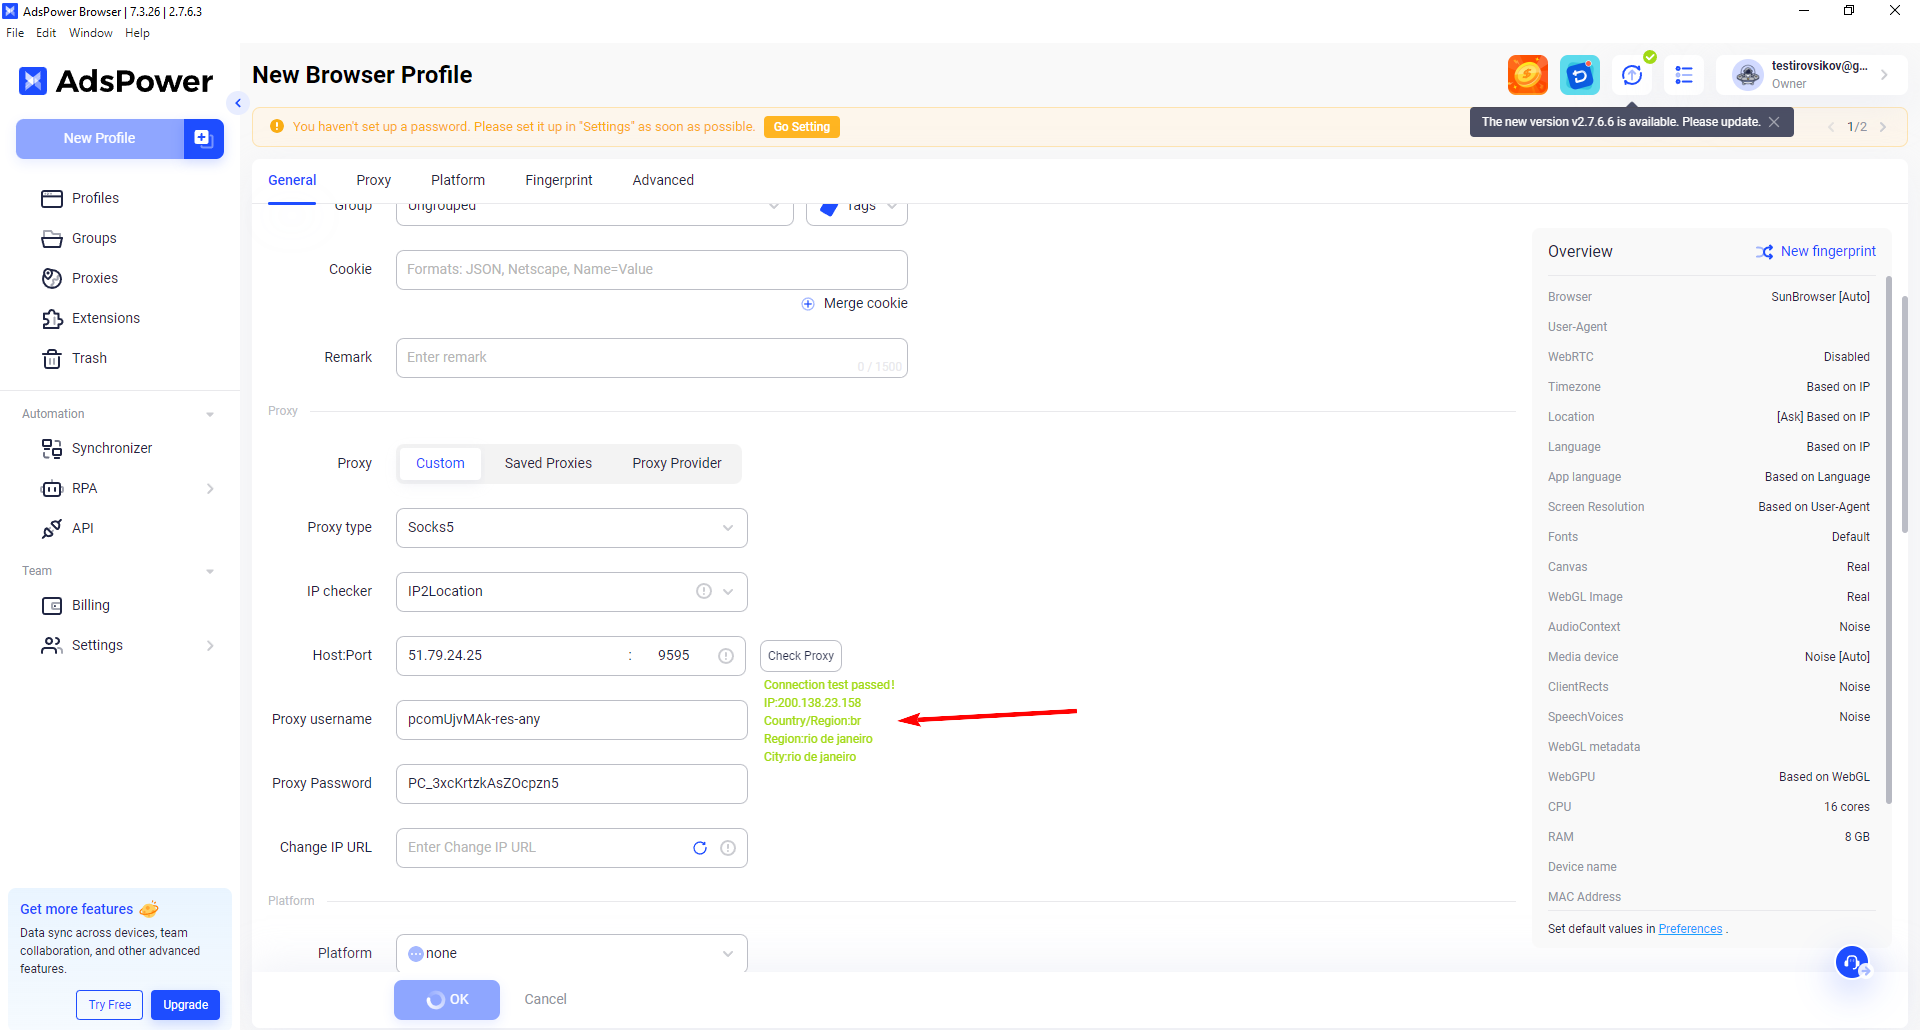 Fig. 5. Proxy check interface in AdsPower, showing the connection status indicator. A green indicator confirms a successful connection and the proxy server's functionality.
If the status is red, check the entered data.
Additional Settings
- Opening URL: You can specify a URL that should open with this profile.
- Username and password: If required, check the box and specify a password for the profile.
- Cookie: Check the box if you want to create a cookie file.
- If the profile is linked to 2FA, specify the authentication code.
- Environment Settings (Fingerprint)
These settings are important for the correct configuration of the browser working environment:
- Timezone: Select the appropriate time zone.
- WebRTC: Disable or configure as desired.
- Location: Specify the location corresponding to your profile.
- Language: Select the required language.
- Screen Resolution: Set the screen resolution to be used.
Completing Profile Setup
After entering all necessary data and settings:
- Click "OK" to save the profile.
- Launch the created profile
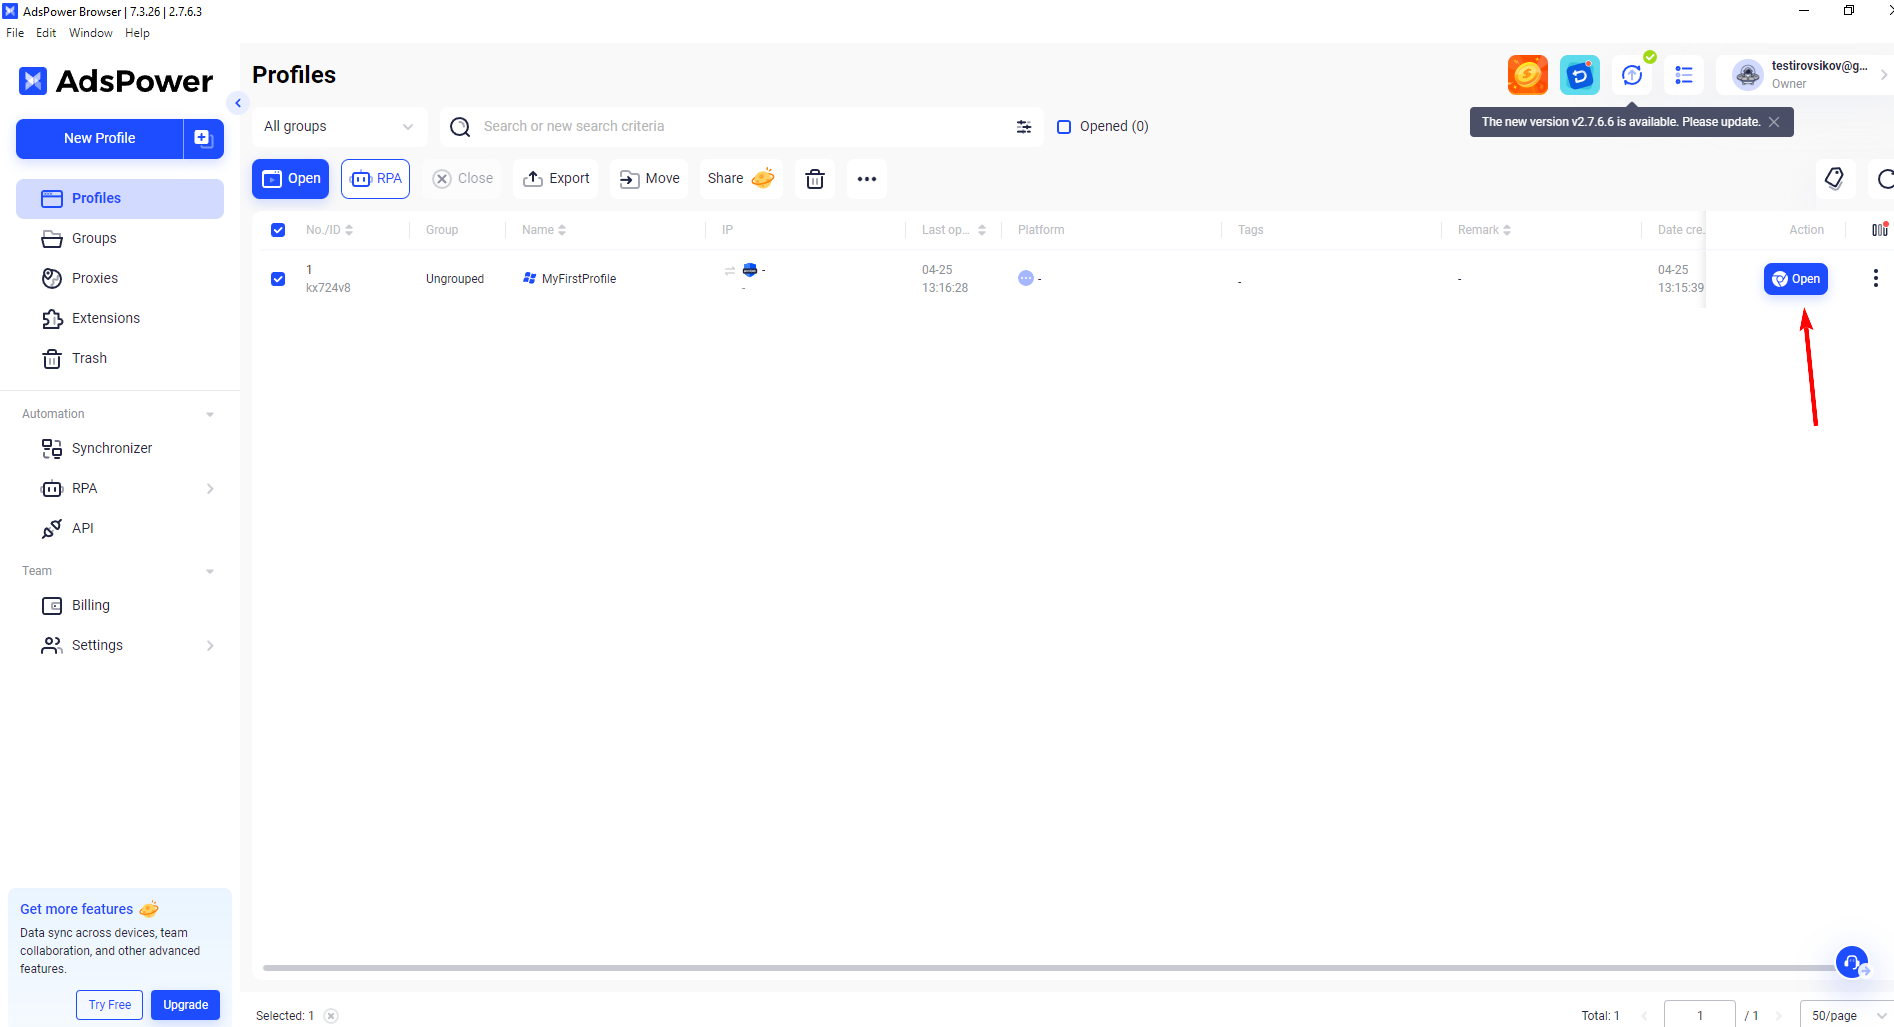 Fig. 6. Final AdsPower profile setup interface demonstrating control buttons and launch elements for the configured profile.
- Go to the created profile and check the proxy connection by visiting a website to verify the IP installation correctness.
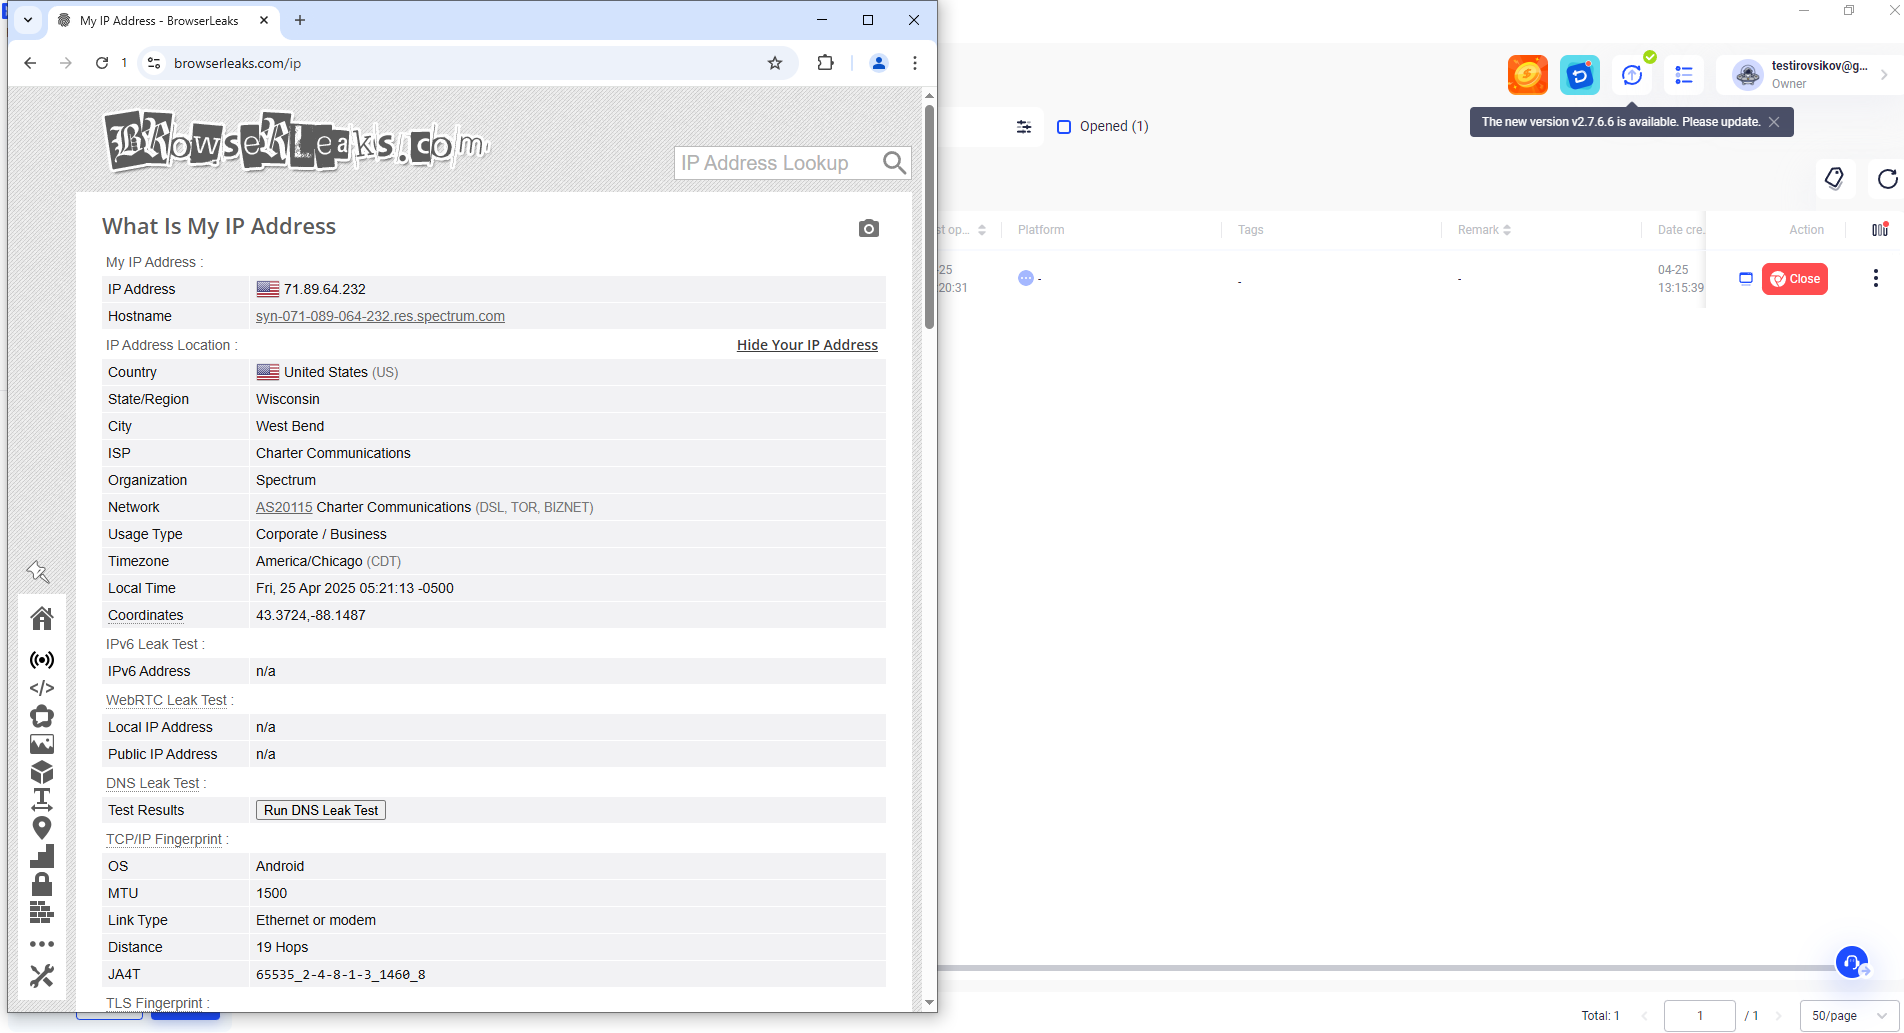 Fig. 7. Example of verifying proxy configuration correctness via the BrowserLeaks service in the AdsPower browser. The image shows the service interface displaying information about the current IP address and other connection parameters for verifying the proxy server configuration.
Congratulations! You have successfully configured the profile and connected the proxy in the AdsPower browser. Now you are ready for safe and comfortable work online, utilizing all the capabilities of this tool. For additional protection, we recommend using secure communication channels — this will help make your work even safer and protect corporate data.
