
ClonBrowser — is a powerful multi-profile browser that allows you to effectively manage multiple workspaces from a single computer. It creates isolated virtual profiles, each with its own unique configuration: screen resolution, OS version, fonts, and WebGL parameters.
But configuring profiles is only half the battle. The other half is correct network routing. If you run 10 workspaces from a single IP address, it can lead to connection issues or access restrictions by platforms.
In this guide, we will break down which type of proxy to choose for your tasks (to ensure stable operation) and how to correctly connect them in ClonBrowser.
Part 1. Strategy: Which proxy do you need for ClonBrowser?
Before creating a profile, you need to choose the right infrastructure. An error at this stage can lead to interrupted work sessions.
1. Mobile Proxies (4G/5G)
- What for: Social media management (Facebook, TikTok, Instagram), marketing agency operations, automated testing.
- The Essence: You get a dynamic IP from a mobile operator. Thanks to CGNAT technology, these addresses have a high level of trust from platforms, providing a reliable and stable connection.
- In ClonBrowser: Use them for tasks that require regular IP address changes.
2. Residential Proxies (ISP)
- What for: E-commerce (Amazon, eBay), financial platforms, CoinList, payment systems (PayPal).
- The Essence: Static IP addresses from home internet service providers.
- In ClonBrowser: Use them in static mode. One workspace should be linked to one IP for the entire duration of the work. Frequent IP changes can interrupt active sessions and trigger additional security checks on platforms like Amazon.
3. Datacenter Proxies
- What for: Simple data collection, technical tasks, websites with basic connection requirements.
- Limitations: They are poorly suited for managing important client profiles due to unstable IP reputation levels (Trust Score).
Part 2. Data Preparation
For stable operation and secure connection routing (WebRTC/DNS), we recommend using private channels from CyberYozh App.
After purchasing, you will receive the data in your personal account. ClonBrowser supports individual data entry. You will need:
- Host: IP address (e.g.,
172.98.60.180) - Port: Port (e.g.,
58763) - Username/Password: Login and password for authentication.
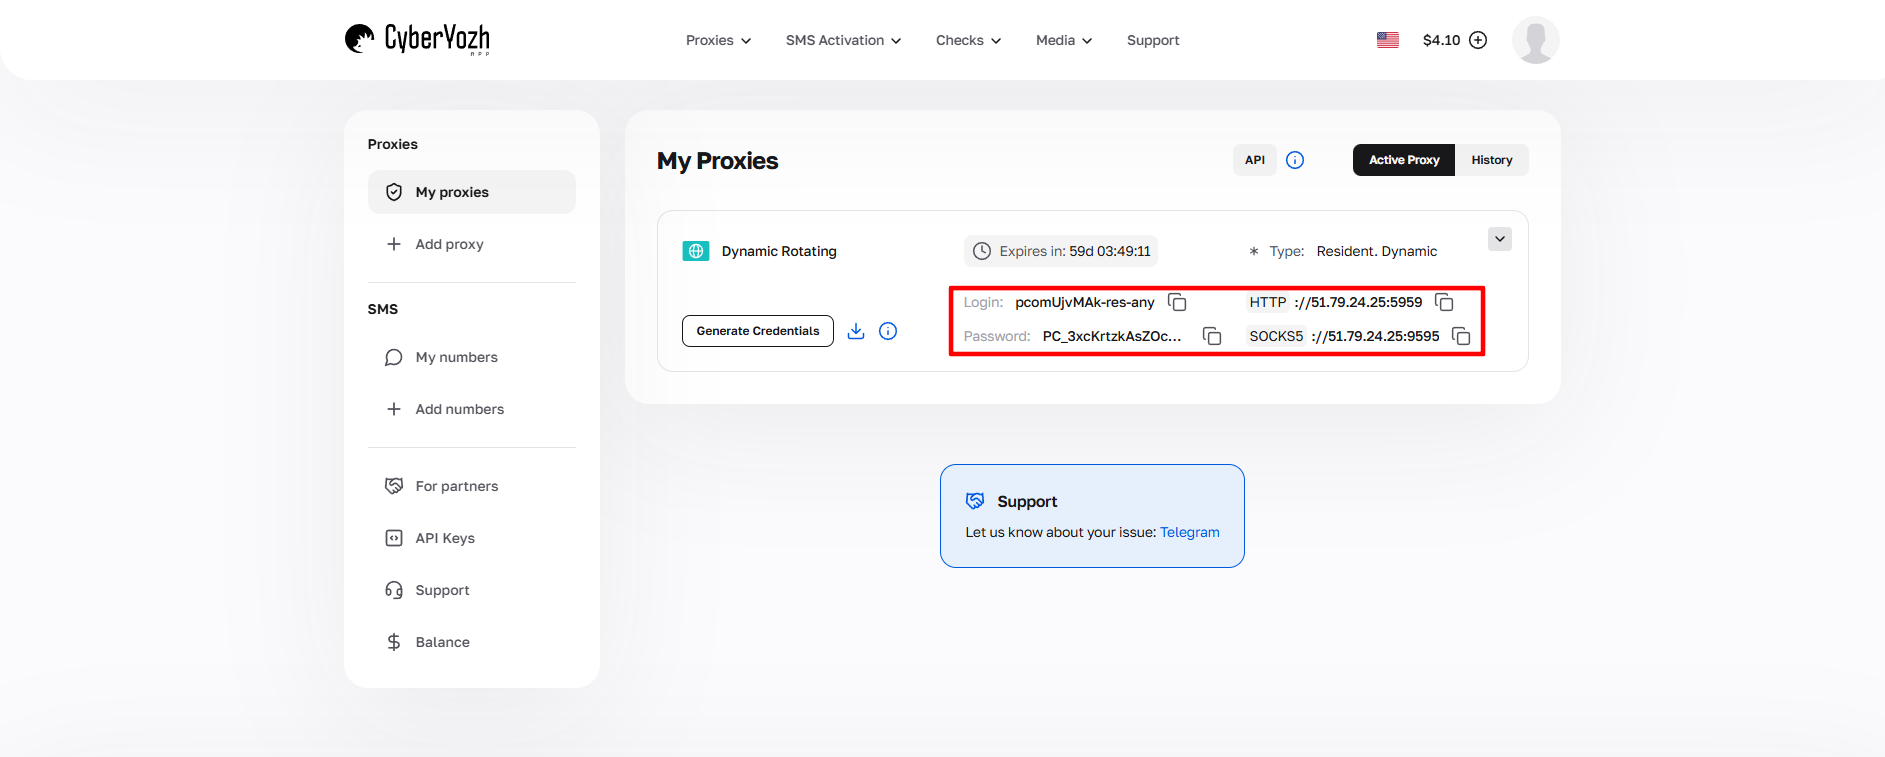 Fig. 1. Screenshot of the CyberYozh App platform interface showing the location of the proxy server connection data. The image displays fields for IP address (Host), port (Port), username (Proxy Username), and password (Proxy Password).
Part 3. Creating a Profile and Connecting a Proxy
Step 1. Creating a New Profile
- Launch ClonBrowser.
- On the main screen, click the large button «Create a New Browser Profile».
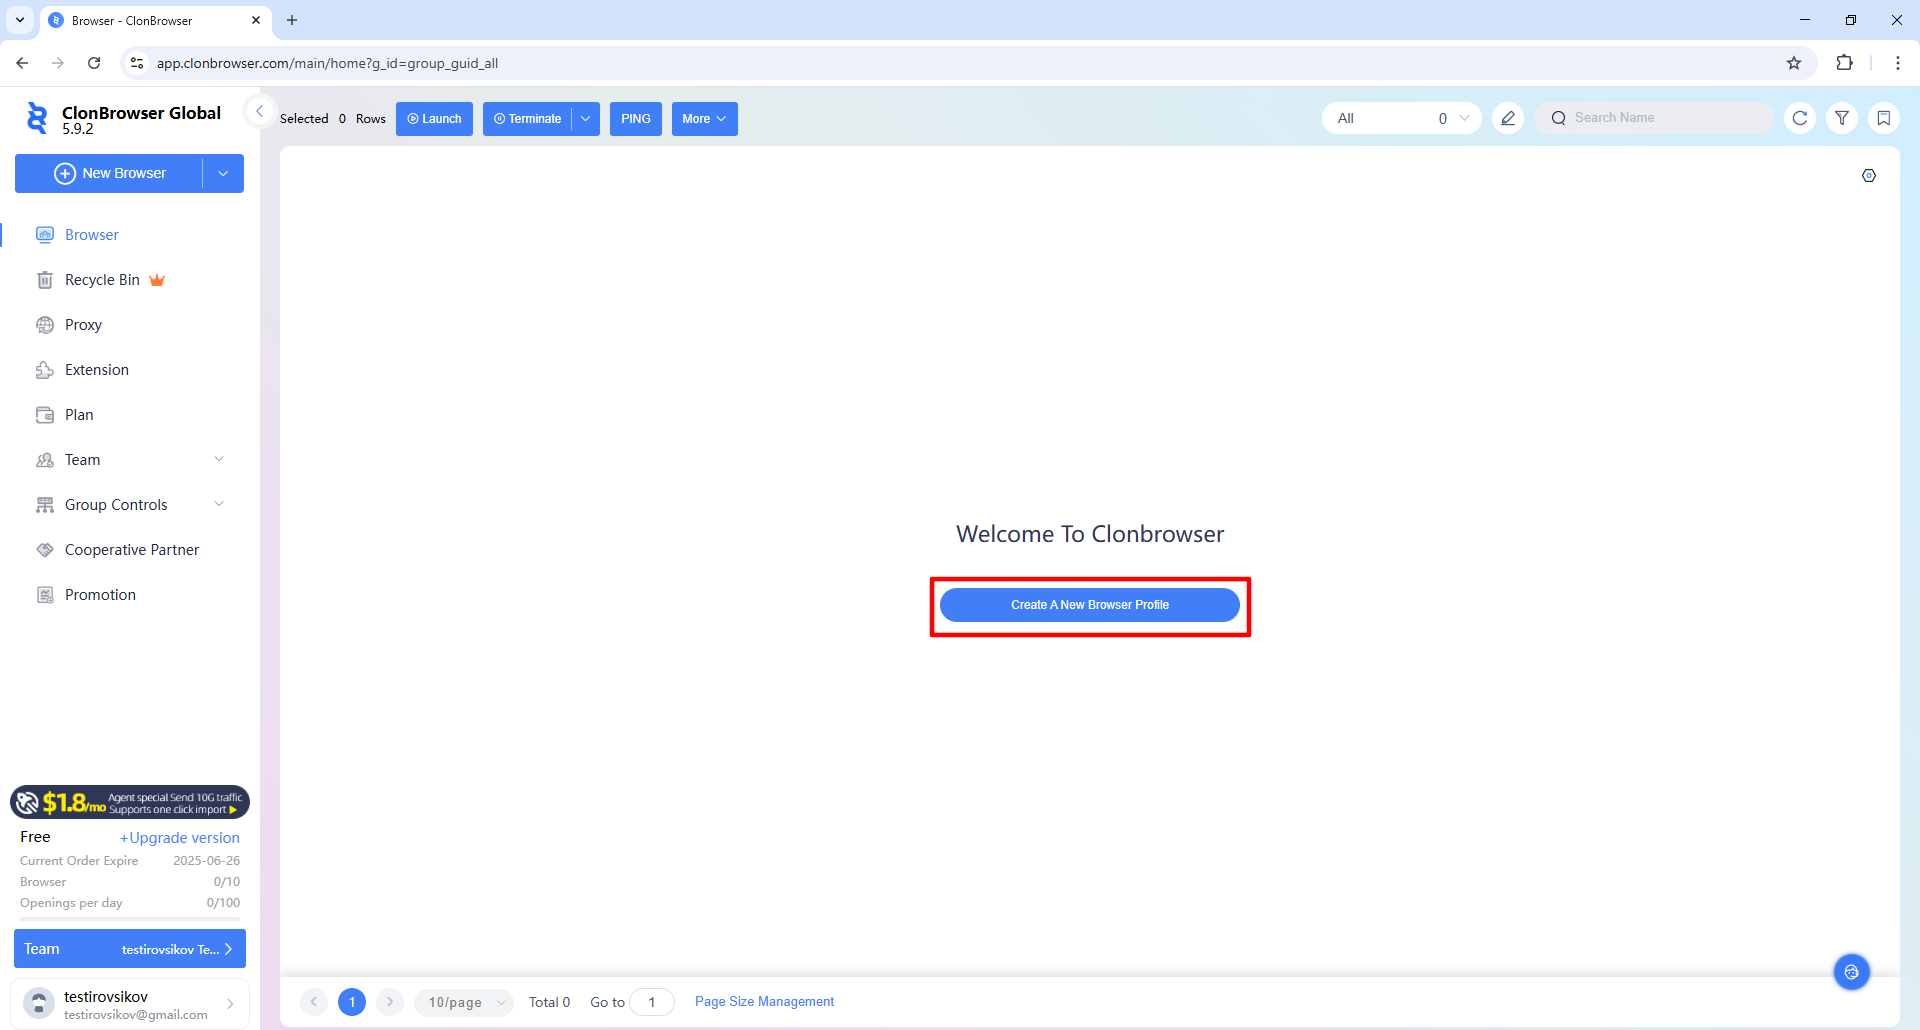 Fig. 2. ClonBrowser main screen interface with the "Create a New Browser Profile" button. The image shows the software's start page where a user can initiate the creation of a new browser profile.
Step 2. Basic Settings
In the window that opens, fill in the basic parameters:
- Name: Name the profile (e.g.,
Google_Project_01). - Browser: Select the engine (usually Chrome).
- OS: Select the operating system.
- Tip: Choose the OS that is actually installed on your PC (Windows for Windows, Mac for Mac). This increases the technical compatibility of the profile.
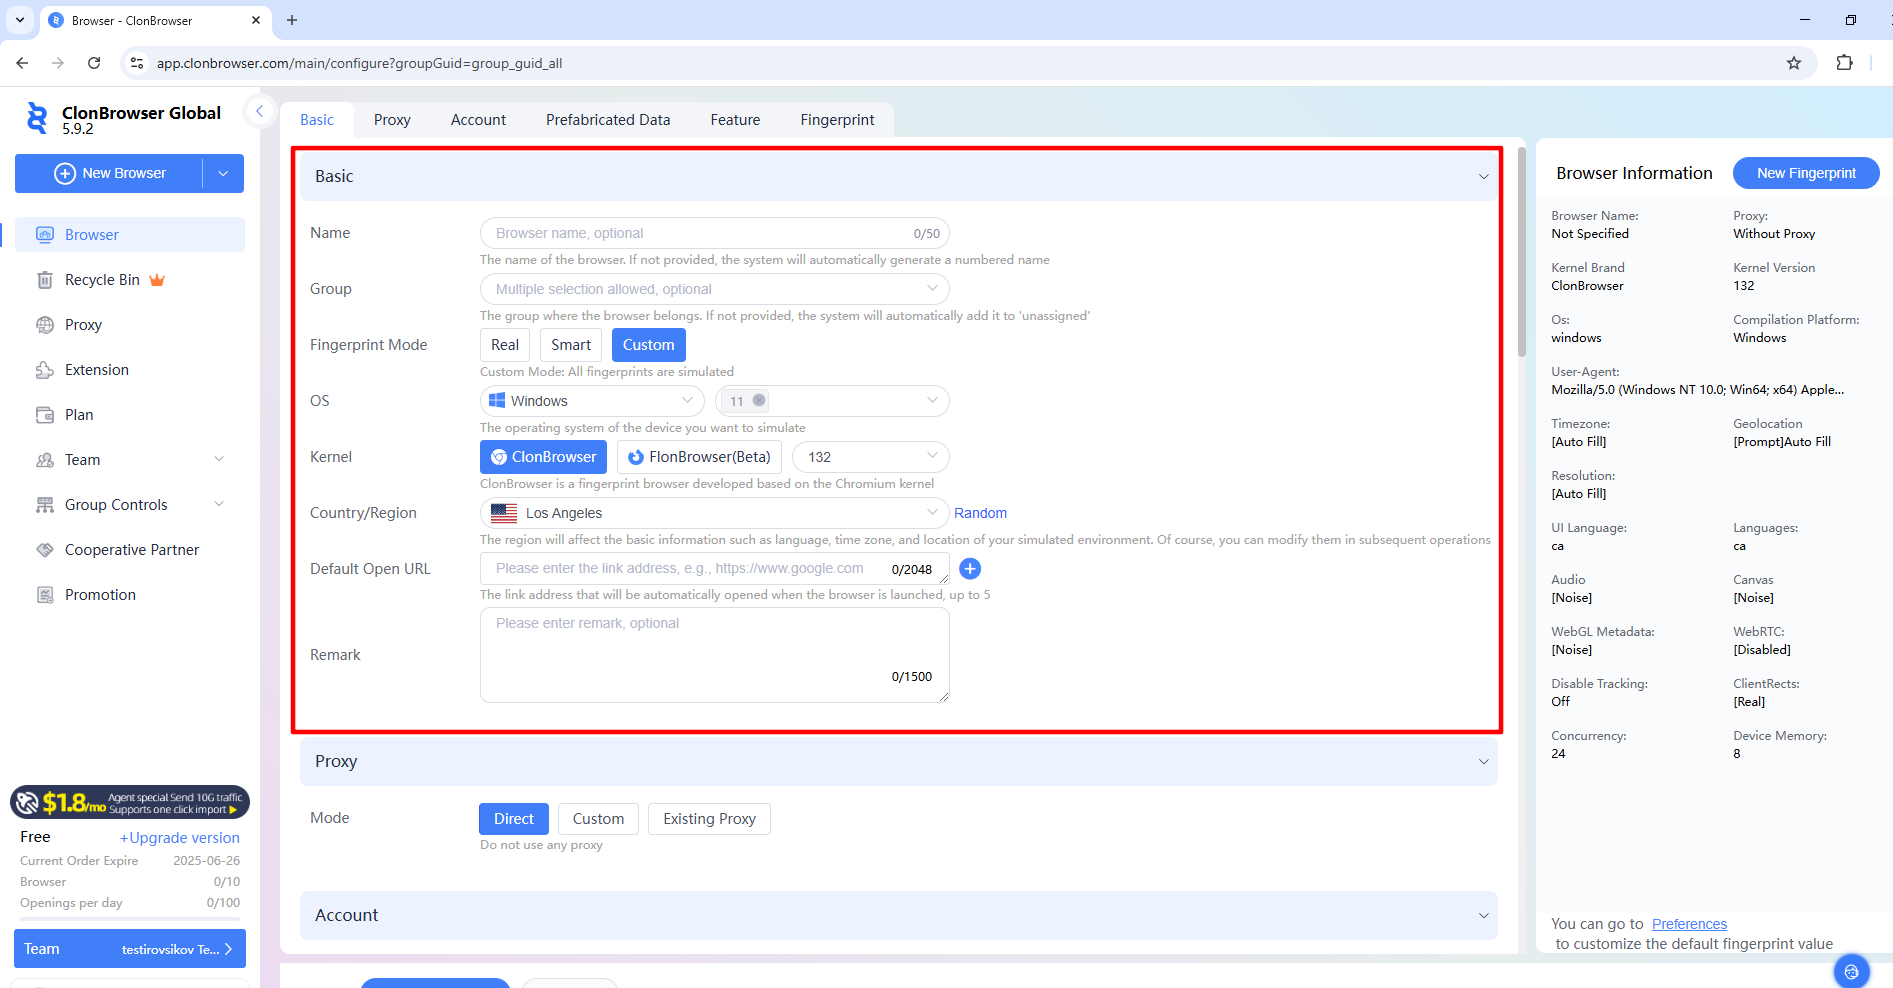 Fig. 3. New profile creation interface in ClonBrowser, demonstrating basic settings for workspace configuration. The image shows fields for entering a profile name, selecting browser type, operating system, and User Agent settings.
Step 3. Proxy Configuration (Important!)
Scroll down the settings to the Proxy section.
- Click the Custom button to enter the data manually.
- Proxy Type: Select the protocol. We recommend SOCKS5. It is universal, supports UDP, and works faster and more stably with heavy websites than HTTP.
- Fill in the fields with data from your provider's personal account:
- Proxy Host: Your IP.
- Proxy Port: Your port.
- Proxy User / Password: Your login and password.
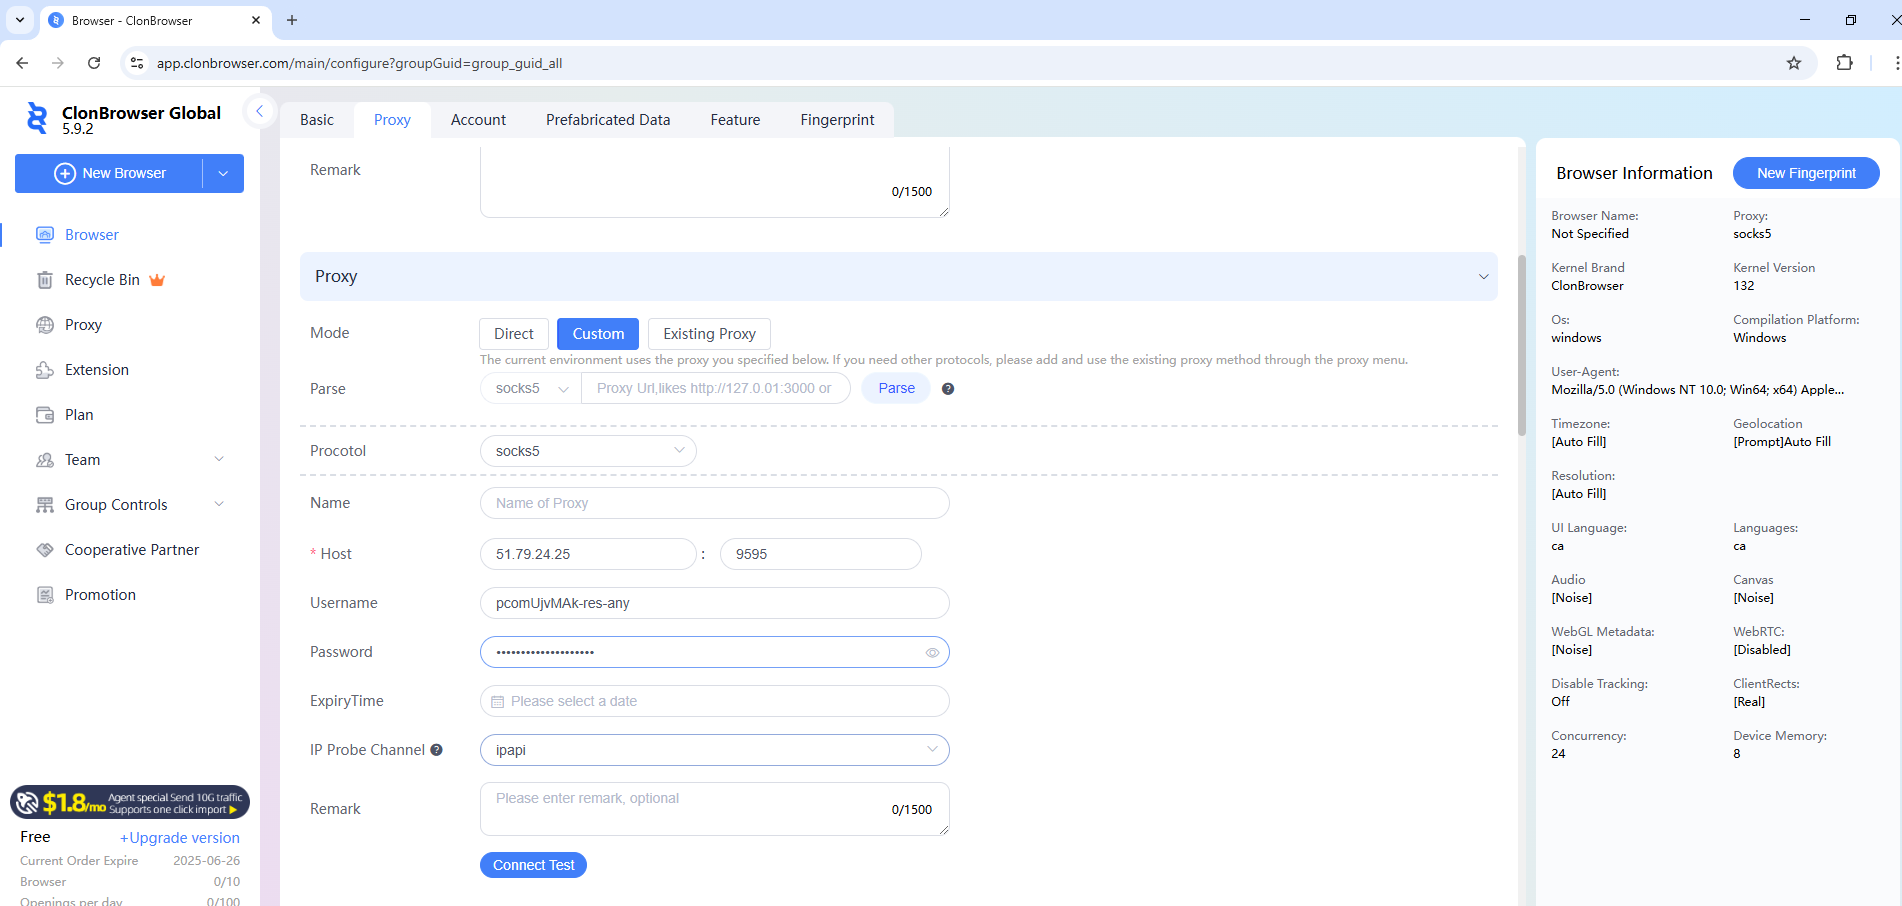 Fig. 4. Proxy server configuration interface in ClonBrowser. Shows the configuration panel with fields for entering proxy connection parameters, including host, port, proxy type, and authentication credentials.
Step 4. Testing the Connection
Do not save the profile until you have checked the connection parameters.
- Click the «Connect Test» button.
- The system will check the availability of the server.
- If you see green text (e.g., Connection successful and country detection) — everything is perfect.
- If there is an error — check the data, balance, or refresh the IP (if it's a mobile proxy).
- Click «Create Browser» to save the profile.
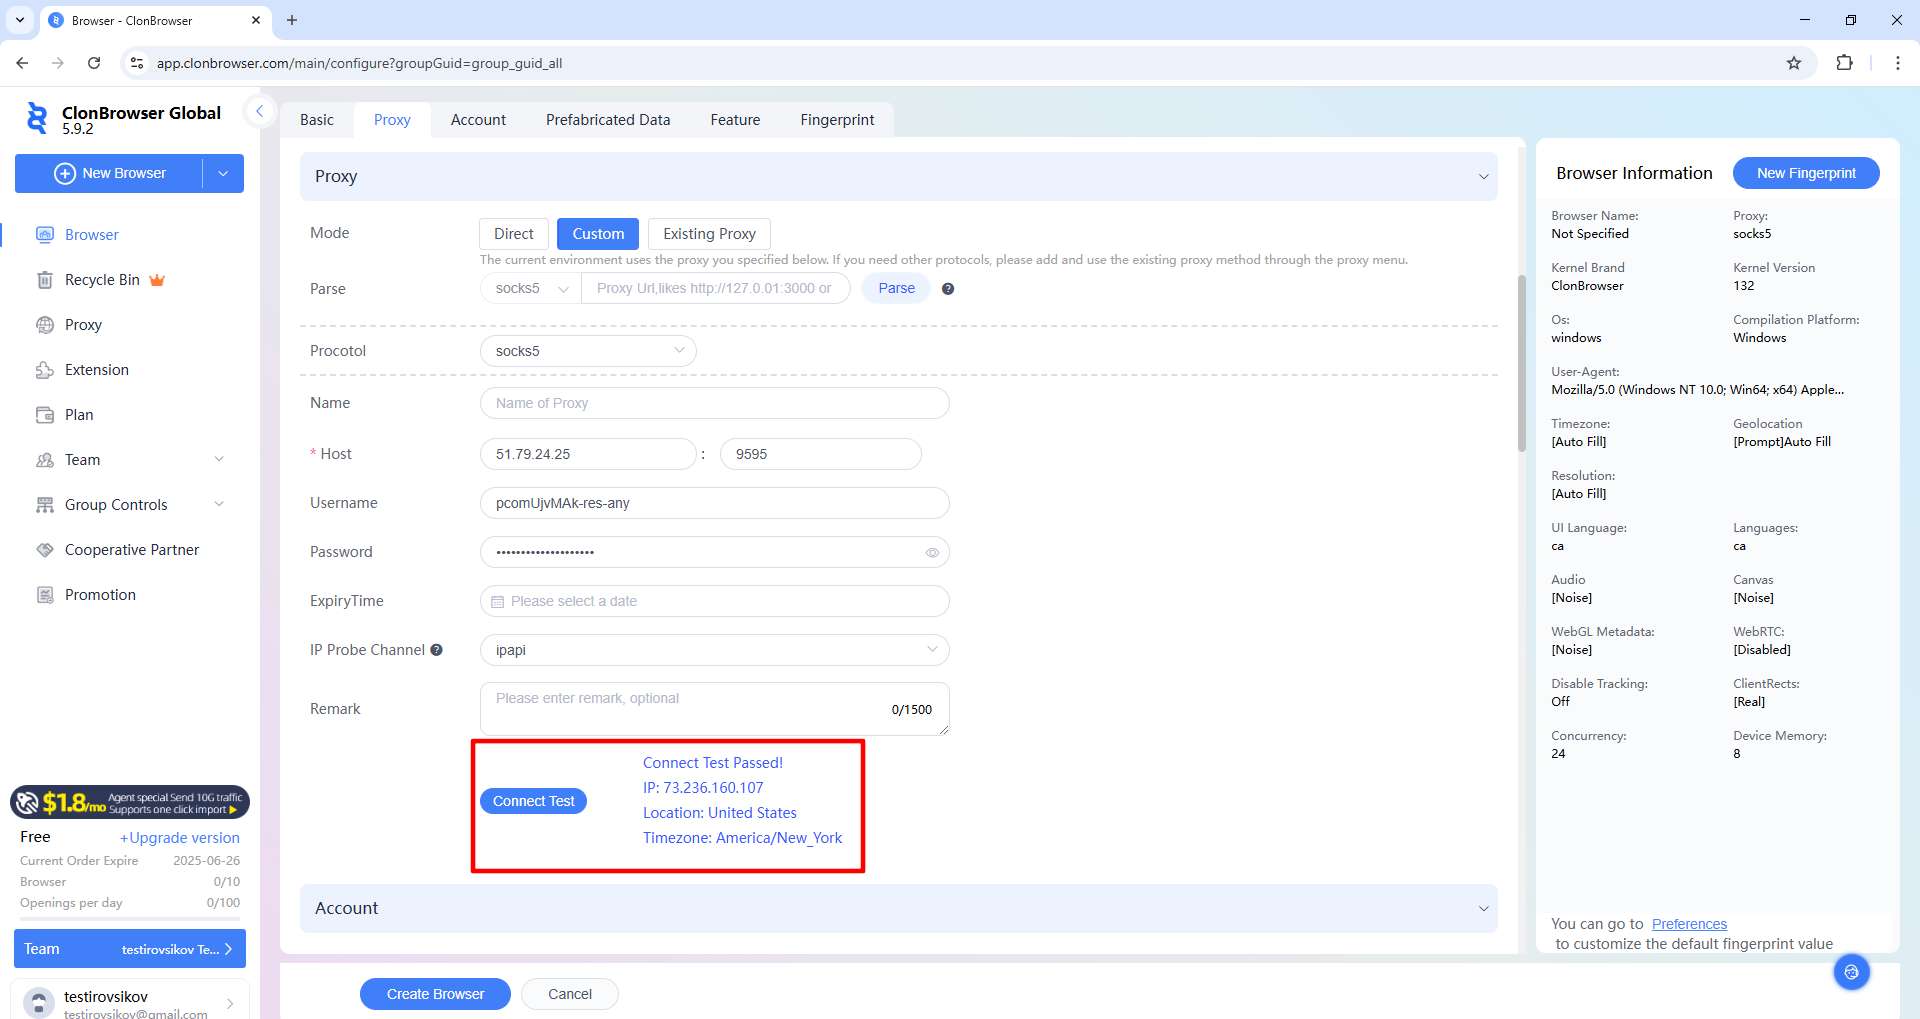 Fig. 5. Proxy connection testing process in the ClonBrowser interface. The image shows the connection check result using the "Connect Test" button, which allows verifying the correctness of the entered proxy parameters and their functionality.
Part 4. Launching and Verifying the Connection
The profile is created and appears in the general list.
- Click the «Launch» button.
- A browser window will open.
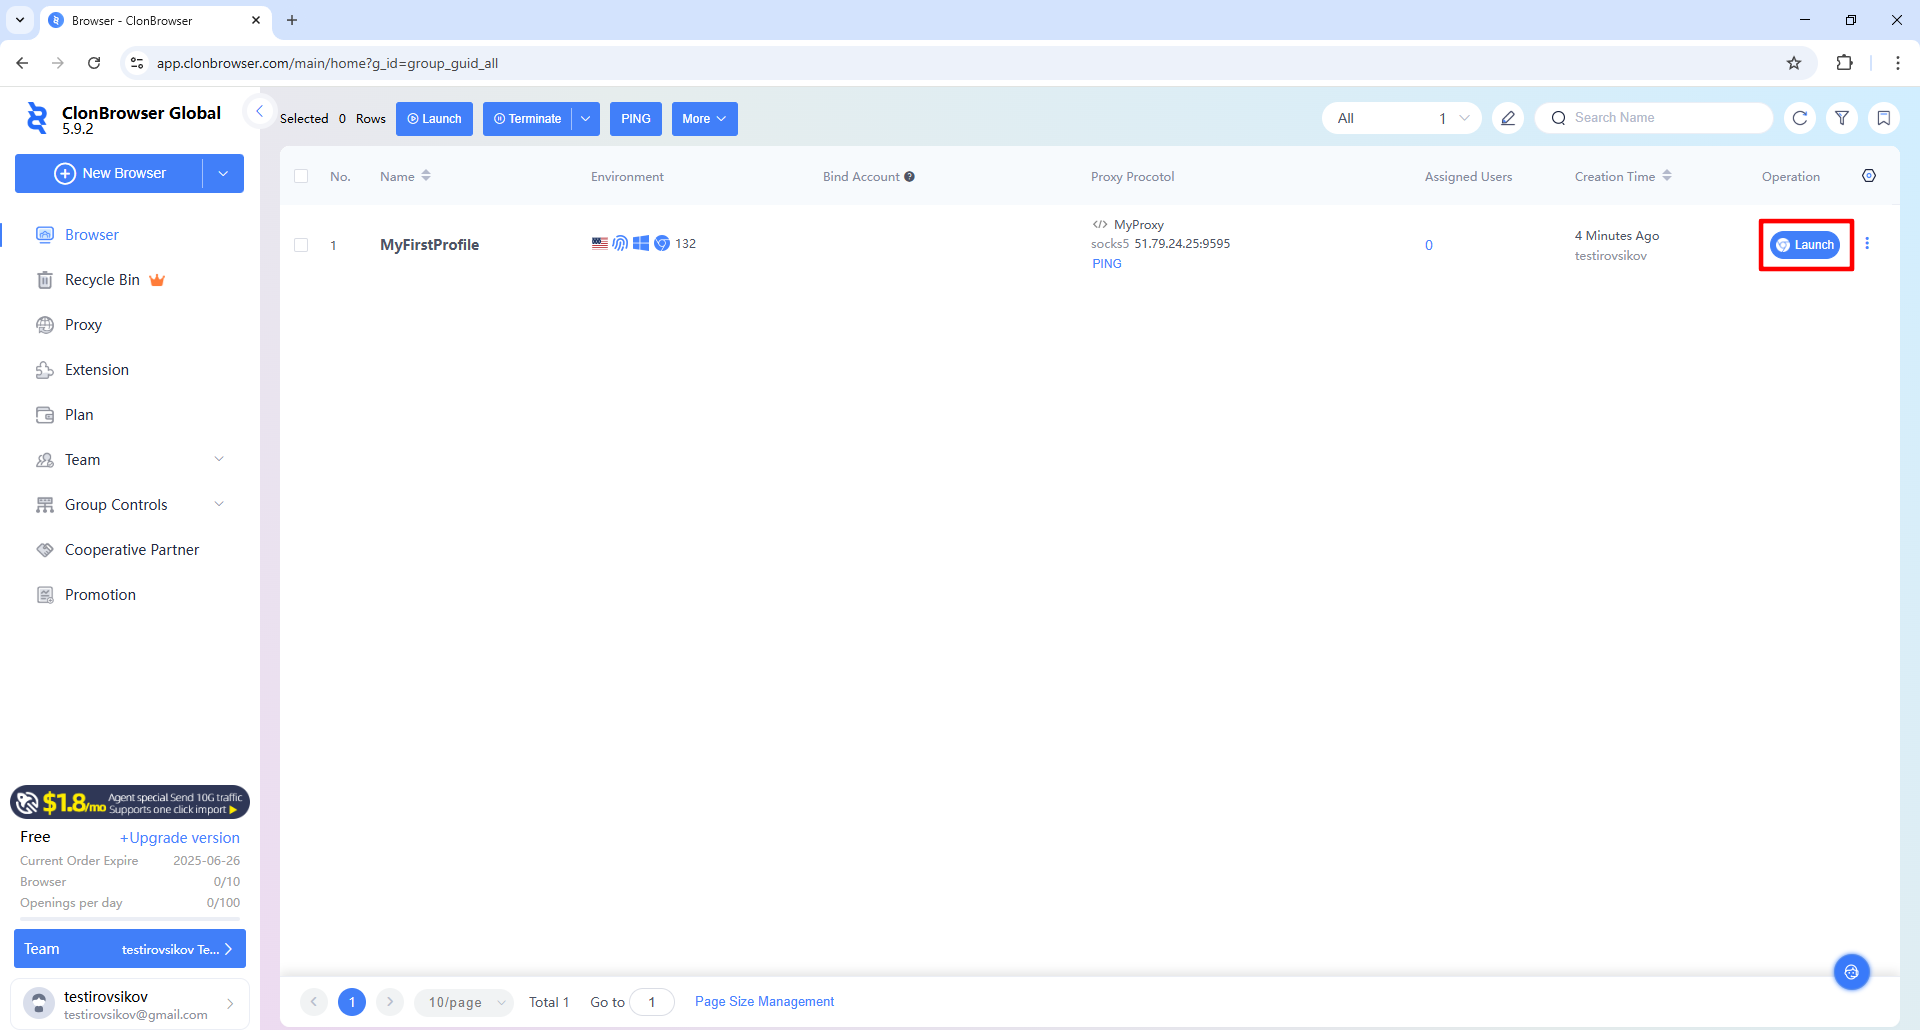 Fig. 6. ClonBrowser profile management panel interface, displaying a list of created browser profiles with available actions. The image shows the "Launch" button to start the selected profile with configured proxy settings.
Final Check: Before authenticating on work platforms (Facebook, Amazon, etc.), it is recommended to check your network routing parameters. Go to browserleaks.com/ip or whoer.net.
Verification Checklist:
- Does the IP address match the connected proxy?
- Is the country determined correctly?
- Is WebRTC routing traffic correctly?
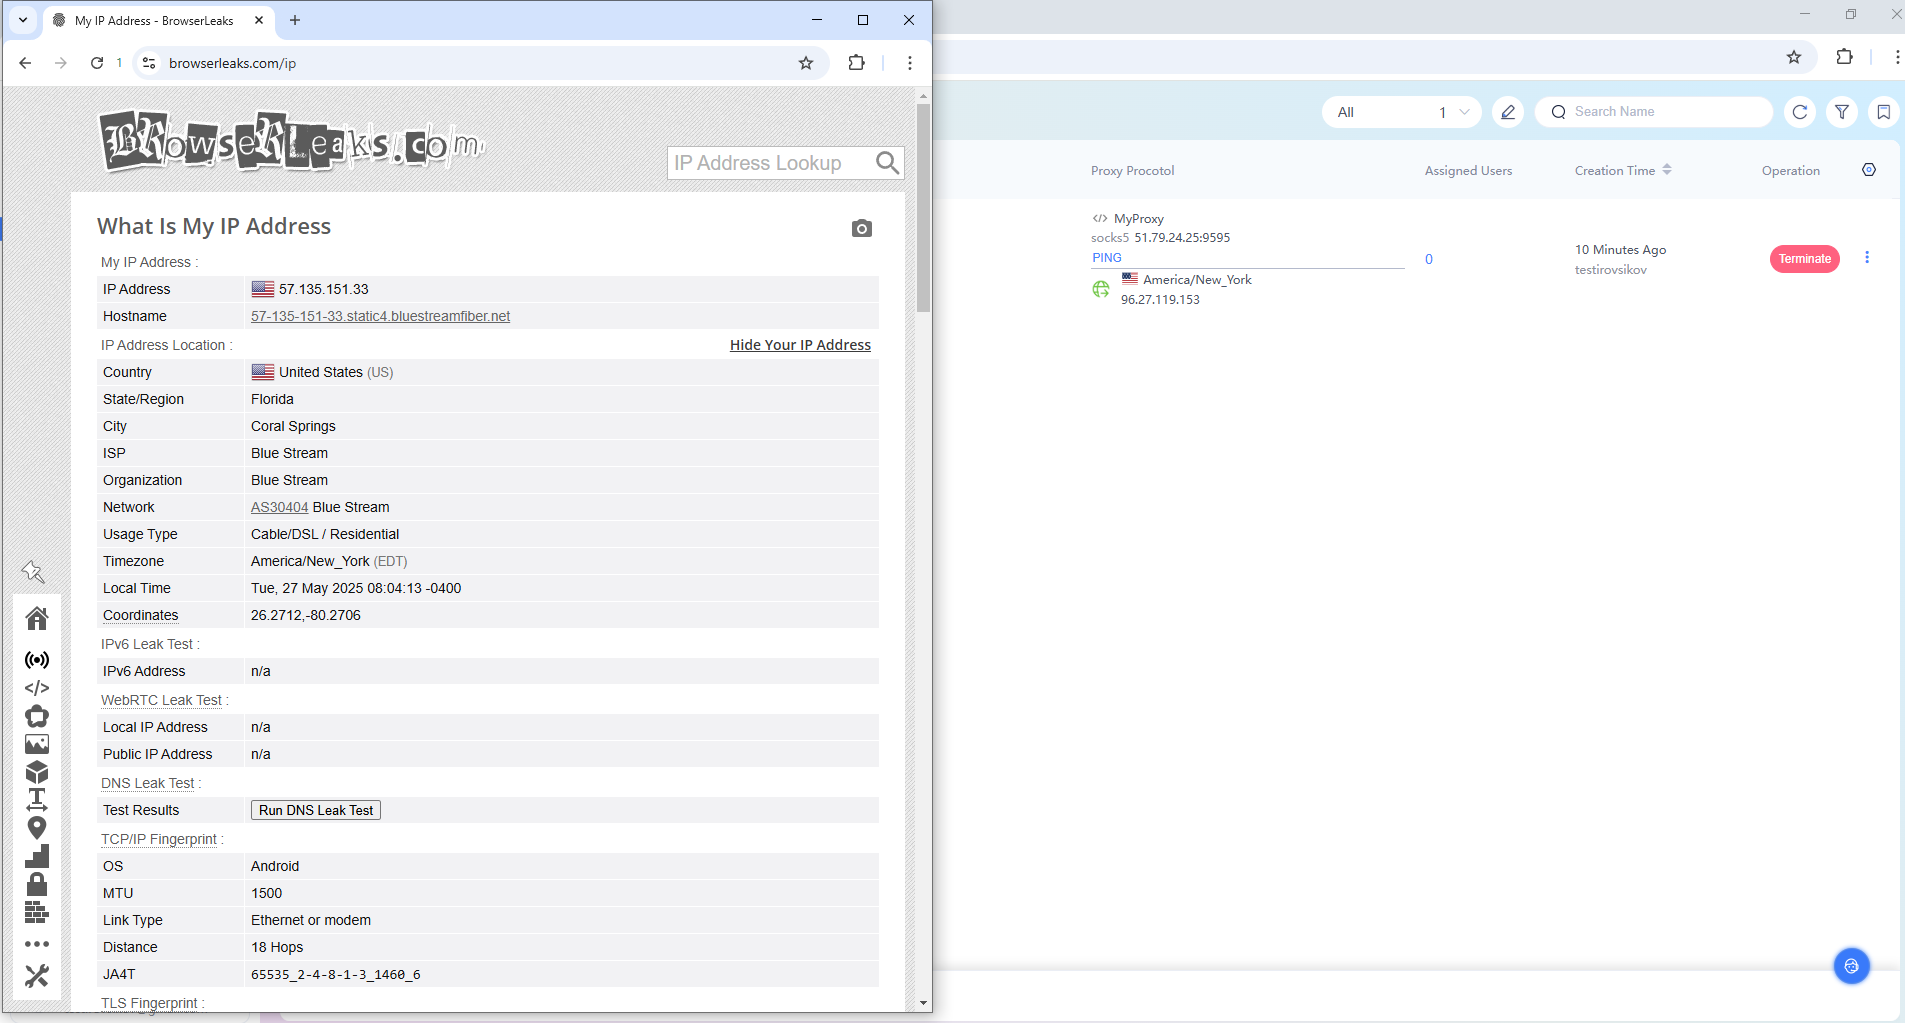 Fig. 7. Interface displaying the browser work window with an active profile, confirming successful integration of proxy settings and system readiness for online work.
If all points are in order, the configuration is performed correctly, and you are ready to work.
Conclusion
ClonBrowser paired with high-quality proxies is a reliable foundation for managing business processes.
- For scaling marketing tasks, use Mobile Proxies.
- For managing corporate stores and accounts, use Residential Proxies.
You can find proxies with UDP support for any task in the CyberYozh App catalog. Successful work!