
Undetectable Browser is an anti-detect browser that prioritizes freedom and security. Unlike many "cloud-based" competitors, it allows you to store profiles locally on your device. This means your data and cookies never leave your computer, which is critical for working with finances and private data.
Local storage helps maintain confidentiality. A high-quality proxy ensures a stable and secure connection for your daily tasks.
In this guide, we will break down which type of proxy to choose for your tasks (so as not to waste your budget) and how to correctly configure the connection in Undetectable Browser using two methods.
Part 1. Strategy: What proxy do you need for Undetectable?
Before setting up a profile, you need to choose the right proxies. The correct proxy choice ensures stable and uninterrupted access to your professional tools.
1. Mobile Proxies (4G/5G)
- Purpose: Social media management, marketing campaigns, and maintaining corporate profiles.
- Essence: Dynamic IPs from cellular operators. Maximum trust from social networks thanks to CGNAT technology.
- In Undetectable: If you have a private mobile proxy, set up convenient IP rotation in the browser (there is a field for the IP change link in the proxy manager).
2. Residential Static Proxies (ISP)
- Purpose: E-commerce (Amazon, eBay), crypto exchanges, CoinList, working with payment systems.
- Essence: Static IP addresses from home internet service providers.
- In Undetectable: Use the “1 Profile = 1 Static IP” rule. The IP address must remain static to ensure a stable and reliable connection for e-commerce and financial platforms.
3. Datacenter Proxies
- Purpose: Scraping, technical tasks, testing.
- Risk: Not recommended for tasks requiring high connection stability or managing important business profiles.
Part 2. Data Preparation
For stable operation, we recommend using verified proxies from CyberYozh App. We guarantee clean IP pools and high speeds.
After purchasing, you will receive data in your personal account. You will need:
- Host: IP address (e.g.,
172.98.60.180) - Port: Port (e.g.,
58763) - Username: Login
- Password: Password
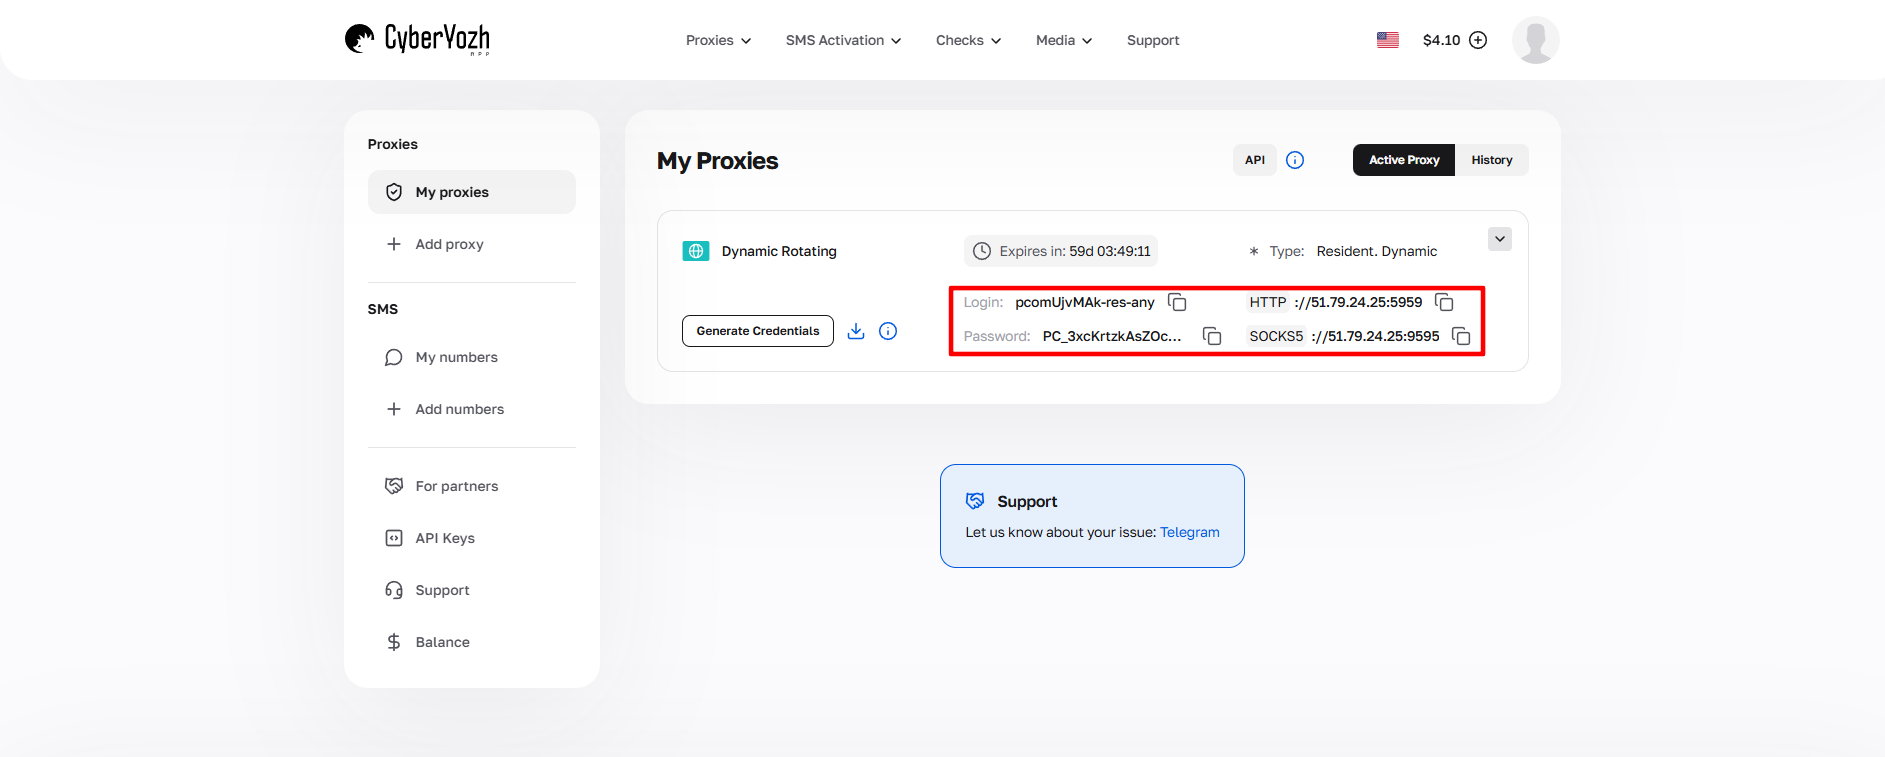 Fig. 1. Screenshot of the CyberYozh platform interface, demonstrating the location of proxy server connection data. The image shows fields for IP address (Host), port (Port), username (Proxy Username), and password (Proxy Password).
Part 3. Proxy Configuration: Two Methods
In Undetectable, there are two ways to add a proxy: "on the fly" when creating a profile or through a general manager. We recommend Method 1 (via the Manager) — this is a professional approach that keeps your proxy database organized.
Method 1: Via Proxy Manager (Recommended)
Go to the Proxy section in the left menu.
 Fig. 2. The left menu interface of the Undetectable anti-detect browser with the "Proxy" section highlighted for managing proxy connections.
Click the New Proxy button. An addition window will open.
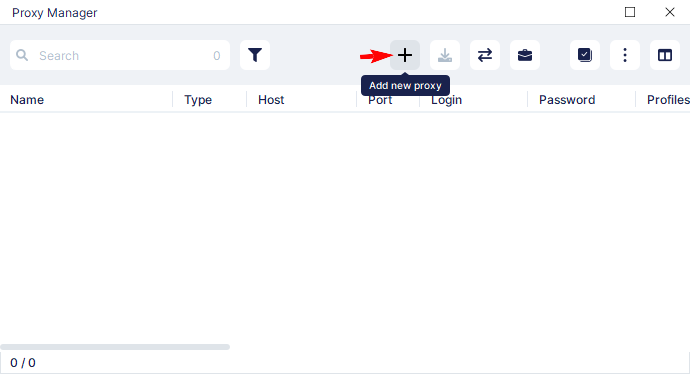 Fig. 3. Interface for adding a new proxy in the Undetectable anti-detect browser.
Fill in the data in the opened window:
- Proxy Name: Give it a descriptive name (e.g.,
CyberYozh Proxy). - Type: Select SOCKS5. This is the most reliable protocol, supporting UDP (important for WebRTC and speed).
- Host / Port / Login / Password: Enter the data from the provider's dashboard.
- IP Change Link: If you have a mobile proxy, paste the IP change link here.
- Click Check Proxy. If the status is green — click Save.
 Fig. 4. Configuration form with fields for entering main proxy server parameters: proxy name, protocol type (SOCKS5/HTTPS), IP address, port, and authentication credentials (login/password). At the bottom of the interface is a button for checking and confirming connection settings.
Method 2: Configuration Inside the Profile
Now let's create a profile and link our proxy to it.
Click New Profile in the main menu.
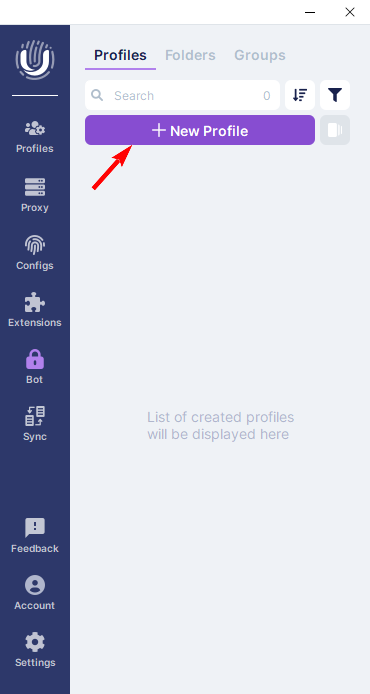 Fig. 5. The Undetectable anti-detect browser interface, displaying the "New Profile" button for creating a new profile.
Fingerprint Setup (Important): In the opened window, configure the browser profile parameters:
- Profile Name: Name of the profile.
- OS & Browser: Select the operating system and engine. Tip: Choose an OS that matches your real one (Windows to Windows).
- Screen: Screen resolution.
It is best to leave the User Agent, CPU, and RAM tabs on automatic.
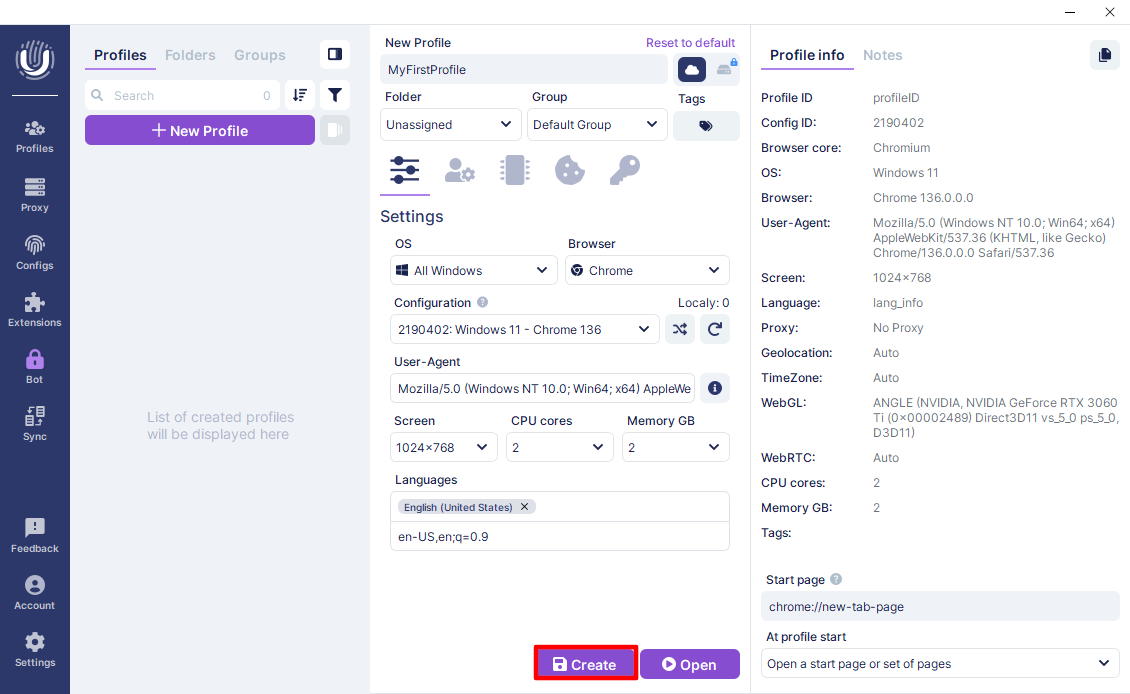 Fig. 6. Interface for configuring a new profile in the Undetectable anti-detect browser.
Connecting the Proxy: Go to the Proxy tab in the same window. Here you have two paths:
Path A (Select existing): From the Select proxy dropdown list, choose the proxy we created in the Manager (Method 1). This is fast and convenient.
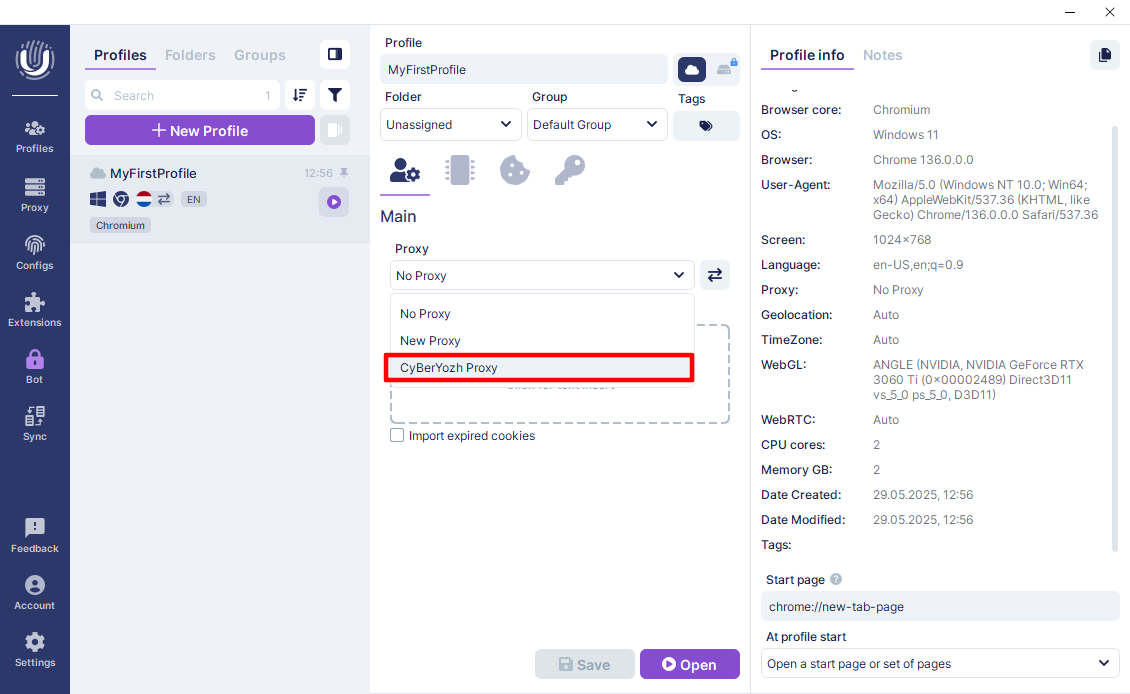 Fig. 7. Interface for selecting a proxy server in the Undetectable anti-detect browser.
Path B (Manual entry): Select New Proxy, protocol SOCKS5, and enter the data manually in the
ip:port:login:passformat.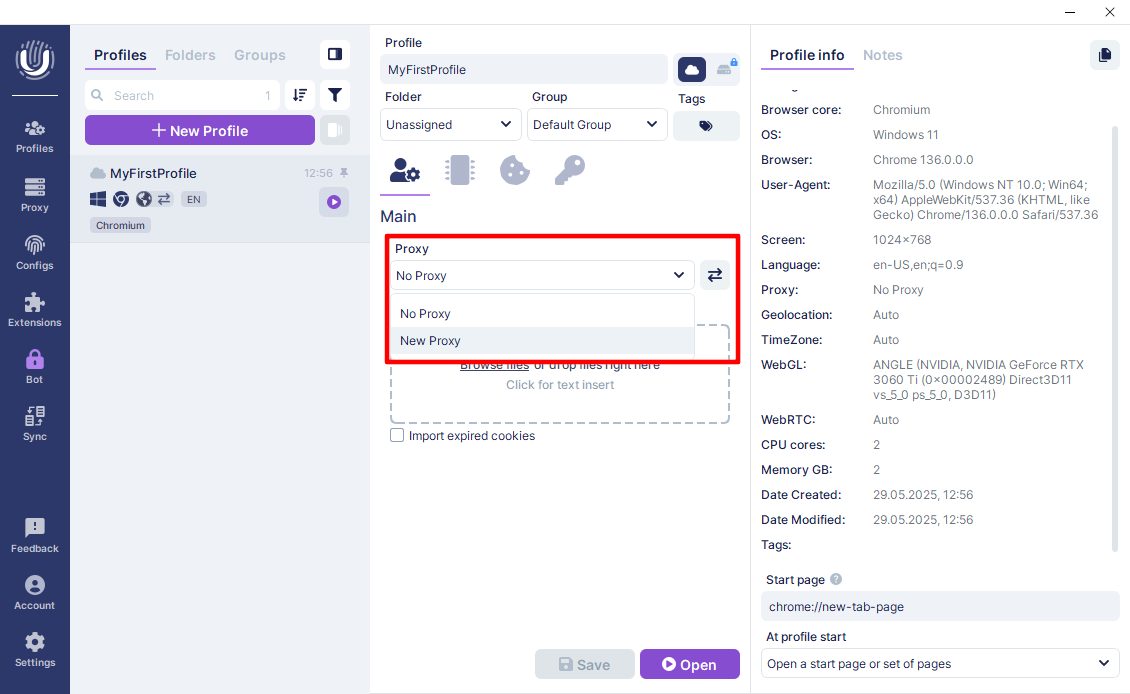 Fig. 8. Proxy settings interface in the Undetectable anti-detect browser.
Verification: Click the check button (radar icon/Check). Ensure the proxy is active, shows the correct GEO, and a green status.
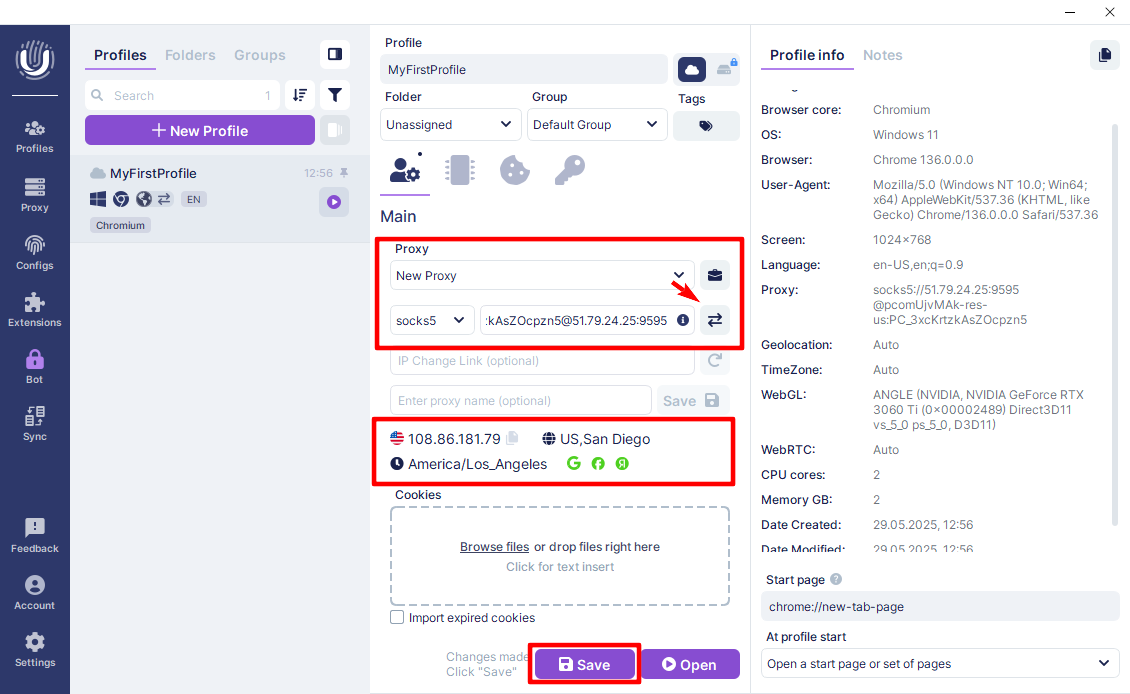 Fig. 9. Demonstrates the proxy connection setup interface in the Undetectable anti-detect browser. The image shows the configuration panel with fields for entering proxy server parameters, including connection type (SOCKS5/HTTPS), IP address, port, login, and password. At the bottom of the interface is a button for checking the connection and saving settings.
Click Create to finish creating the profile.
Part 4. Launch and Final Check
Your profile is ready. Go to the Profiles section and click the Start button.
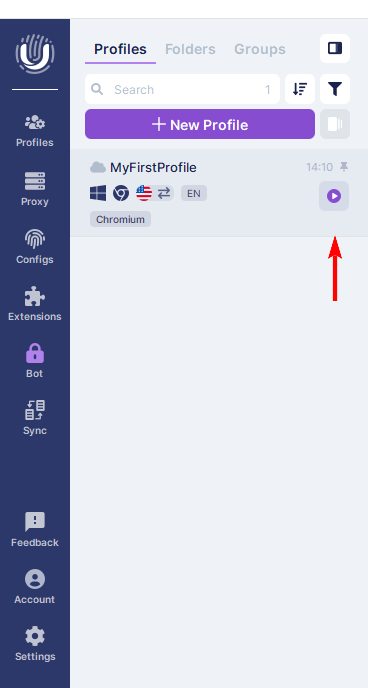 Fig. 10. The Undetectable anti-detect browser interface showing the profile list and control elements for launching them. This interface allows the user to manage created profiles and launch them using the specified configuration, including configured proxy connections.
A browser window will open. Before starting work, be sure to check your anonymity. Go to browserleaks.com/ip or whoer.net.
Security Checklist:
- IP Address: Must match the one purchased.
- DNS: Must not "leak" (showing your real provider's country).
- WebRTC: Must not reveal your local IP. Undetectable masks it automatically, but verification is mandatory.
 Fig. 11. Demonstrates the results of an IP address and network parameters check, allowing visual confirmation of correct proxy connection setup and digital fingerprint masking.
If all indicators are normal — your privacy and network settings have been successfully applied.
Conclusion
Undetectable Browser is an excellent choice for those who value data privacy.
- For social networks, use Mobile proxies.
- For finances and stores, use Residential static proxies.
You can always find high-quality proxies with a clean history for any task in the CyberYozh App catalog. Good luck with your work!
