
Detect Expert (formerly Vektor T13) is an advanced tool for creating virtual machines with unique hardware fingerprints, designed specifically for professional work with various online services. This software is a comprehensive solution for anti-detect technologies, allowing users to effectively manage multiple virtual environments, ensuring stable operation and seamless process management.
In this guide, we will look at working with the Vektor T13 anti-detect browser – from purchasing the necessary components (proxies and software) to configuration and testing. The instructions cover installation, security setup, and performance verification. Examples are shown in the English interface, but you can use any language version, as all functions are identical.
Choosing a Proxy: Quality Fuel for Your Machine
Vektor T13 gives you the perfect "body" (virtual PC). A proxy gives you a "place of residence" (IP address). An error in choosing the proxy type will destroy the entire legend.
1. Mobile Proxies (4G/5G)
- What for: Managing multiple social media profiles for marketing agencies and secure registrations.
- The Essence: You get the IP of a real cellular operator. Thanks to CGNAT technology, this IP provides high reliability, connection stability, and collective anonymity.
- In tandem with Vektor T13: The ideal solution. The virtual machine looks like a home PC sharing internet from a phone (Tethering). This setup provides a highly stable and authentic connection profile.
- 👉 You can read more about mobile proxies here
2. Residential Rotating Proxies (ISP)
- What for: Working with Amazon, eBay, PayPal, Stripe, crypto exchanges.
- The Essence: IP addresses of home internet service providers.
- In tandem with Vektor T13: Use static (Sticky) sessions and choose their duration. Configure credentials in your CyberYozh App personal account. The virtual machine looks like a regular computer connected to a home router. Optimal network stability for e-commerce management.
3. Datacenter Proxies
- What for: Only for technical tasks, parsing, or tests.
- Verdict: We do not recommend using them with Vektor T13 for serious tasks. There is no point in spending resources to create the perfect virtual machine only to face privacy compromise or connection drops on a datacenter IP.
Obtaining Connection Data in CyberYozh App
On the CyberYozh App website, choose the proxy type that suits you, considering the following parameters:
• Proxy type: mobile or residential
• IP type: static or dynamic
• Geolocation: select a country or region
• Provider: ensure it meets your requirements
 Fig. 1. Screenshot of the CyberYozh platform interface, demonstrating the location of proxy server connection data. The image shows fields for IP address (Host), port (Port), username (Proxy Username), and password (Proxy Password).
After purchasing a proxy, you will receive the connection information:
- Host: Proxy IP address
- Port: Proxy port
- Proxy Username: Login
- Proxy Password: Password
Proxy example:
- Host: 172.98.60.180
- Port: 58763
- Login: 7XbvvWautzmOZMA
- Password: xdtAof3xB7RSmUr
Preparation
What is needed for work: - PC or laptop with Windows 10 - Antidetect VektorT13 program - License - Official Windows OS 10/11 image for creating the virtual machine
Activation
Activate the license. To do this, click: File, Settings, License.
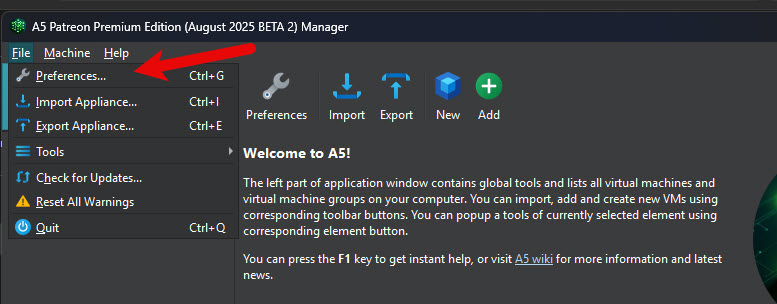 Fig. 2. License settings interface in the Detect Expert (Vektor T13) program. The image shows a dialog box for entering the Machine ID and activation key required for software registration.
Copy the Machine ID
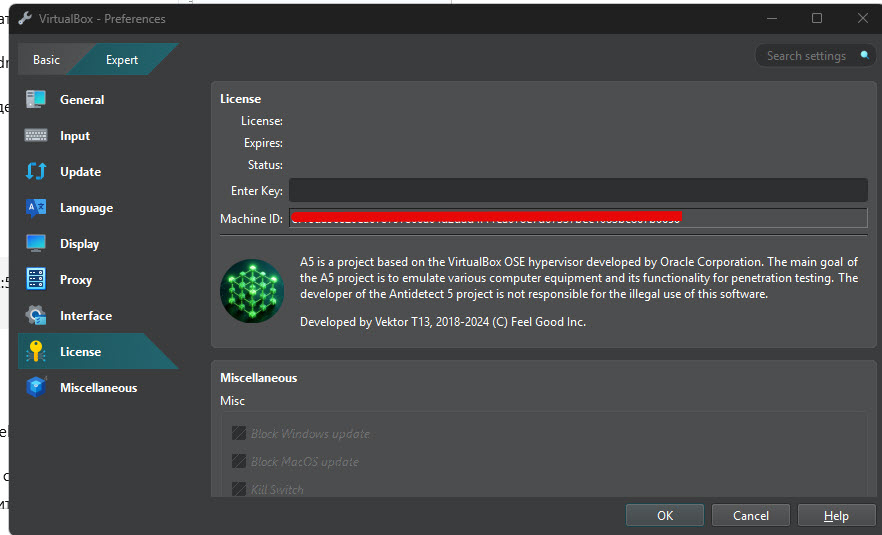 Fig. 3. Machine ID entry interface in the Detect Expert (Vektor T13) program. The image shows a dialog box with a field for entering the Machine ID, which is needed to obtain an activation key from the official website. A button to copy the identifier is located on the left side of the window.
Go to the Detect.Expert website and log into your account. In the virtual machine registration menu, specify your Machine ID.
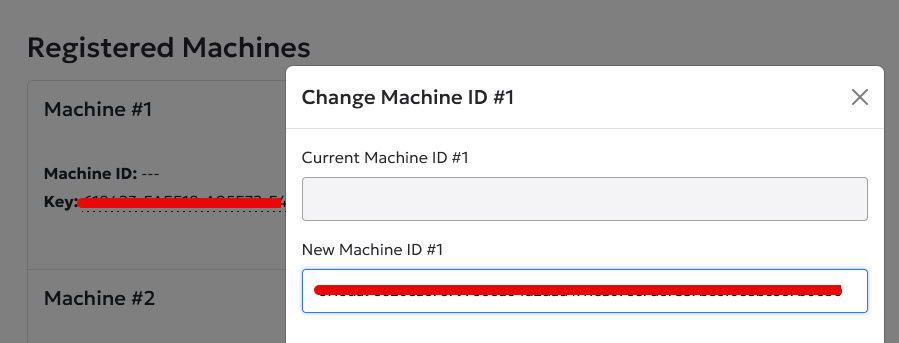 Fig. 4. License activation interface on the Detect.Expert website. The image shows a user account dialog box with a field for entering the Machine ID and a button to receive the activation key.
You will receive an activation key. Copy it.
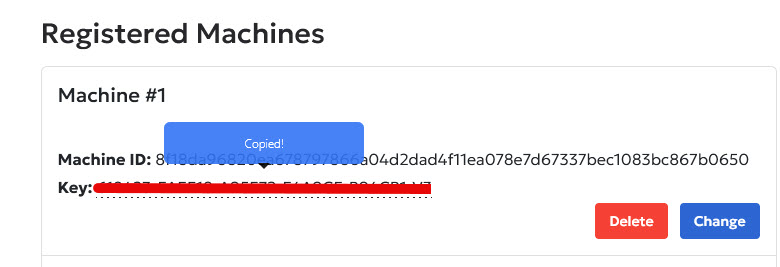 Fig. 5. License activation interface on the Detect.Expert website. The image shows a user account dialog box with the field for receiving the activation key.
Return to the Antidetect program in the license settings menu and paste your copied license key into the top field.
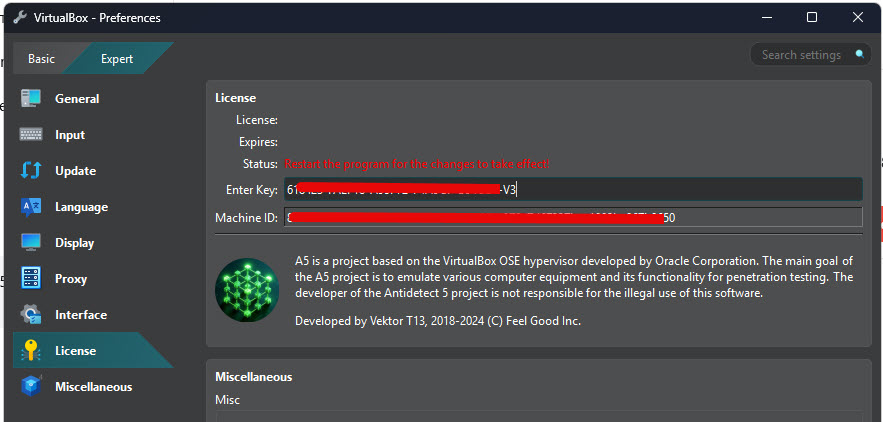 Fig. 6. License key entry screen in the Detect Expert (Vektor T13) program. The image demonstrates the field for pasting the activation key obtained from the official website.
Restart the program for the changes to take effect. After restarting, you should see a message about successful license activation similar to this.
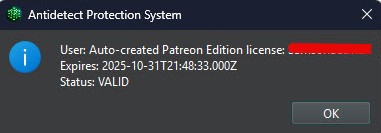 Fig. 7. Successful license activation message in the Detect Expert (Vektor T13) program. The image shows confirmation of successful software registration with information about the license expiration date.
Program Configuration
Antidetect Vektor T13 fundamentally differs from standard browser-based anti-detects. All browser anti-detects are built on the Chromium engine. Vektor T13, however, is built on virtual machines.
This means you can create an unlimited number of virtual machines and choose unique hardware fingerprints for each (processor, motherboard, RAM, video card, and much more).
Thus, you can create as many different virtual machines as you like, each functioning as a completely independent and isolated system environment.
Standard browser anti-detects use a built-in proxifier that doesn't fully support the UDP protocol. This, in turn, can lead to real IP and DNS leaks. In contrast, Vektor T13 has a built-in VPN client that works fully with UDP. You can also install a third-party VPN client (like OpenVPN Connect) or a proxifier with UDP support (like NekoRay or V2RayN). Consequently, with our anti-detect and proper configuration, you won't have any issues with IP leaks.
But the main advantage is that browser anti-detects are forced to spoof fingerprints via software, which is easily detected by external monitoring systems. In our anti-detect, hardware-level configuration ensures maximum data protection and strict privacy control.
Stage 1. Basic Settings
To create a virtual machine, you need to download a system ISO image from the official website.
Next, click New to create a machine.
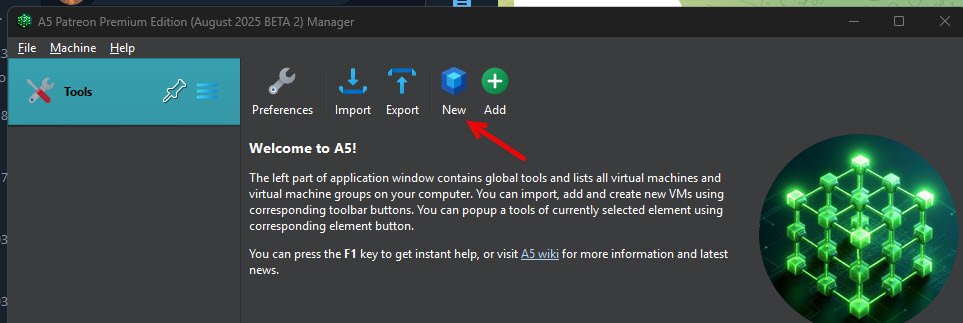 Fig. 8. Interface for creating a new virtual machine in the Detect Expert (Vektor T13) program. The image shows the "New" button to start the virtual machine creation process.
Be sure to specify the machine name, the path to the ISO image downloaded earlier, and the Windows version.
You should only check Skip Unattended Installation if manual Windows installation is strictly necessary. For all other cases, we recommend leaving it unchecked, as this allows for the automatic addition of the Guest Additions disk, which is required for many Vektor T13 features.
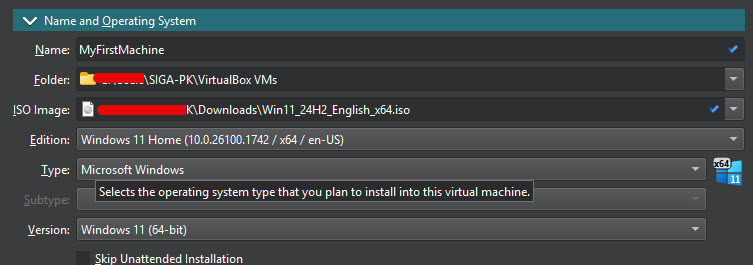 Fig. 9. Interface for creating a new virtual machine in the Detect Expert (Vektor T13) program. The image shows the machine name and the path to the ISO image.
In the unattended install section, you can optionally set a login and password for the system administrator, but this is optional; you can skip this step. The Guest Additions checkbox must remain checked.
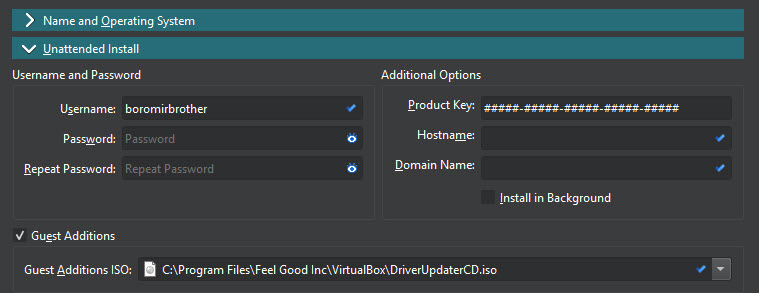 Fig. 10. Interface for creating a new virtual machine in the Detect Expert (Vektor T13) program. The image shows the optional ability to set a login and password for the system administrator.
In the Hardware section, set the amount of RAM and the number of processor cores to be allocated to the virtual machine. It all depends on the power of your personal computer, but the minimum recommended requirements for smooth virtual system operation are 8 gigabytes of RAM and 2 processor cores.
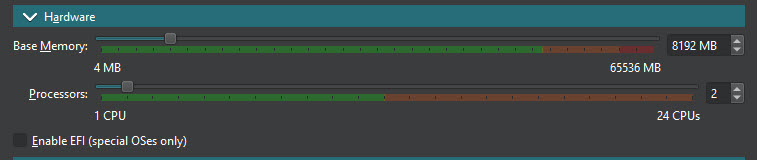 Fig. 11. Configuring virtual machine hardware parameters. The image demonstrates the interface for selecting the amount of RAM and processor cores for the virtual machine.
Attention! If you are using a standard Windows 10 or Windows 11 operating system, the "Enable EFI (special OSes only)" checkbox must be UNCHECKED, as it is intended only for special operating systems like macOS.
In the Hard Disk section, we set the path for the virtual disk and the amount of storage space allocated to the virtual system. Attention! If the path to the virtual disk or the virtual disk itself is corrupted, the virtual system will not start.
Allocate enough space for the Windows system itself and the programs that will be installed on it. We recommend setting at least 50 gigabytes, as Windows alone takes up about 40. If you are willing to give all the free space on your hard drive to the virtual system, you can check Pre-Allocate Full Size.
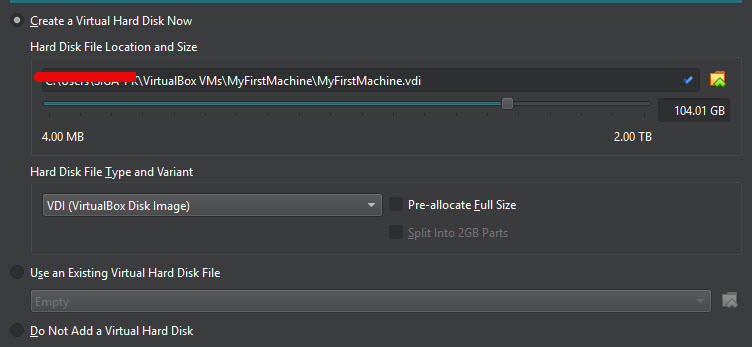 Fig. 12. Virtual hard disk setup. The image shows parameters for choosing the storage path and size of the virtual disk for the new virtual machine.
In the Presets menu, you must select a preset for the virtual system. A preset is a set of tools and fingerprints specifically tuned for a particular service. The choice depends on which services you are working with. For example, you can choose a preset for working with Amazon, Google, eBay, PayPal, LinkedIn, Marketplace, email services, and many others.
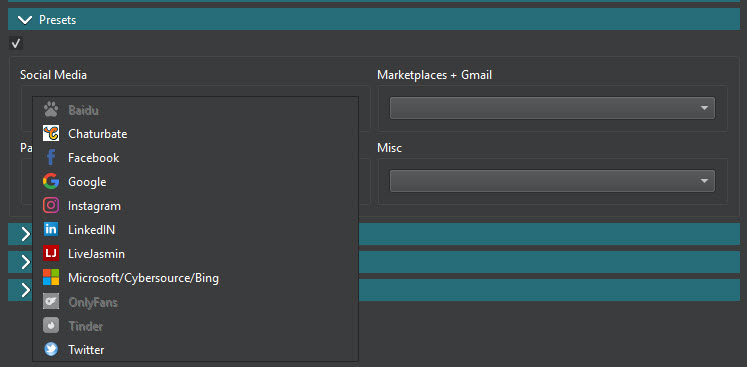 Fig. 13. Selecting a preset for the virtual machine. The image demonstrates the menu for choosing pre-configured settings for working with various services.
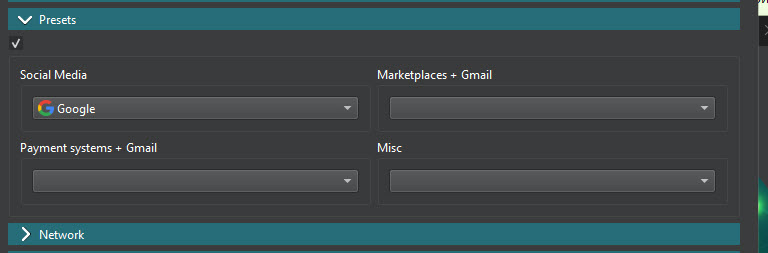 Fig. 14. Advanced preset settings. The image shows additional parameters for fine-tuning the virtual machine preset.
Stage 2. Network Settings
The Network menu is divided into several parts.
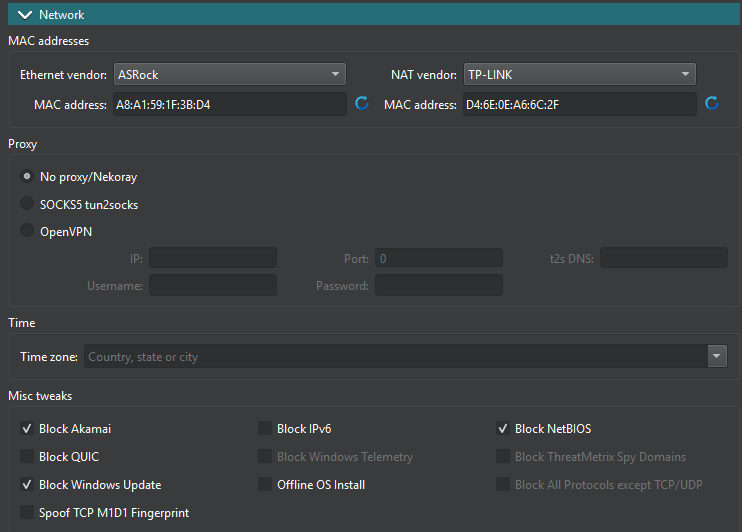 Fig. 15. Configuring virtual machine network parameters. The image demonstrates the configuration menu for MAC addresses, proxies, and other network settings.
1) Mac addresses. You can choose a network equipment manufacturer and a MAC address. This is optional; you can leave these values as default.
2) Proxy. This is the main part for us. Setting up a proxy or VPN. You can choose one of three options. I have described each point in more detail in the "Virtual Machine Launch Examples" section.
No proxy/NekoRay. By choosing this, you create a virtual machine without pre-installed proxies or VPNs. After installing the system, you can install any proxifier, such as NekoRay or an OpenVPN client, and connect to a proxy or VPN through it.
SOCKS5 tun2socks. In this case, you will need to enter proxy data: IP, port, login, password.
When the system starts, the tun2socks proxifier will automatically be used to connect to the proxy in the background. This method is convenient when you need to quickly create a virtual machine with pre-installed proxies. It also allows you to be connected to the proxy even before Windows starts, which is necessary for some tasks.
- OpenVPN. This is the simplest, most convenient, and most reliable method, as you just need to specify the path to the OpenVPN config, along with the username and password.
Attention! This method is only suitable for proxies provided with an OpenVPN configuration. Not all proxies support OpenVPN configuration. Pay attention to this when purchasing. Regardless of the option chosen, you can change the connection method, proxy, or VPN config at any time after the system is installed.
3) Timezone. You must set a timezone that matches your proxy's geolocation.
4) Misc tweaks. Here you can specify which options should be blocked depending on your environment's security requirements. If you're not sure about a specific checkbox, we recommend contacting Vektor T13 technical support.
Attention! If your proxies do not support the UDP protocol, you must check the "Block QUIC" box.
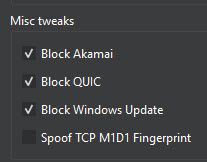 Fig. 16. Setting additional network parameters. The image shows options for configuring the blocking of certain protocols and services.
Stage 3. AntiOS and Fingerprints
AntiOS is software built into the VektorT13 anti-detect that enhances your digital security by allowing you to completely isolate work environments. The options you select in this menu will be automatically applied when the system boots.
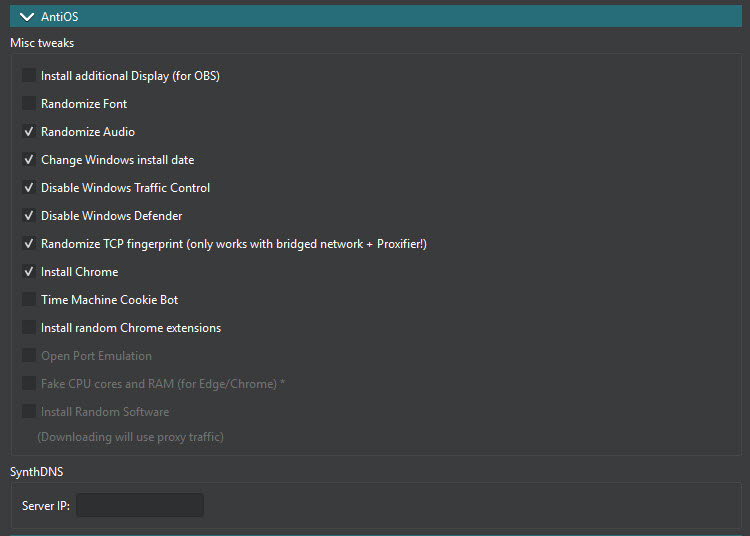 Fig. 17. Setting up AntiOS and fingerprints. The image demonstrates the interface for configuring special parameters to increase virtual machine anonymity.
In the Canvas menu, you can change the graphics card model and the method of fingerprint spoofing. This allows you to spoof the Canvas fingerprint at the hardware level (rather than at the software level, as is done in browser anti-detects). Managing the Canvas fingerprint is critical for maintaining strict privacy control.
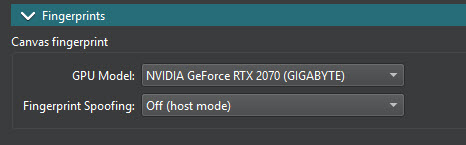 Fig. 18. Configuring the Canvas fingerprint. The image shows parameters for spoofing the graphical fingerprint at the hardware level.
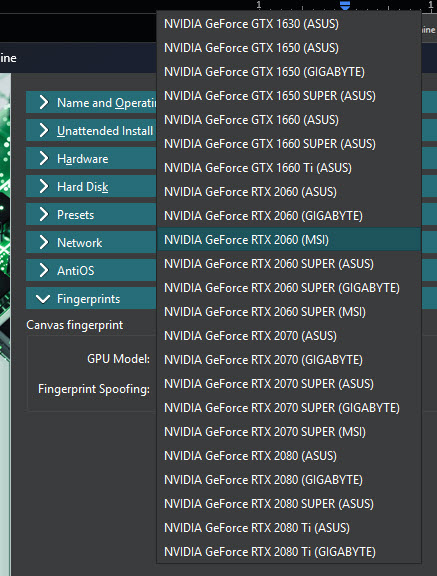 Fig. 19. Configuring the Canvas fingerprint. The image shows parameters for selecting a specific video card.
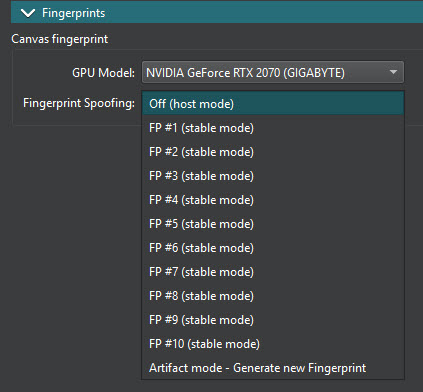 Fig. 20. Additional fingerprint settings. The image demonstrates advanced parameters for configuring unique hardware fingerprints.
First Launch of the Virtual Machine
Once setup is complete, click Finish. The list of virtual machines will be displayed in the left menu of the Antidetect main window. In this case, we have only one virtual machine so far.
 Fig. 21. List of created virtual machines. The image shows the main program window interface with a list of available virtual machines and control buttons.
Click the "Start" button.
During the first launch of the virtual machine, the Windows installer will start, just like on any normal computer. Follow the step-by-step instructions and wait for the installation to complete. After that, the program will automatically launch Windows.
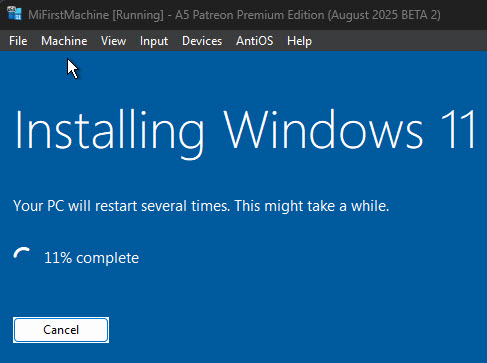 Fig. 22. Windows installation process on the virtual machine. The image demonstrates the standard Windows installer during the operating system setup.
Examples of Launching a Virtual Machine and Connecting to Proxy / VPN
If "No proxy/NekoRay" was selected:
 Fig. 23. Configuring connection without a proxy. The image shows parameters for configuring a virtual machine without pre-installed proxies.
If you choose this option, you don't need to enter any proxy data during the initial virtual system setup. You will need to use an additional proxifier like Proxifier or NekoRay to save and then connect to the proxy there.
Attention! Remember that you need to start the proxifier and activate the proxy every time you restart.
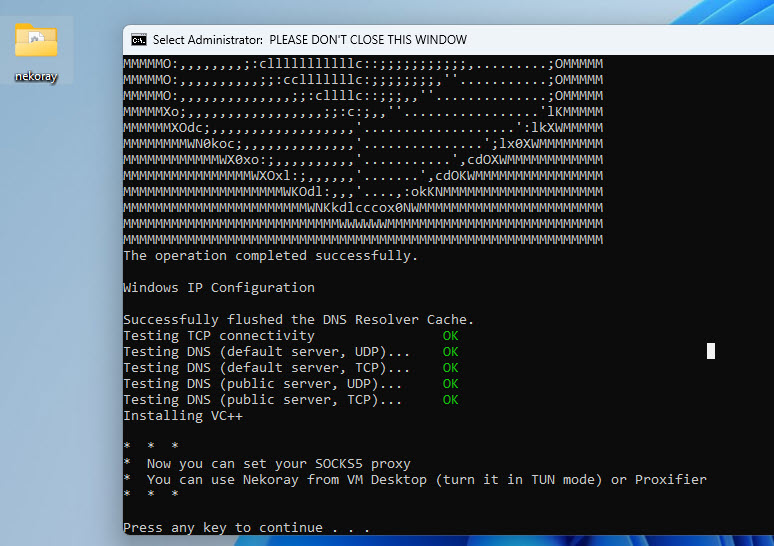 Fig. 24. The image shows a screen with a successful operation message and DNS testing.
Open the nekoray folder. Launch the Nekobox.exe file.
Add the proxy, click Start, System Proxy, and Tun Mode. After this, you can check on checkers to confirm that the virtual machine's IP has changed.
 Fig. 25. NekoRay proxifier interface within the Detect Expert (Vektor T13) virtual machine environment. The image shows the control panel with System Proxy and Tun Mode modules activated, demonstrating a successful proxy connection.
If SOCKS5 tun2socks was selected:
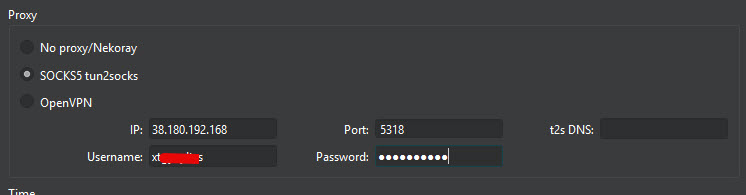 Fig. 26. Interface for SOCKS5 tun2socks proxy connection configuration in Detect Expert (Vektor T13). The image shows the connection parameter entry panel, including fields for IP address, port, username, and password.
In this case, you will need to enter the IP address, port number, login, and password for the Proxy. The program will save this data, and after the virtual system starts, the proxy with this data will be automatically connected via the Tun2Socks application.
This is quite convenient, as the proxy will connect automatically every time the system starts. This means you won't forget to turn it on.
When Windows starts, a black console window with the Tun2Socks program will open automatically. As soon as you see the IP address, you can open a browser with any checker and see that your IP has changed to the proxy IP.
Attention! You must not close the console window, otherwise Tun2Socks will close and websites will see your real IP address. You can minimize the window.
If you need to change the proxy in the future, go to the Tun2Socks folder on the virtual system desktop. Find the start.bat file there, open it in a text editor, and replace the proxy data with the new ones. Save the file and restart the system.
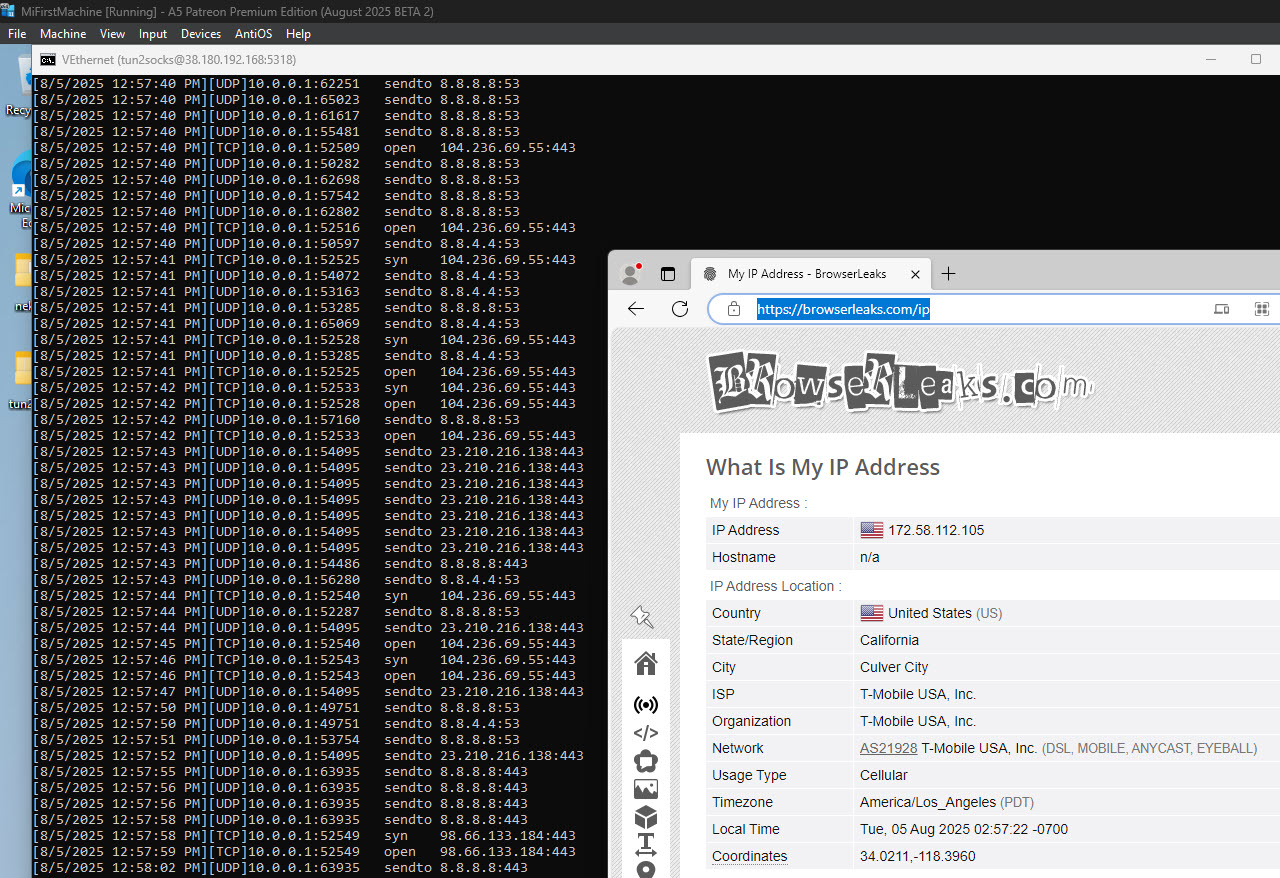 Fig. 27. NekoRay proxifier interface within the Detect Expert (Vektor T13) virtual machine environment. The image shows the control panel with System Proxy and Tun Mode modules activated, demonstrating a successful proxy connection.
If OpenVPN was selected:
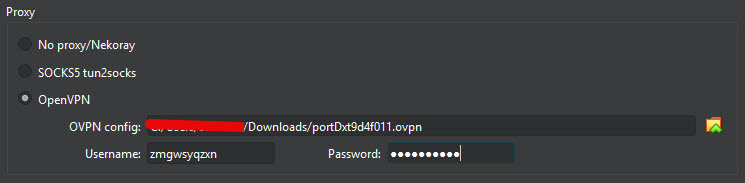 Fig. 28. OpenVPN proxy connection configuration interface in Detect Expert (Vektor T13). The image shows the virtual private connection setup dialog panel, demonstrating a structured interface for loading and configuring OpenVPN profiles. The panel contains fields for specifying the path to the configuration file (.ovpn) as well as additional authentication parameters.
In the virtual machine, open the system menu (Tray). Right-click on the OpenVPN GUI icon, and you will see that your OpenVPN profile, which you added earlier during the initial virtual machine setup, is already there. Click "Connect". Enter the login and password for the config (if the program requests them).
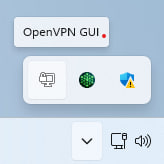 Fig. 29. OpenVPN GUI system tray menu interface in the Detect Expert (Vektor T13) virtual environment. The image shows the context menu called by right-clicking the OpenVPN icon in the system tray.
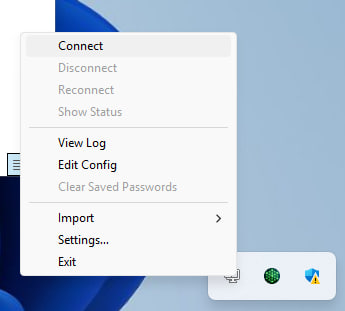 Fig. 30. OpenVPN connection interface in Detect Expert (Vektor T13) software, demonstrating the successful establishment of a secure VPN connection.
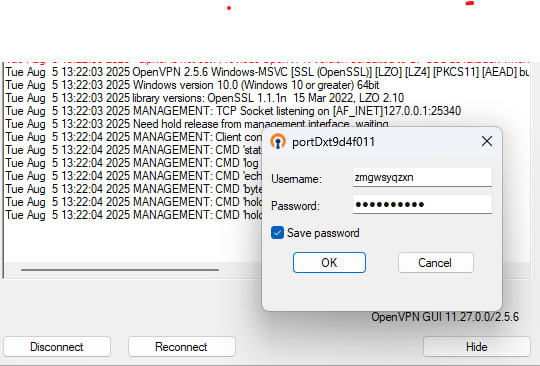 Fig. 31. Dialog interface of the network connection security management system in the Detect Expert (Vektor T13) software suite. The image shows an information and configuration module displaying the parameters of the current VPN connection with secure tunnel status indicators.
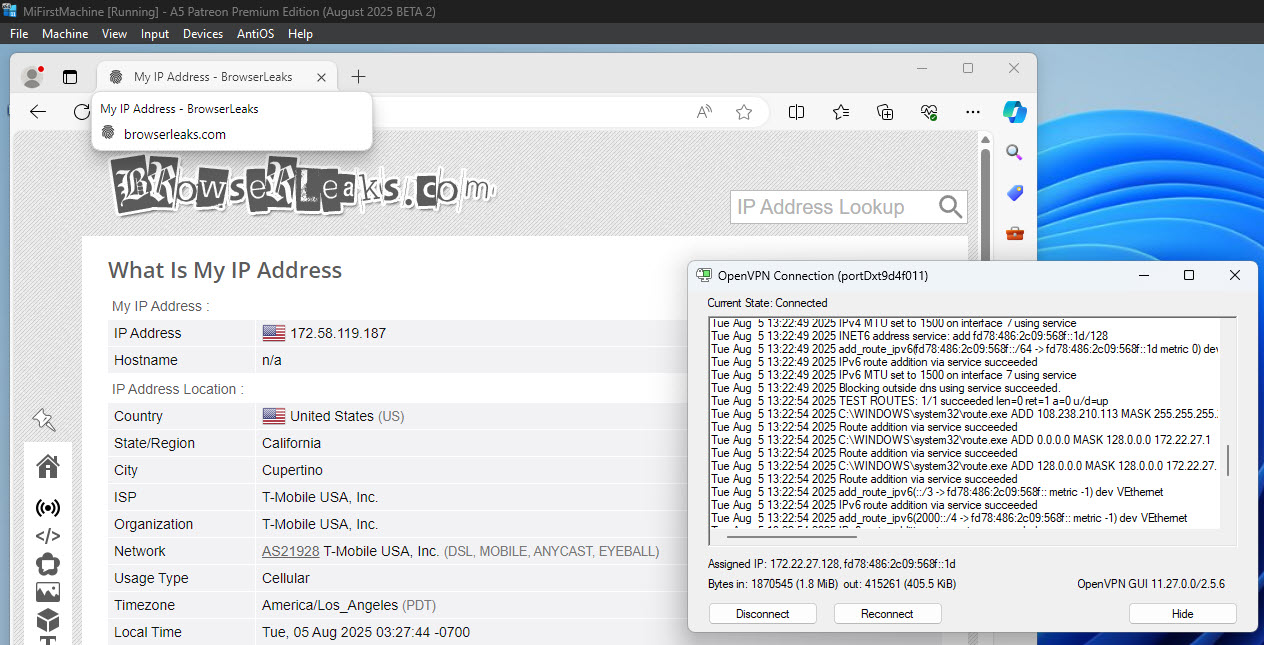 Fig. 32. Visualization of the OpenVPN connection interface in the Detect Expert (Vektor T13) software suite. The image shows a graphical user interface demonstrating the process of establishing a secure virtual private connection.
If necessary, you can add a new profile or delete an old one.
Congratulations! You have successfully configured a proxy in the Detect Expert (Vektor T13) anti-detect browser. Now your virtual machine is securely set up and has a unique network fingerprint, ensuring protected interaction with various online services. This configuration guarantees that your real network infrastructure remains completely isolated from the virtual environment, providing full data privacy and preventing external tracking.
To further enhance protection, we recommend using anonymous number rental for SMS reception and activation — this will provide additional confidentiality and protection against data leaks.
