
Safari — is the "native" macOS browser, known for its speed and energy efficiency. However, when it comes to changing your IP address, Safari isn't as simple as it seems.
The main feature of Safari: it does not have its own proxy settings. It completely follows the macOS system network settings.
- What this means: When you configure a proxy for Safari, you automatically reroute traffic for the entire system (including Mail, App Store, updates, and other browsers).
In this guide, we will break down which proxy type to choose for your tasks and how to properly configure it in macOS.
Part 1. Strategy: Which Proxy Do You Need for Mac?
The choice of proxy depends on why you want to change your IP.
1. Datacenter Proxies — For Speed and Content
- What they are: IP addresses from data centers.
- Purpose: Increasing online privacy and securely connecting to online services and media platforms.
- Pro: They are the cheapest and fastest. An excellent choice if you need to route traffic through a specific region for network testing.
2. Residential Proxies (ISP) — For Shopping and Work
- What they are: IP addresses of real internet service providers (Verizon, AT&T, etc.).
- Purpose: Secure access to global e-commerce platforms, market research, price comparison, and purchasing.
- Why: Provides high reliability and a stable connection when working with foreign services and platforms.
3. Mobile Proxies (4G/5G) — For SMM
- What they are: IPs from mobile carriers.
- Purpose: Securely managing corporate social media accounts and testing ad campaigns in different regions.
- Why: High level of security and stability when working with social platforms.
- 👉 You can read more about mobile proxies here
Part 2. Data Preparation
To configure the settings, we will need data from a reliable provider. We recommend CyberYozh App.
After purchase, you will receive:
- IP (Host):
172.98.60.180 - Port:
58763 - Login / Password: Authorization credentials.
Important: macOS perfectly supports both HTTP/HTTPS and SOCKS5.
- For web surfing, choose Web Proxy (HTTP) and Secure Web Proxy (HTTPS).
- For versatility, choose SOCKS Proxy.
 Fig. 1. Screenshot of the CyberYozh App platform interface, showing the location of the data for connecting to the proxy server. The image displays fields for IP address (Host), port (Port), username (Proxy Username), and password (Proxy Password).
Part 3. Step-by-Step Setup in macOS
Remember: we are changing settings for the entire operating system.
Step 1. Navigating to Network Settings
Open Safari. In the top menu bar, click Safari -> Settings...
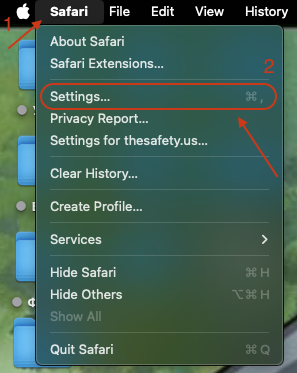 Fig. 2. Safari browser interface on macOS with the marked location of the application's main menu, required to access proxy server settings.
Go to the Advanced tab.
- Next to "Proxies", click the Change Settings... button.
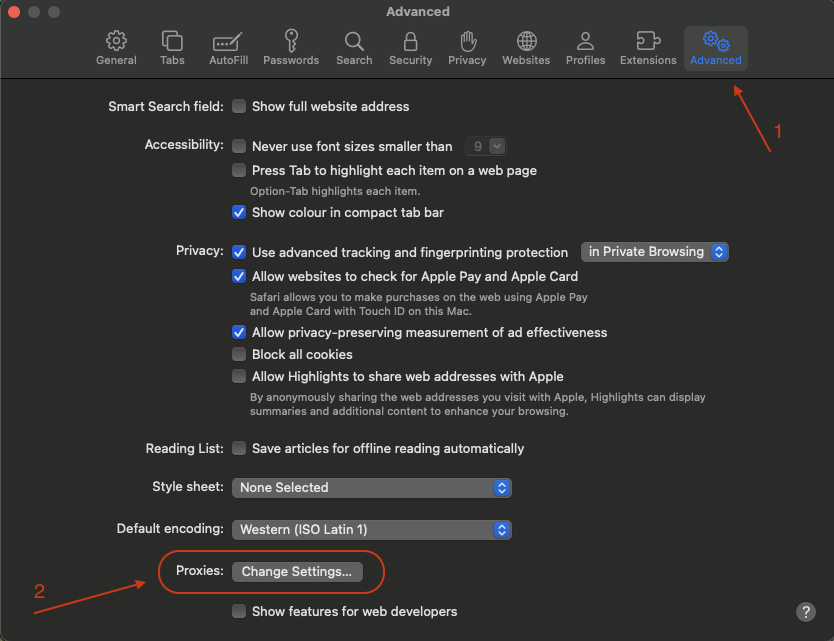 Fig. 3. Safari settings window with the "Advanced" tab open, showing the location of the "Change Settings" button in the proxy server configuration section.
Alternative path: You can also go to System Settings -> Network -> Select active connection (Wi-Fi or Ethernet) -> Details... -> Proxies tab.
Step 2. Selecting Protocol and Entering Data
The system proxy settings window will open. You will see a list of protocols on the left.
- Select the protocol:
- If you have an HTTP proxy: Check the boxes for Web Proxy (HTTP) and Secure Web Proxy (HTTPS).
- If you have a SOCKS proxy: Check the box for SOCKS Proxy.
- Tip: Do not turn everything on at once. Select only what you purchased.
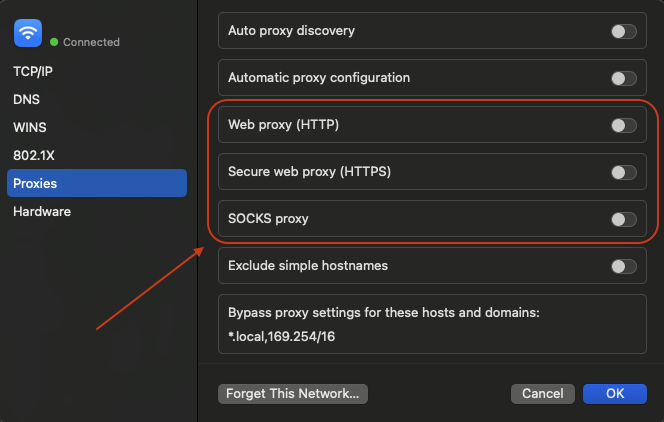 Fig. 4. macOS system settings dialog box, "Network" section, demonstrating the proxy server configuration panel with a menu for selecting the protocol type (HTTP, HTTPS, SOCKS).
Enter the data:
- Server: Enter the IP address (e.g.,
172.98.60.180). - Port: Enter the port (e.g.,
58763). 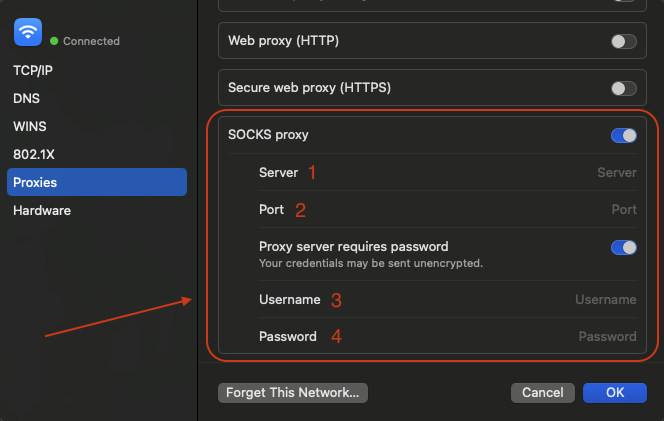 Fig. 5. Proxy server setup window with fields for entering the IP address and port.
Authorization (Important): If your proxy is private (with a login and password), check the box "Proxy server requires password".
- Enter the Username and Password.
Step 3. Saving
- Click OK.
- In the network settings window, click Apply for the changes to take effect.
Part 4. Connection Check
Now your Mac is working through a new IP. Let's verify it. Open Safari and go to whoer.net or browserleaks.com/ip.
What to look for:
- IP Address: Should change to the one you purchased.
- DNS: Should match the proxy's country.
If the data matches, you have successfully set up a secure connection for the entire system.
Conclusion
Safari on macOS doesn't require complex manipulations, but remember that the proxy will work for all programs.
- For working with global platforms, use Residential Proxies.
- For fast and secure web surfing, use Datacenter Proxies.
High-quality and fast proxies, perfectly compatible with macOS, can be found in the CyberYozh App catalog. Work safely!
