
Viber — is not just a chat; it is, first and foremost, about calls. Unlike Telegram or WhatsApp, Viber's architecture is very sensitive to network quality. If your local network has poor VoIP routing or strict firewall rules, connection quality drops to zero, or the app fails to connect altogether.
Many try to enable a VPN, but this "kills" the battery and slows down the entire phone. Viber offers an elegant solution — a built-in proxy client.
This guide will show you how to set up a proxy inside the app so that calls are clear and messages arrive instantly, even in complex networks.
📌 Part 1. What kind of proxy is needed for Viber?
Before moving to the settings, you need to understand the technical side. Viber transmits data in two streams:
TCP (Text and images): Reliable message delivery.
UDP (Calls and video): Fast data stream for voice.
Main beginner mistake: Buying an HTTP proxy. Viber does not support HTTP proxies. It requires protocols capable of working with binary traffic.
Best choice for Viber:
SOCKS5 (Recommended): A universal standard. Fast, supports UDP. Ideal if Viber is simply "glitchy" or partially restricted.
ShadowSocks: A special obfuscation protocol. Choose this protocol if you face serious routing issues or an unstable connection, as it provides a more reliable and secure data transfer method.
🧩 Part 2. What type of proxy to choose for Viber?
Understanding the protocol (SOCKS5) is only the foundation. The walls and roof are the IP address type. Whether your calls "stutter" or your number gets blocked for suspicious activity depends on the IP you choose.
Here is a breakdown of the three main types of proxies as they apply to Viber.
A. Residential Proxies
These are IP addresses from real home internet service providers (like your home Wi-Fi). To Viber, they look completely natural.
Important choice: Static vs. Rotating
For messengers, this is a critical point.
Static (ISP Static): The IP address is assigned to you exclusively and does not change.
Verdict for Viber: IDEAL. You mimic a regular person sitting at home. A stable IP ensures continuous communication during a call.
Use case: Personal accounts, long conversations, business correspondence.
Rotating: The IP changes automatically.
Verdict for Viber: DANGEROUS. Changing the IP during a call will lead to a disconnection ("Reconnecting...").
Use case: Used for automated corporate tasks or high-volume network requests. Not suitable for regular communication.
B. Mobile Proxies (Mobile 4G/5G)
The elite in the proxy world. These are IP addresses from cellular operators. Viber's security systems are most loyal to them because thousands of real people can share a single mobile IP (CGNAT technology).
Protocol | Task in Viber | Why it's cool |
SOCKS5 + Mobile | Ensuring maximum account stability and maintaining a connection with a high level of trust | If your connection drops or you use the app in a region with complex network routing, a mobile proxy will provide the most reliable and stable connection. Highest trust level. |
C. Datacenter Proxies
The most common and cheapest option. These are IP addresses from data centers (Amazon, Hetzner, etc.).
Access type: Dedicated vs. Shared
The rule here is: "Buy cheap, pay twice."
Dedicated (Private / Individual): You are the sole owner of the IP.
Pros: Speed. Datacenter channels are very fast, resulting in low ping (latency) in voice calls. The sound will be clearer than on mobile proxies.
Use case: Improving connection quality and Viber performance in corporate or local networks with strict rules.
Shared: One IP is used by 10-50 people.
Risks: If your IP "neighbor" starts sending spam on Viber, the entire IP will be blacklisted, and your number might suffer as well.
Verdict: Not recommended for personal Viber. Saving $1 isn't worth losing 5 years of chat history.
🏆 Summary: What to buy?
For ideal call quality: Choose Dedicated Datacenter (Private IPv4) or Static Residential (ISP). The main requirements are low ping and stability.
For the highest trust: Choose Mobile proxies.
Protocol: Always strictly SOCKS5.
👉 Important: When purchasing, look for the "UDP Support" label. Without it, Viber will turn into a pager (text only).
🔧 Part 3. Step-by-Step Setup (Android/iOS)
The setting is hidden deep in the menu, but thanks to the screenshots, we will complete this path in a minute.
Step 1. Accessing the hidden menu
Open Viber and tap the "More" button (three dots or lines at the bottom).
Go to the "Settings" section (gear icon).
Select "General".
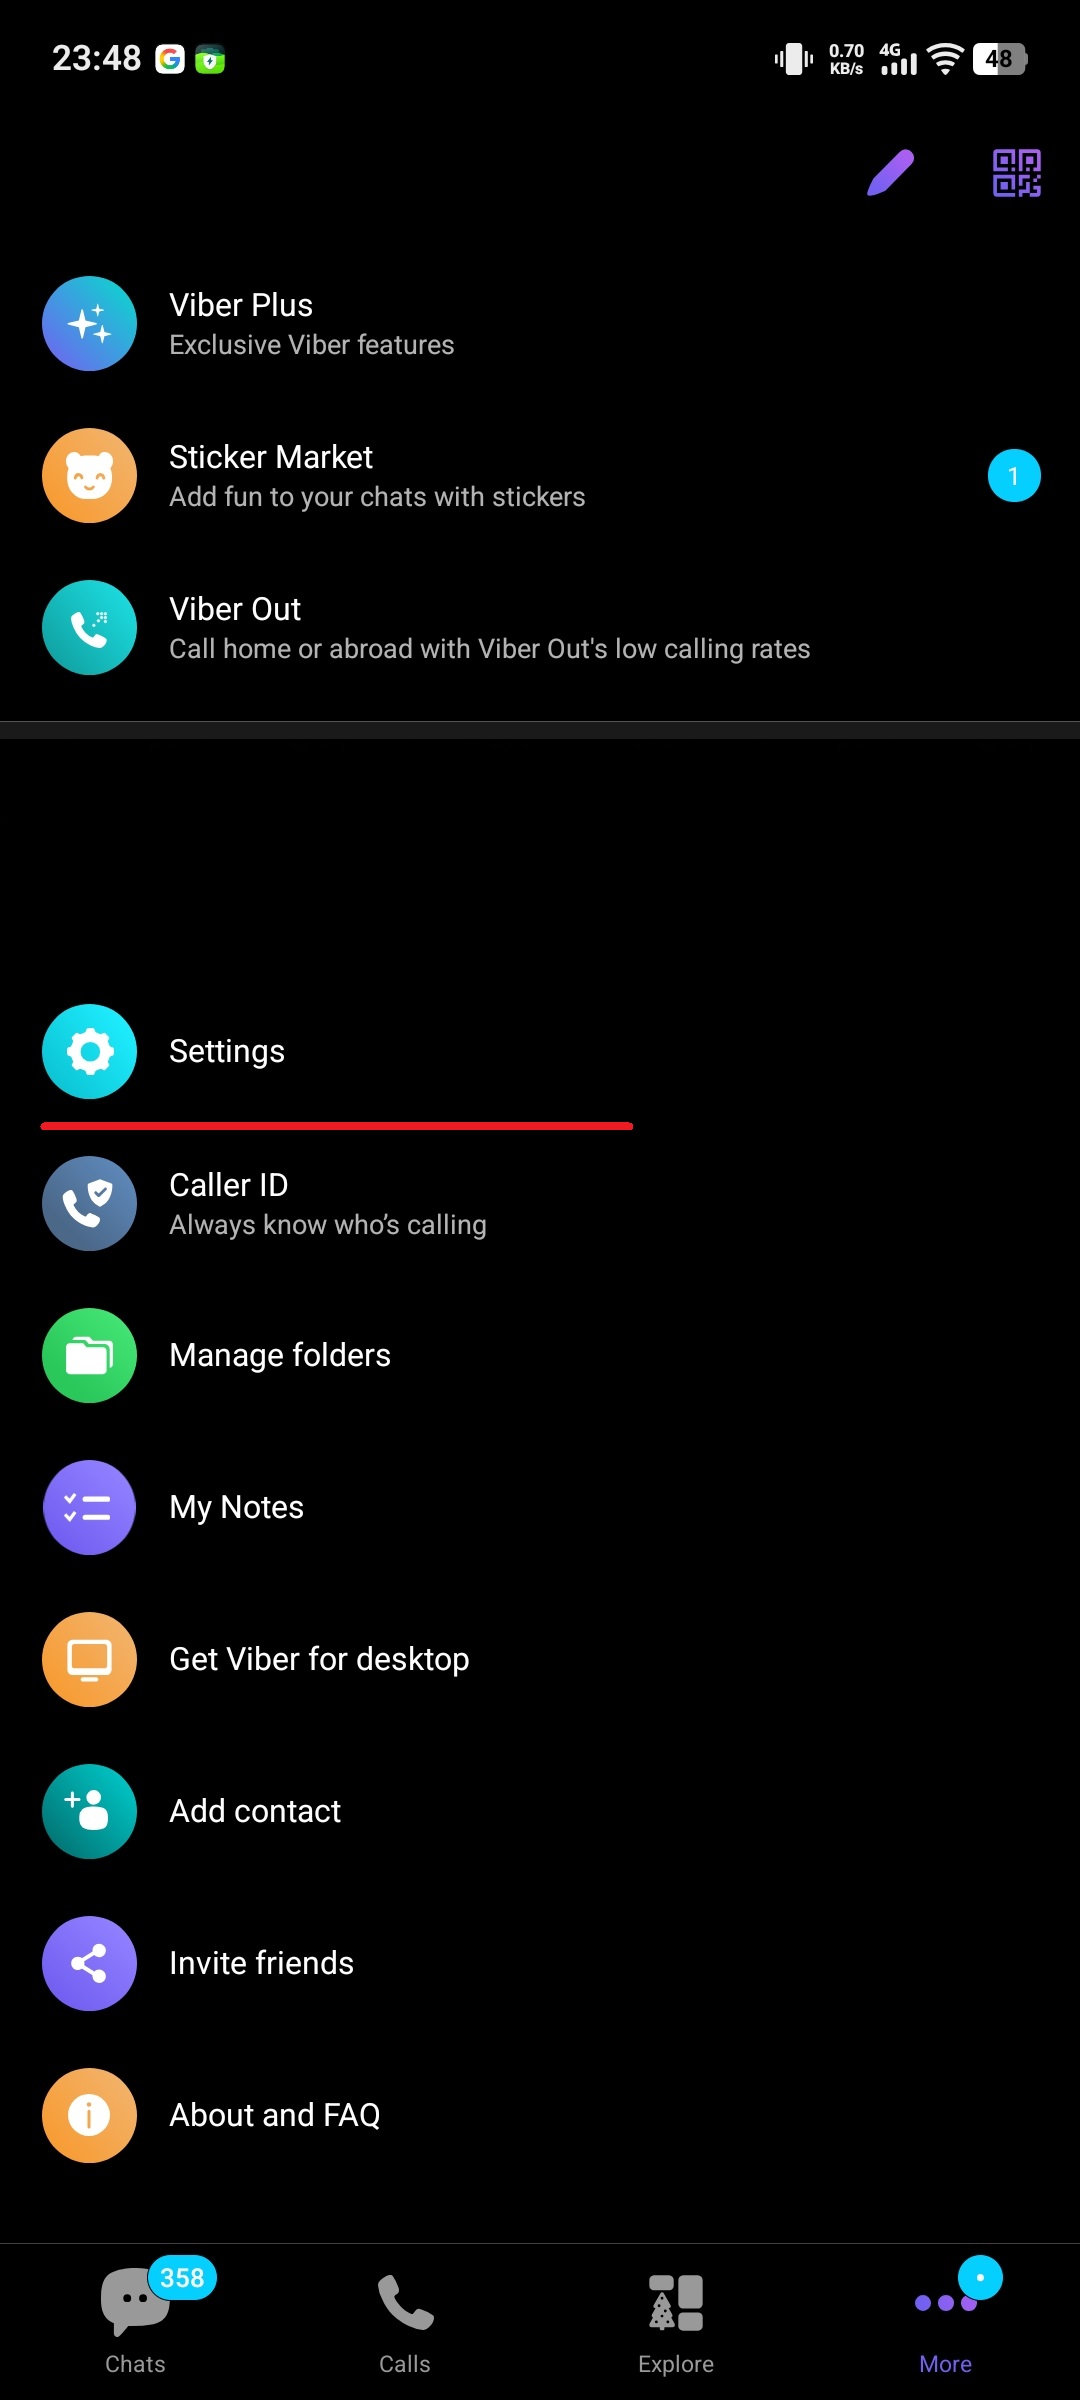
Fig. 1. Navigating to the Viber "Settings" menu.
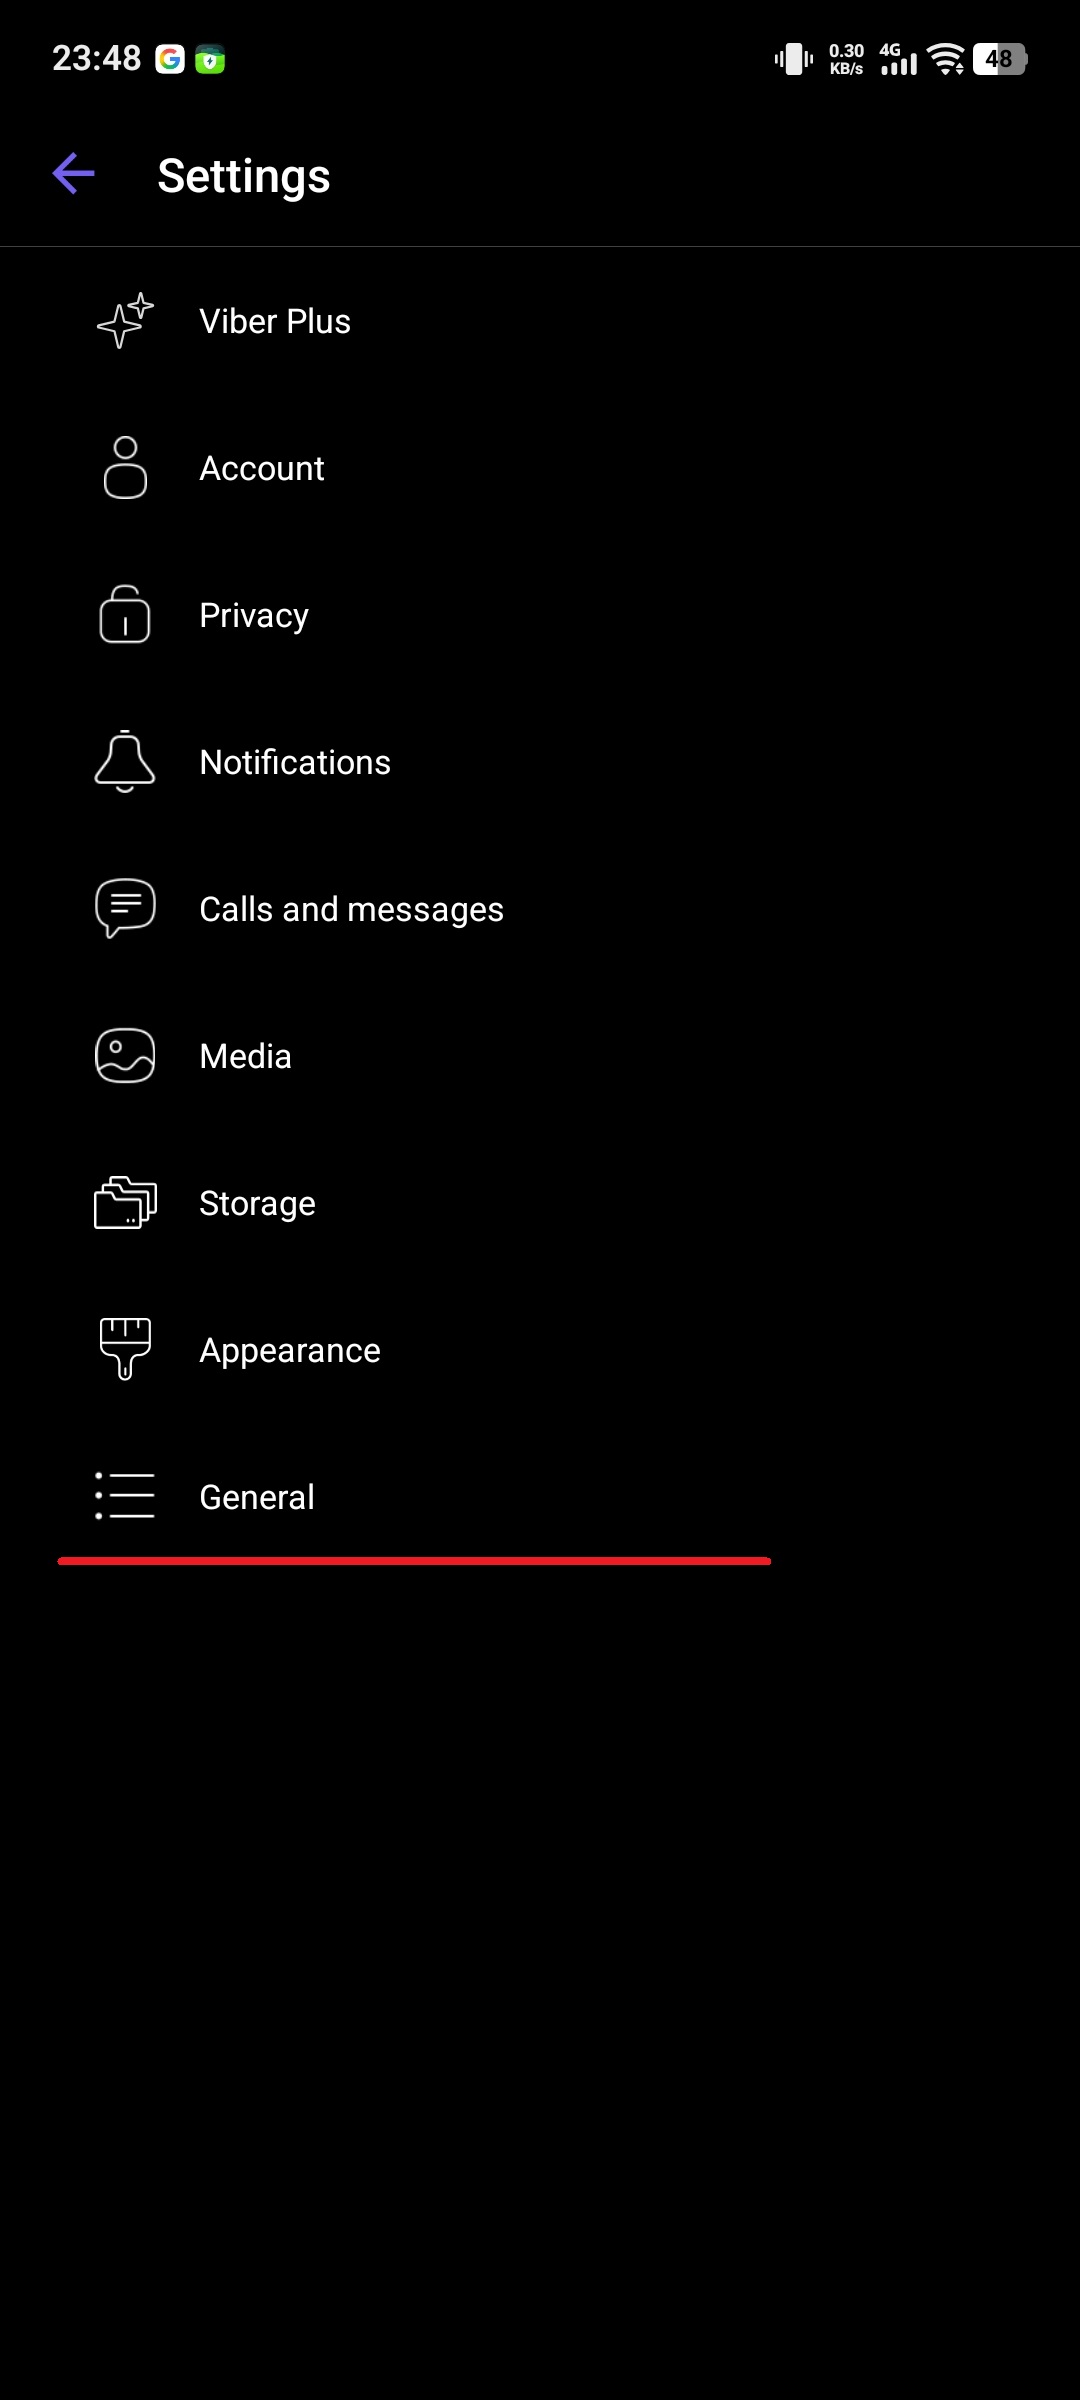
Fig. 2. Selecting the "General" section in the settings list.
Step 2. Activating the proxy
In the "General" menu, scroll down the list. Find the item "Use proxy server".
By default, it says "None".
Tap this item to enter the configuration menu.
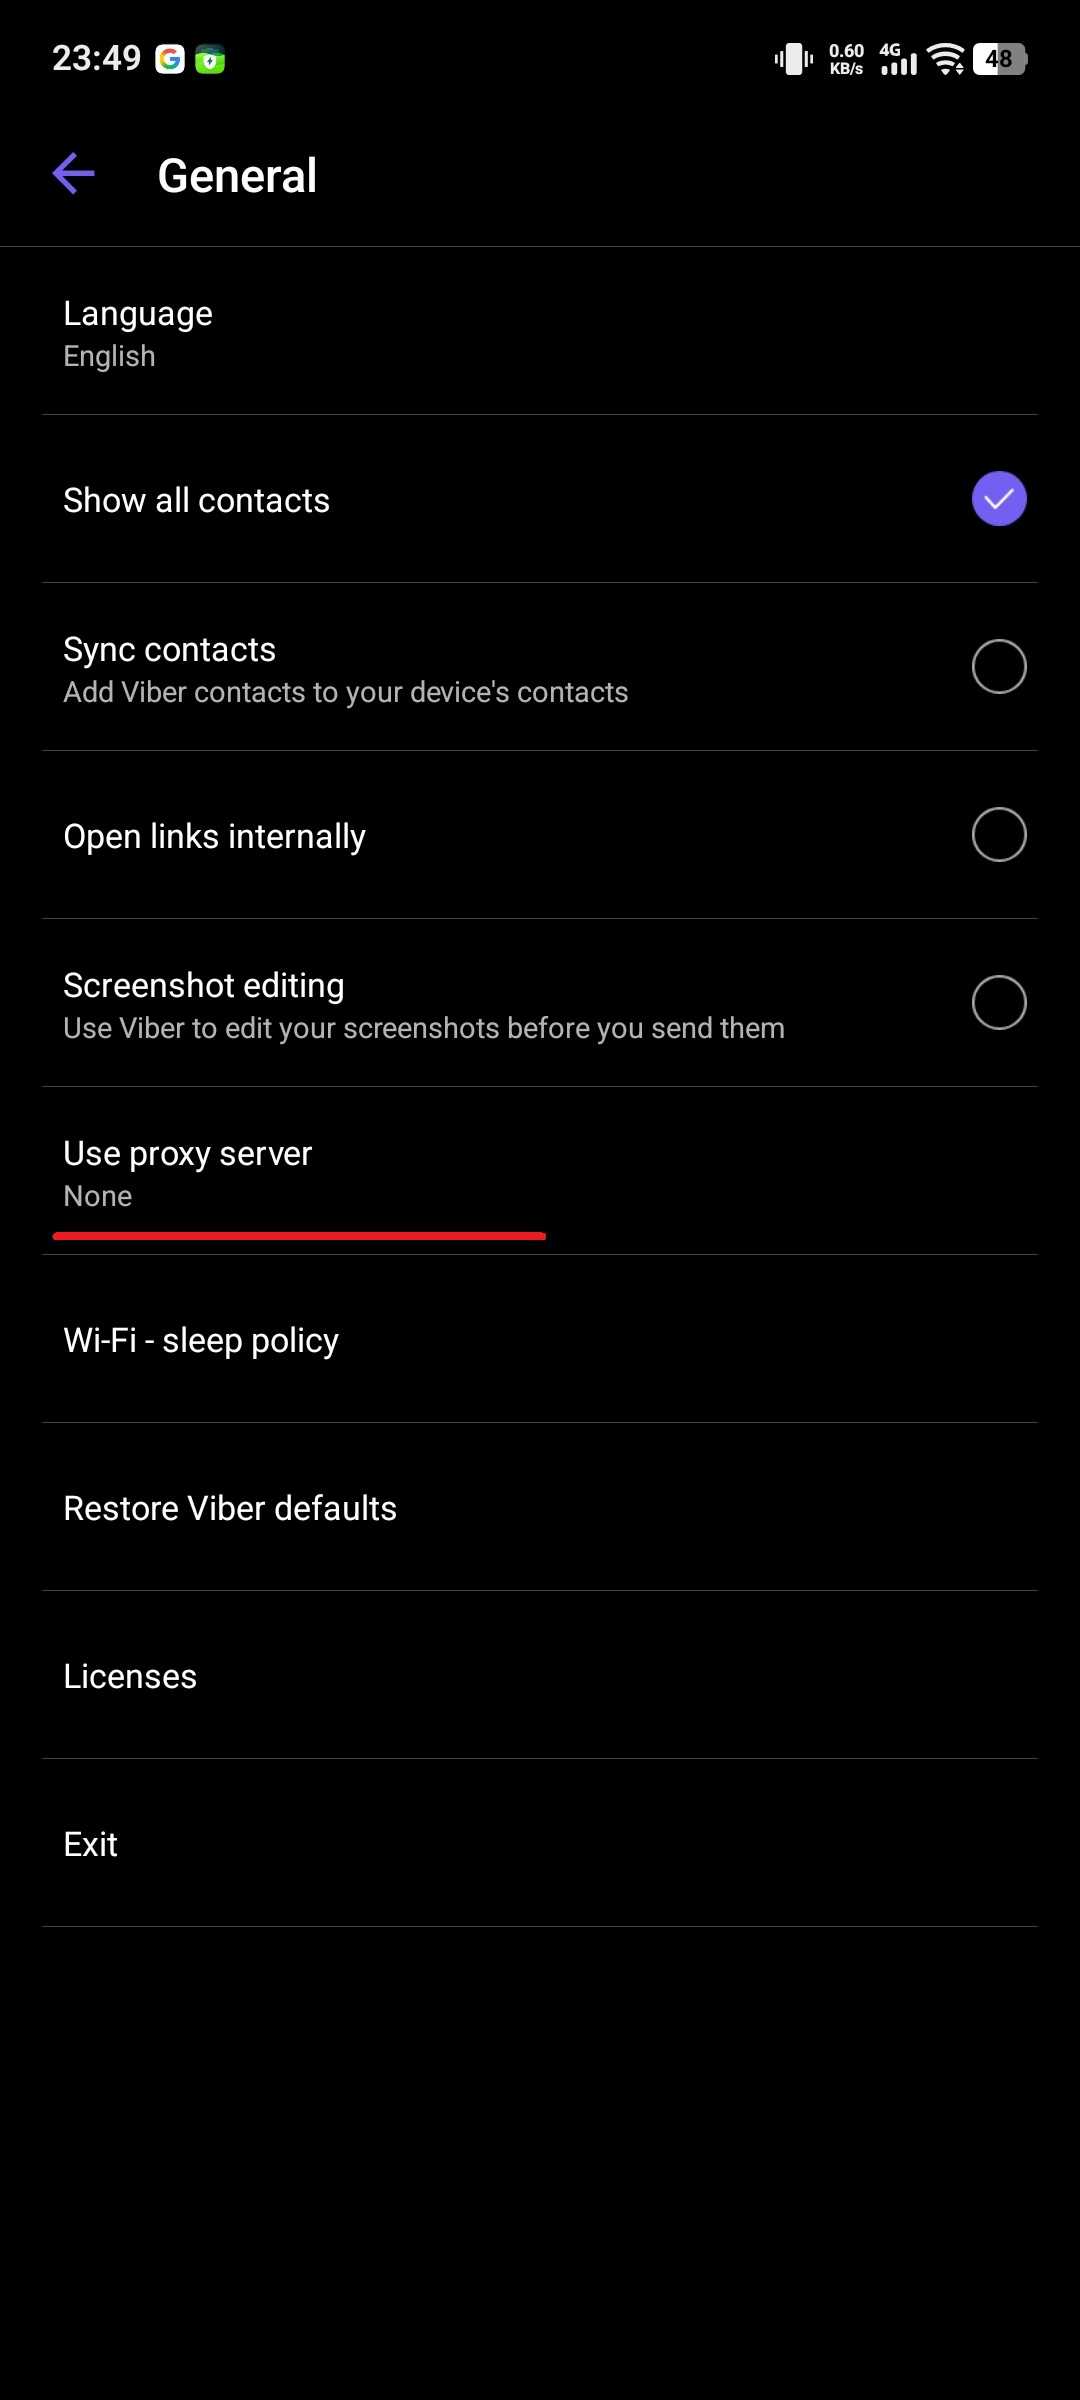
Fig. 3. Menu item for proxy settings (disabled by default).
Step 3. Entering data (The most critical stage)
In the window that opens, perform the following actions:
Enable the toggle in the top right corner (the checkmark will become active).
Select the protocol type (Type): Tap the Type field. In the dropdown list, select SOCKS5. (Note: If your provider gave you ShadowSocks, select that, but most paid proxies require SOCKS5).
Fill in the server details: Enter the server IP address (e.g., 51.77.190.xxx) and Port (e.g., 9595).
Authentication: Enter the Username (Login) and Password for the proxy from your CyberYozh App personal account.
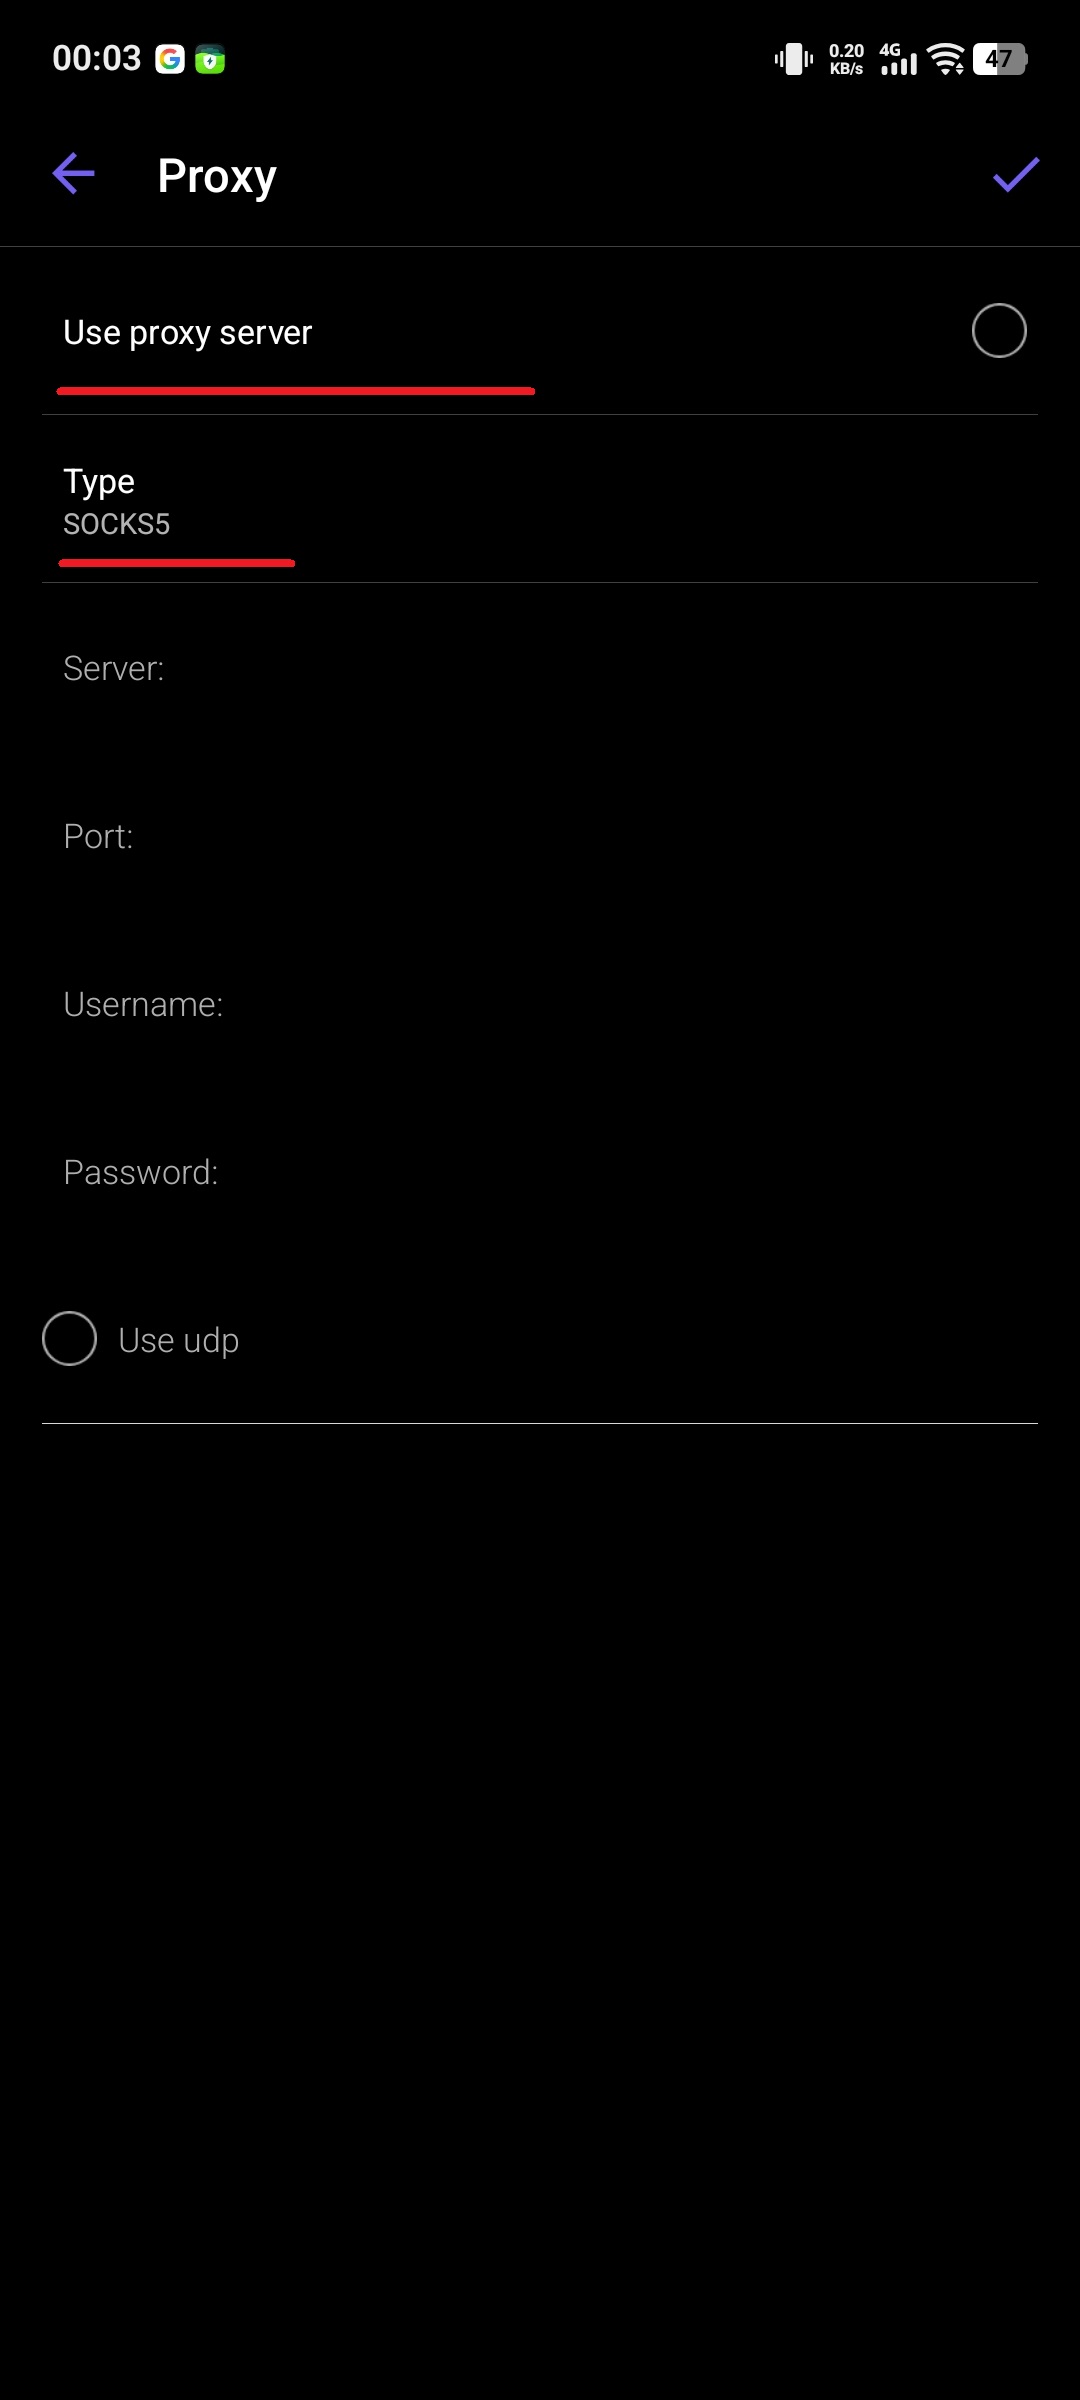
Fig. 4. Proxy server configuration interface.
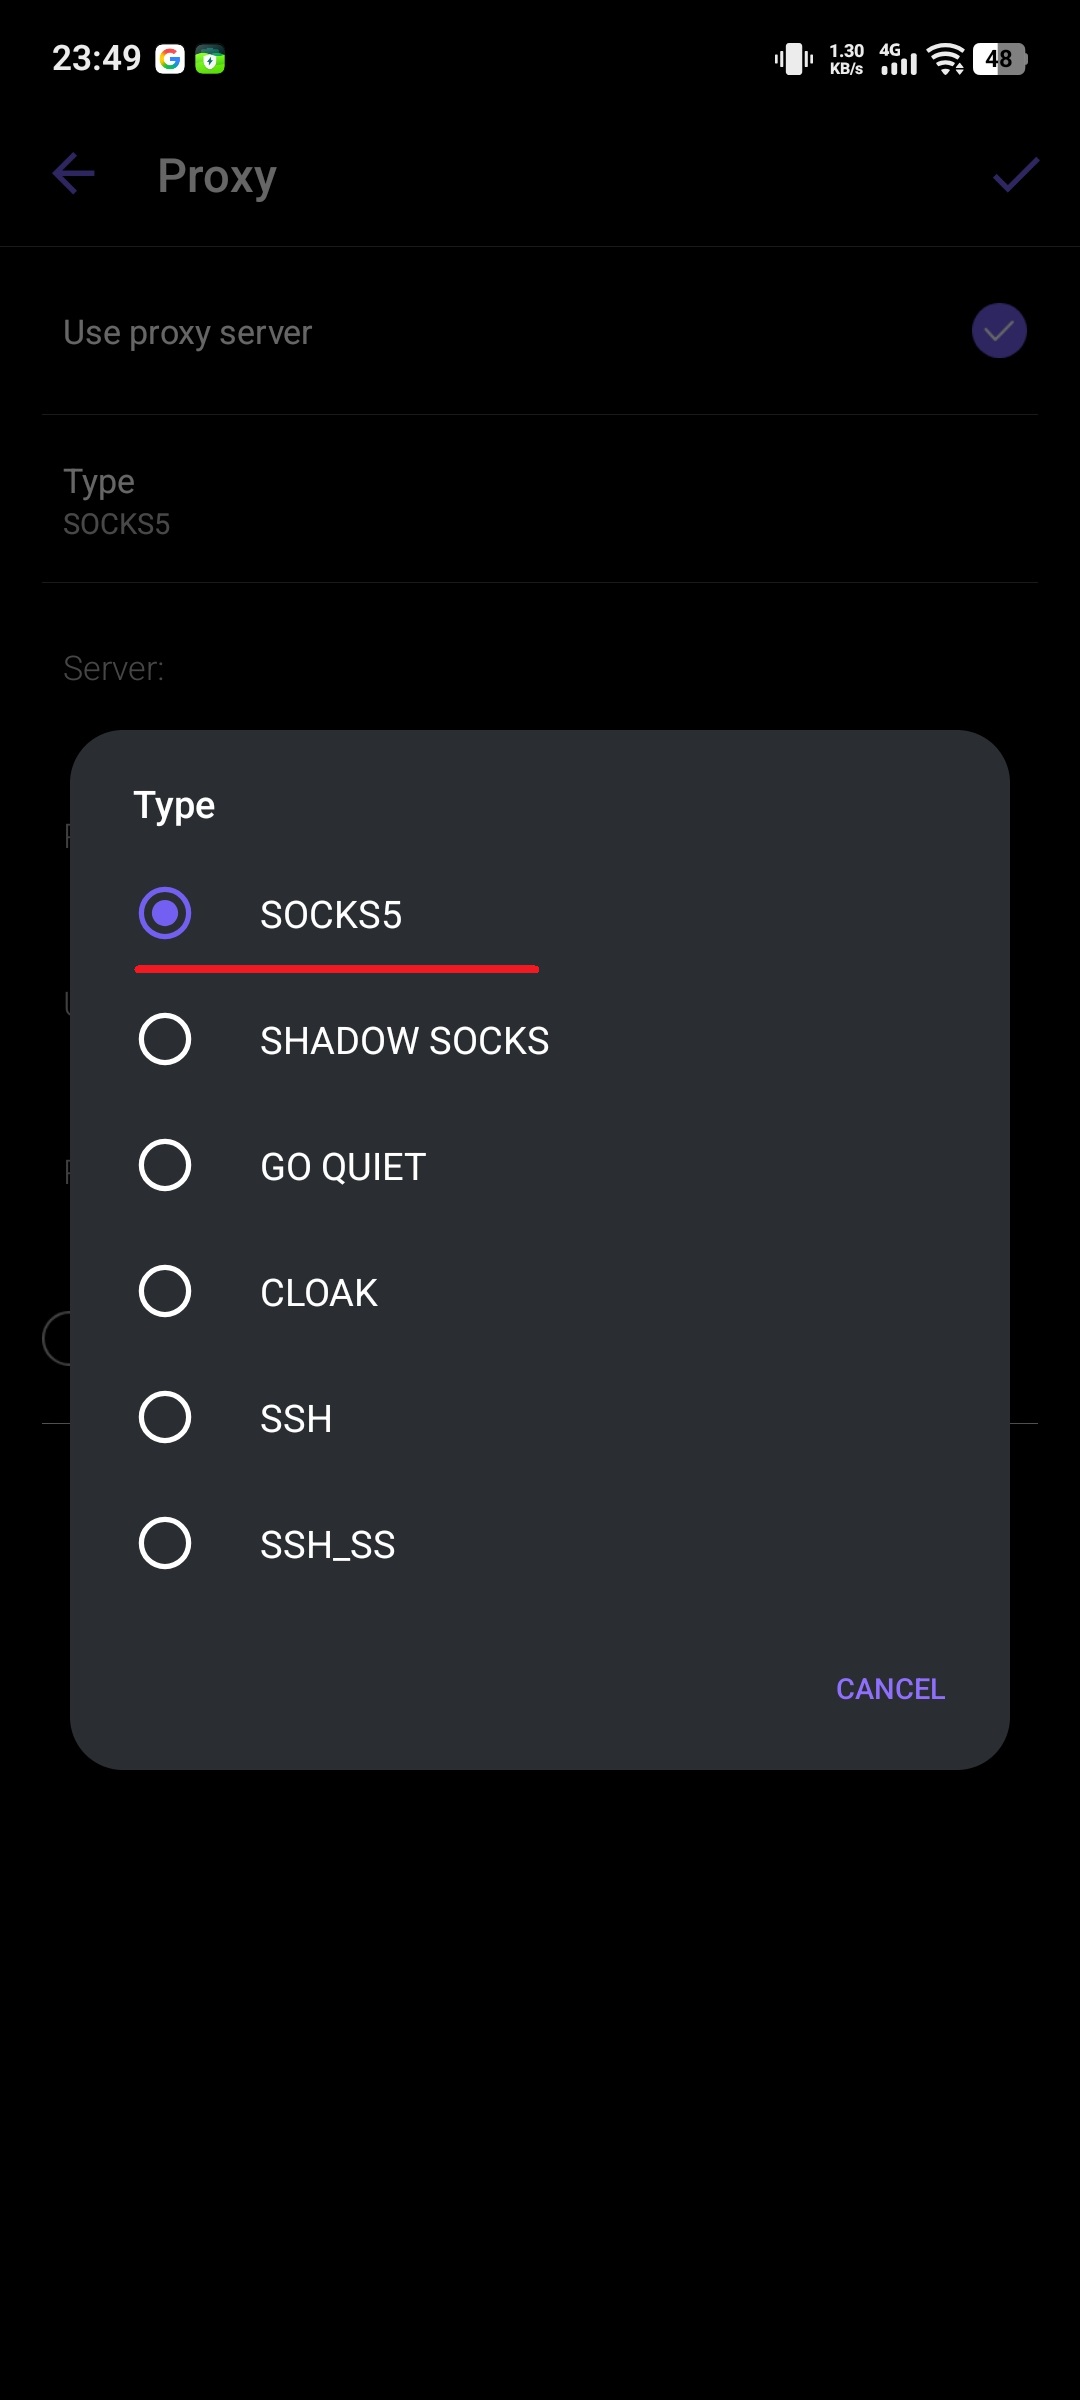
Fig. 5. Selecting the SOCKS5 protocol from the dropdown list.
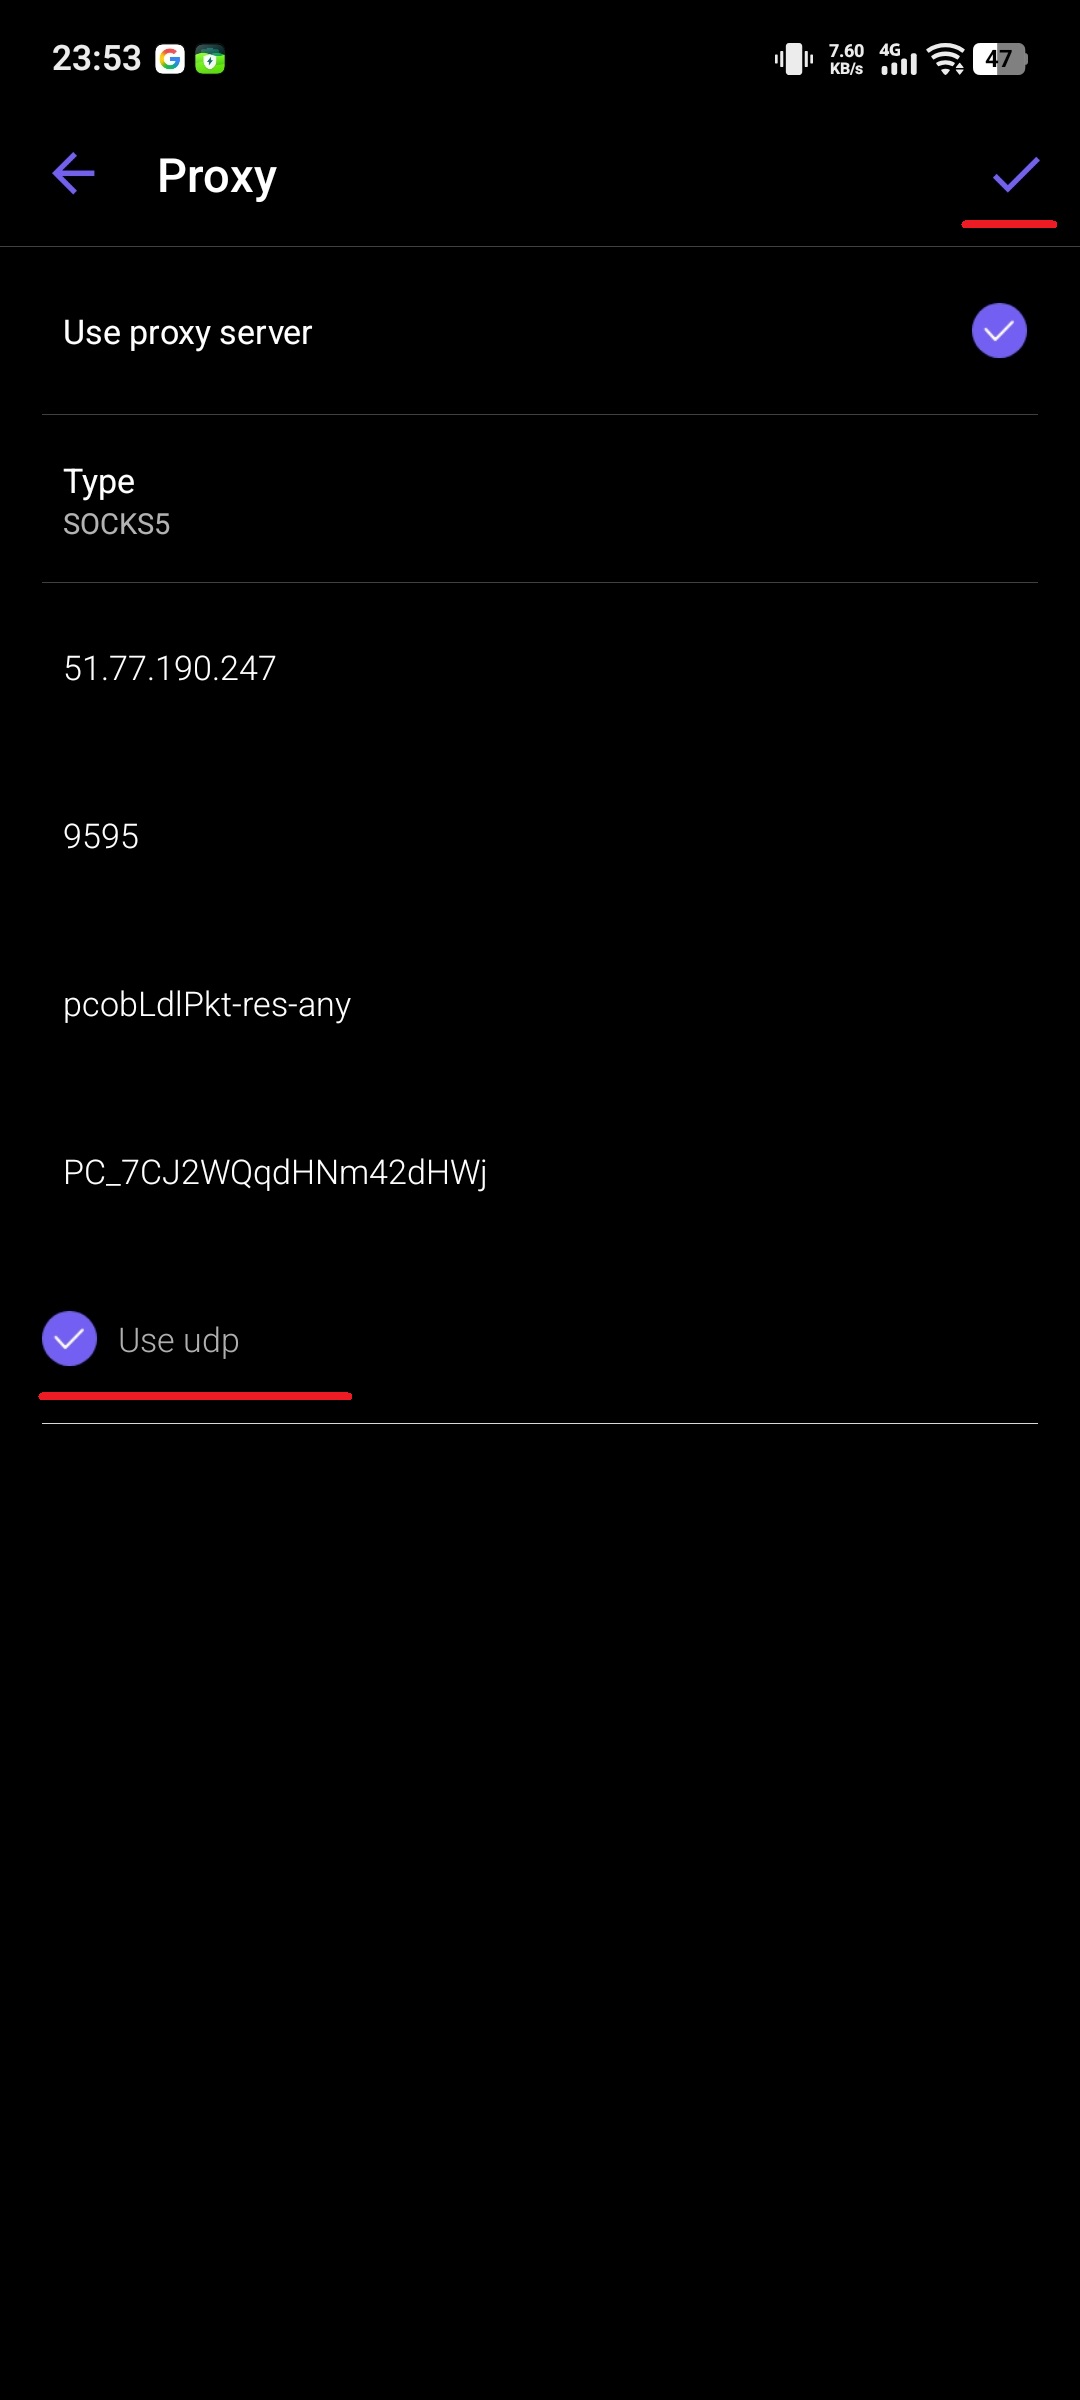
Fig. 6. Entering server data, authorization, and the important "Use udp" checkbox.
⚠️ Step 4. The checkbox that decides everything (The call issue)
At the bottom of the screen, there is an inconspicuous setting "Use udp".
Be sure to check this box!
If checked: Voice call traffic will go through the proxy. You will be able to make calls with improved connection stability and privacy.
If not checked: Only text messages will go through the proxy.
Step 5. Verification and Saving
After entering the data, tap the checkmark in the top right corner to save. Viber will automatically check the connection. If everything is correct:
The status in the menu will change from "None" to the proxy IP address.
The chat background might refresh for a second (reconnecting).
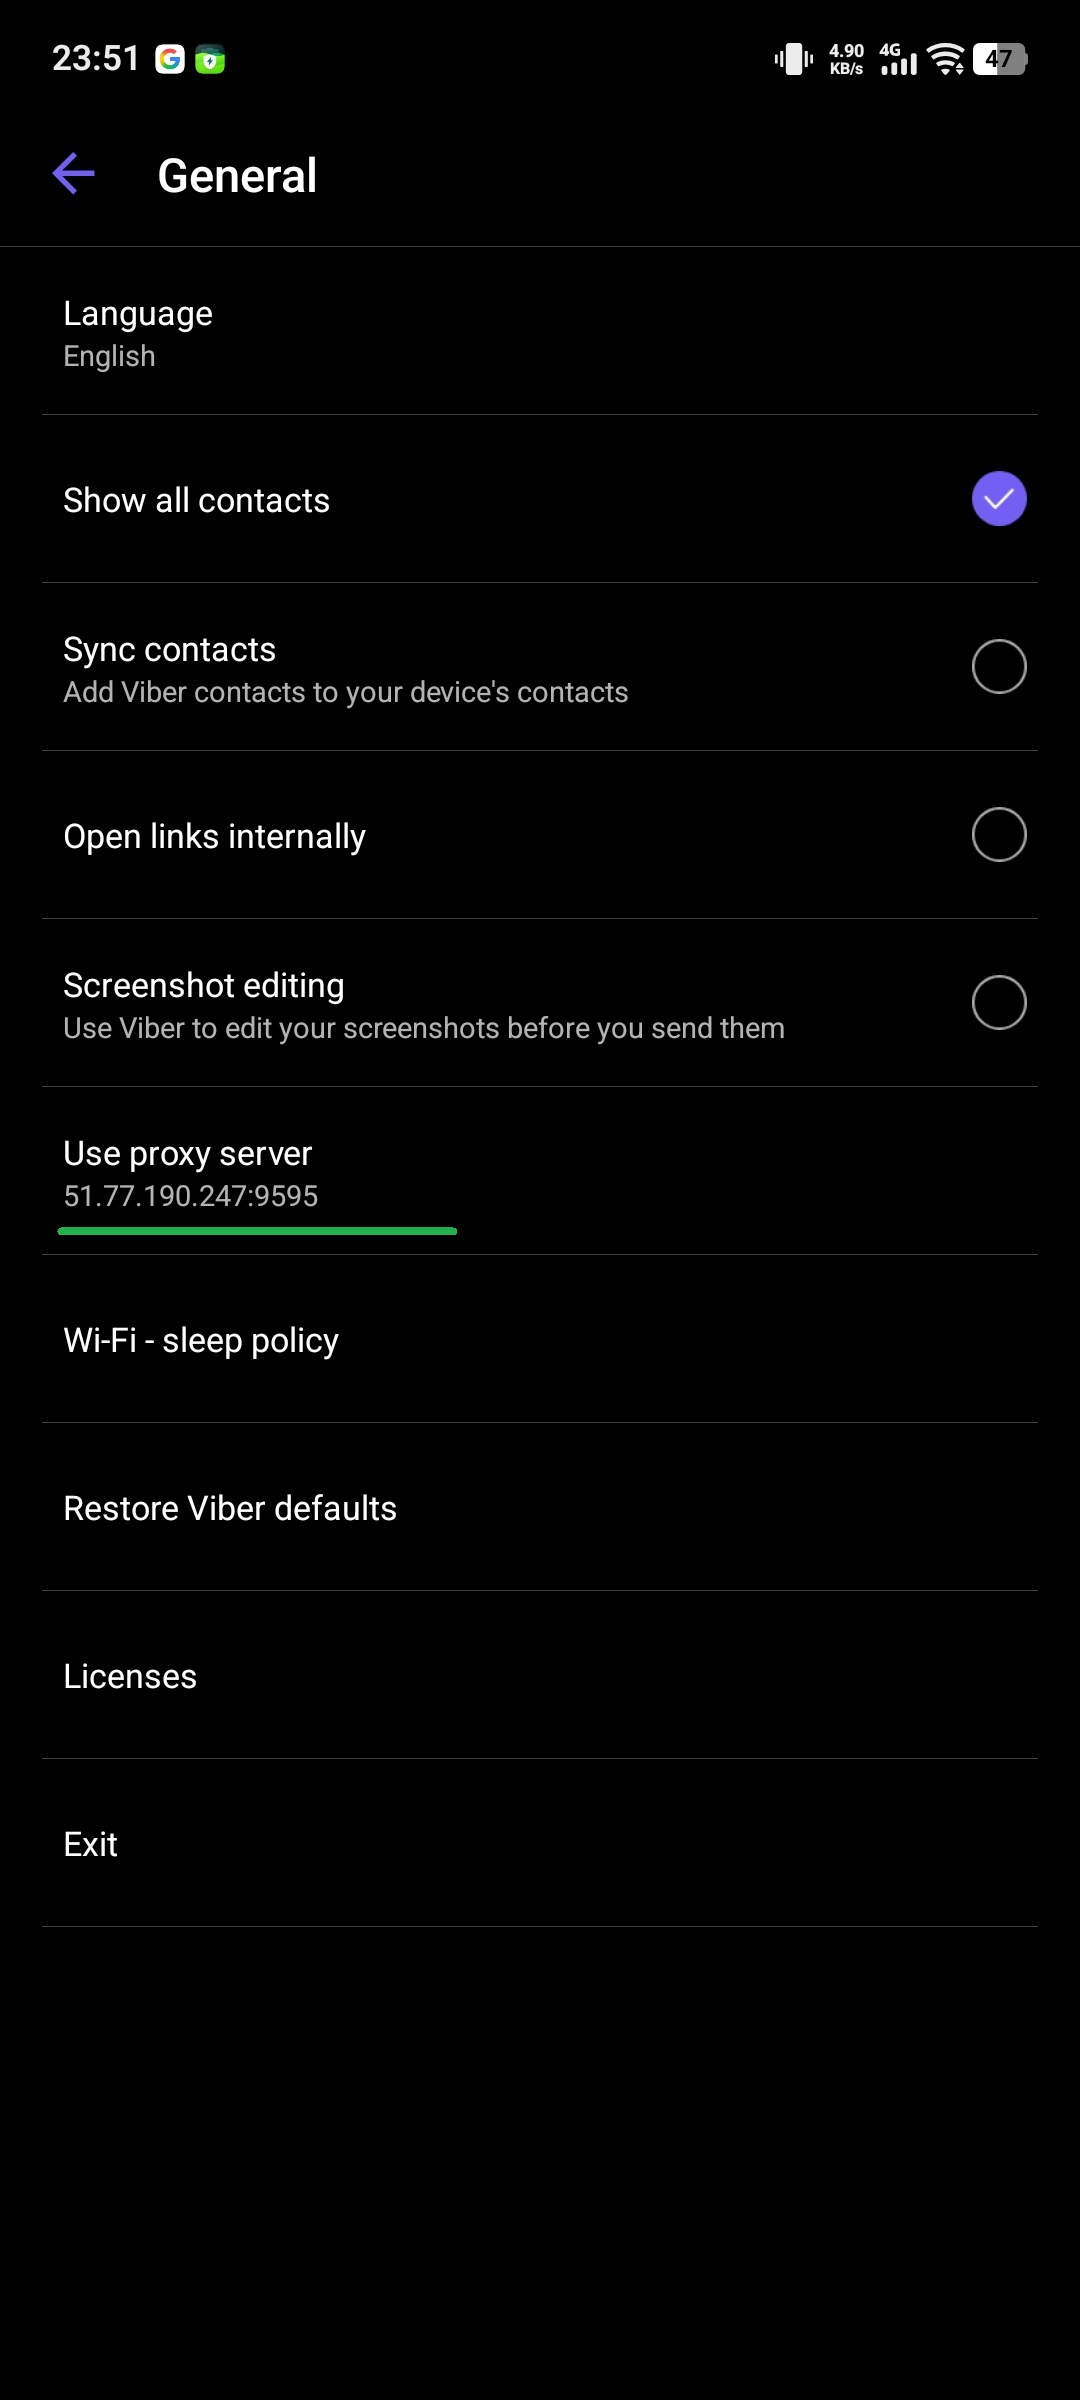
Fig. 7. Successful connection indicator (IP address displayed instead of "None").
If the status changes to "Disconnected" or "Error" — double-check the login/password and ensure your proxy supports SOCKS5.
💡 Part 4. FAQ and Troubleshooting
1. Calls go through, but there's a delay (lag). Most likely, the proxy server is located too far from you. Solution: Use a proxy with a geo-location close to you. If you are in the UK and the proxy is in the USA, the ping will be high. Choose Europe (Finland, Germany, Netherlands).
2. Viber says "No network" after enabling the proxy. You made a mistake in the port or password, or the proxy is "dead". Solution: Try disabling the proxy in the settings. If the internet returns, the issue is with the purchased proxy.
3. Fast battery drain? This is a myth. Unlike a VPN, which encrypts all phone traffic, a proxy in Viber works only for the app itself. The impact on the battery is minimal (less than 1-2%).
Conclusion
Setting up a proxy in Viber is a two-minute task that restores your freedom of communication. You no longer need to switch your VPN on and off for a single call to relatives or business partners.
For stable voice communication, we recommend using private SOCKS5 proxies with UDP support. This will ensure HD Voice sound quality even in poor network conditions.
👉 Need perfect connection in Viber? In the CyberYozh App, you can explore high-speed SOCKS5 proxies optimized for VoIP calls.
