
Android is the most popular mobile OS in the world, and a huge portion of work in digital marketing, SMM, and professional online research is conducted through it. To safely manage network connections and maintain privacy while surfing, you need a properly configured proxy.
Android has a specific quirk: system proxy settings only work for Wi-Fi. If you switch to mobile data (LTE), the proxy will disconnect. For enhanced network privacy and continuous connection management, specialized applications are recommended.
In this guide, we will break down which proxy to choose for your tasks and how to set it up using two methods: the simple way (for home) and the advanced way (for any network).
Part 1. Strategy: Which Proxy Do You Need for Android?
The choice of proxy depends on what you are doing on your phone.
1. Mobile Proxies (4G/5G) — For Social Media
- What they are: IP addresses of real cellular operators.
- What for: Managing corporate social media accounts (TikTok, Instagram, Facebook) and marketing research.
- Why: Mobile networks provide dynamic IP addresses standard for mobile users, ensuring stable and reliable access to mobile-oriented platforms. For manual IP rotation, use private ports with the ability to change the address via a link.
- 👉 You can read more about mobile proxies here
2. Residential Proxies (ISP) — For Shopping and Apps
- What they are: IP addresses of home internet service providers.
- What for: Purchasing from foreign stores (Amazon, Nike), working with payment systems (PayPal), and accessing regional services (Spotify).
- Why: Stores trust "home" IPs more than server-based ones.
3. Datacenter Proxies — For Content
- What for: Secure web surfing, optimizing network routing, and accessing regional data for market analysis.
- Pro: Cheap and fast.
Part 2. Data Preparation
To set everything up, we will need data from a reliable provider: CyberYozh App.
After your purchase, you will receive:
- IP (Host):
172.98.60.180 - Port:
58763 - Login / Password: Authorization credentials.
 Fig. 1. Screenshot of the CyberYozh App platform interface, showing the location of proxy connection data. The image displays fields for IP address (Host), Port, Proxy Username, and Proxy Password.
Part 3. Method 1: Configuration via Wi-Fi (No Apps)
This method is suitable if you are at home or in the office and only need a proxy for your browser and light applications. Important: Only works with HTTP/HTTPS proxies. SOCKS5 is not supported.
Step 1. Network Settings
- Open Settings -> Wi-Fi.
- Tap on the gear icon (or arrow) next to your active network.
 Fig. 2. Wi-Fi settings on Android.
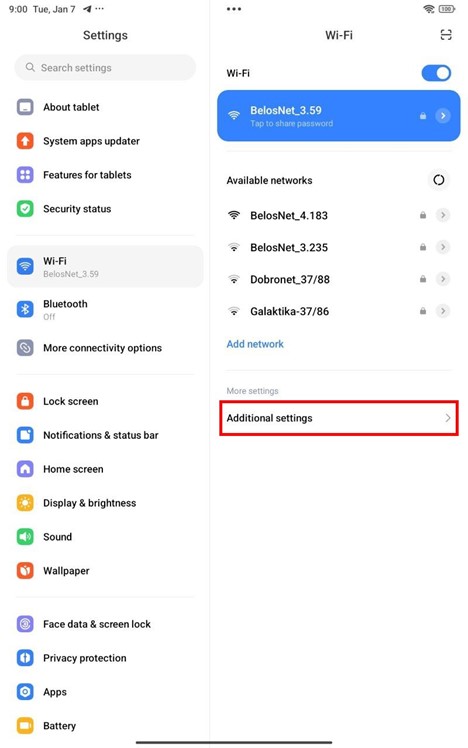 Fig. 3. Select Additional settings.
Step 2. Data Entry
- Find the Proxy item. By default, it is set to "None."
- Select Manual.
- Enter:
- Hostname: Your IP.
- Port: Your HTTP port.
- The "Bypass proxy for" fields can be left blank.
- Tap Save (checkmark at the top).
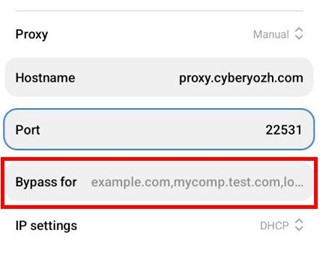 Fig. 4. You can add exceptions for certain sites. Specified websites will connect directly without using the proxy.
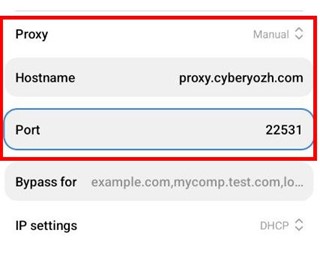 Fig. 5. Proxy data entry window.
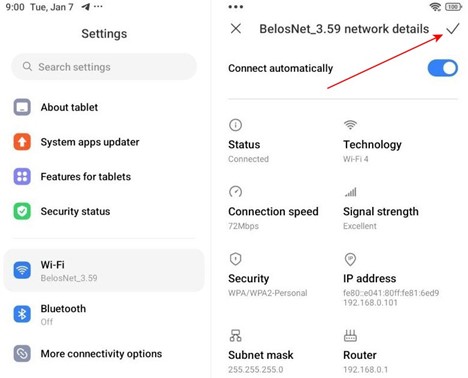 Fig. 6. Save the data.
Step 3. Authorization
Open your browser (Chrome) and try to visit any website. A pop-up window will appear.
- Enter the Login and Password for the proxy.
- Tap Sign In.
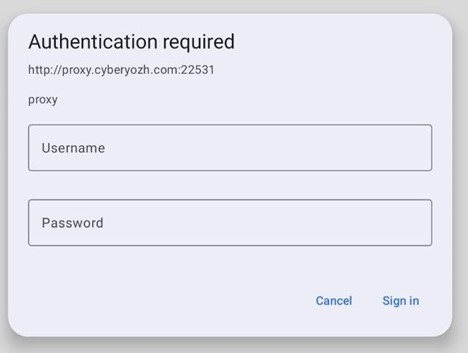 Fig. 7. Authorization request in the browser.
Now your Wi-Fi traffic goes through the proxy. But if the Wi-Fi signal is lost, the phone will switch to mobile internet with your real IP.
Part 4. Method 2: Configuration via v2rayNG (For All Networks)
This is the professional method. It allows the use of SOCKS5 (including UDP) and works on both Wi-Fi and mobile data.
Step 1. Installation
Download the v2rayNG app from Google Play or GitHub. This is a reliable open-source client.
Step 2. Adding a Proxy
- Open the app and tap the + (plus) icon in the top corner.
- Select Type manually [SOCKS] (if you have SOCKS5) or [HTTP].
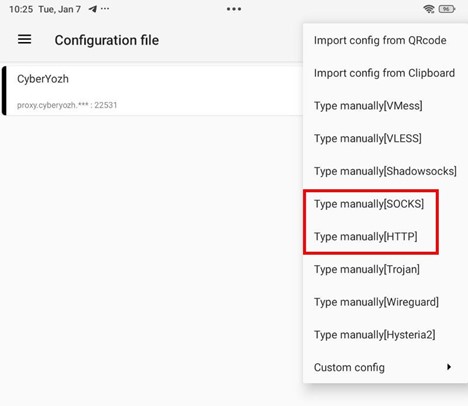 Fig. 8. Profile addition menu in v2rayNG.
Step 3. Profile Configuration
Fill in the fields with data from your personal account:
- Remarks: Name (e.g.,
CyberYozh). - Address (IP): Your IP.
- Port: Port.
- User / Password: Login and password.
- Tap the checkmark (save).
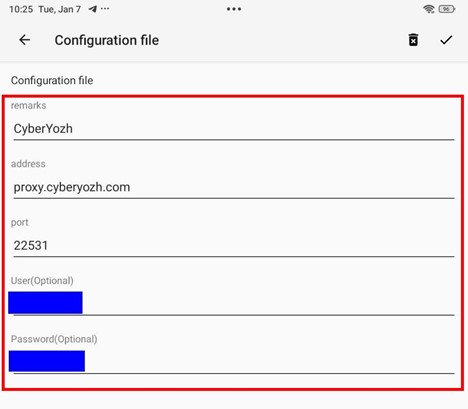 Fig. 9. Filling out the profile.
Step 4. Launch
- Select the created profile from the list (tap on it).
- Tap the round button (Connect) at the bottom. It will turn orange.
- On the first run, Android will ask for permission to create a VPN connection. Tap OK.
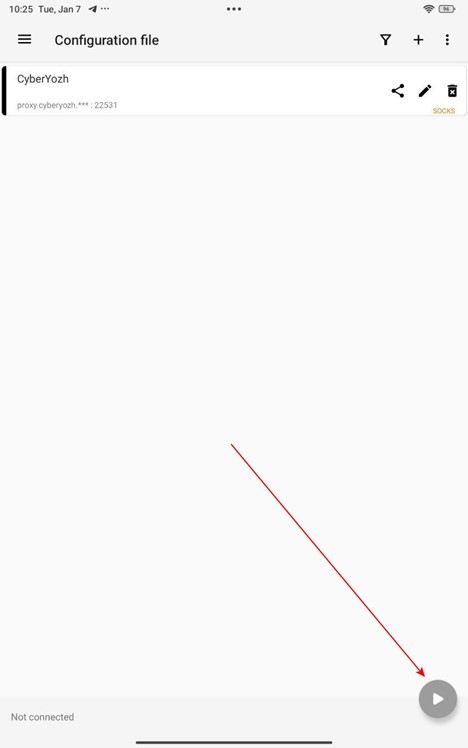 Fig. 10. Starting the proxy.
Now all of your phone's traffic (browser, apps, games) goes through the proxy, regardless of whether you are connected to Wi-Fi or LTE.
Part 5. Anonymity Check
Open your browser and go to browserleaks.com/ip or whoer.net.
What to look for:
- Has the IP address changed?
- Does the country match?
- Does the DNS leak your real provider?
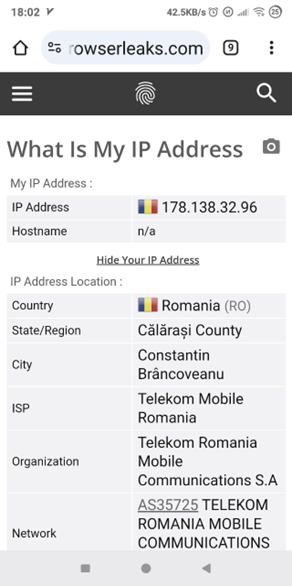 Fig. 11. Checking IP via service.
If everything looks good — your Android is fully protected.
Conclusion
Setting up a proxy on Android takes only a couple of minutes.
- For home (Wi-Fi), system settings are sufficient.
- For working in the field (LTE) and SOCKS5, use v2rayNG.
You can find high-quality mobile, residential, and datacenter proxies in the CyberYozh App catalog.
